SECURITY WARNING: Always execute the downloaded scripts in a sandboxed environment! There is absolutely no guarantee regarding the security and safety of these scripts. Openbio.eu does not take any responsibility on damages caused by the execution of scripts provided by the platform.
Introduction
This is an incomplete documentation of the platform.
OpenBio.eu is an environment for open and collaborative science. On OpenBio you can search, create, store, use, share and comment Tools and Workflows that take part in open scientific experiments. This is the documentation of OpenBio but it is written like a tutorial. Maybe in the future we will offer both in two separate documents. Most of this tutorial and examples assume that you have created an account and that you have verified your email.
Before we start
Before we move on to create our new Tool or Dataset you need to know a few crucial things about the platform. What makes openbio.eu different from other platforms?
-
OpenBio.eu is able to "run" objects. There are many repositories that store tools, data and workflows. Examples are bio.tools, osf.io and omictools. These repositories offer very rich description and annotation of these objects, but they lack one crucial ability: to actually run this object (i.e. tool, workflow) on a computer that you have access to. OpenBio.eu is a repository of research objects that focus on this ability. Therefore, when you add or edit a new tool, data or workflow you need to provide explicit instruction of how to install the tool, download the data or execute the workflow.
-
OpenBio.eu's language for object installation/download/execution description is Bash. Since you need to provide explicit instructions of how to install a tool, download data or execute a workflow, we need a computer language to do so. We chose Bash. Some people will find Bash, difficult or outdated. Nevertheless Bash is the defacto glue language of the *nix universe. Bash is present by default in OSx and even Windows 10 supports it natively. By hosting our code in Bash we make sure that it is directly executable in as many as possible environments.
Also: Hosting code in Bash does not mean that other languages are excluded. On the contrary, Bash was chosen because it is easy to link together different languages, programs, other scripts and logic in a common script.
- In OpenBio.eu Tools and Data are the same type of objects. Most Workflow Management Systems and Open Science environments distinguish Tools from Data. Users have to declare different properties for each, store them in different tables etc. OpenBio.eu does not make this distinction. Tool and Data are exactly the same type of objects, this is why on the remaining of this text, we will refer to these as "Tools/Data".
But why is that? Semantically and in the context of a Workflow Management System (WFM), Tools and Data do not actually have any differences! Tools have dependencies but data are useless without the presence of other data. We need commands to download, configure, compile and install tools but data need to be downloaded and most of the times they also need to be decompressed, pre-processed and installed. Also it is very common tools and data to co-exist in a dependency tree of other tools and data.
- In OpenBio.eu, workflows are NOT DAGs (although they can be converted to DAGs). Workflows in OpenBio.eu are written just like any Bash script. Different components, called steps, are called explicitly from other steps with simple Bash function calls. This mechanism will be explained later but we need to make a crucial distinction here. In most existing Workflow Management Systems, workflows are written as Directed Acyclic Graphs, or else DAGs. In a DAG you do not explicitly call steps. Instead you declare beforehand the order of step execution by defining which steps are running after which steps. This approach has pros and cons. The positive is that you have a simple data model. Also, you can easily take one part of a DAG and plug it in another part of a DAG to create a new workflow. The negative is that common programming structures like conditional execution and iteration are not supported (some WFMs offer these structures but in hack-y, unnatural way). Also DAG composing is not very intuitive for users that are used to typical programming and most of the times you need to learn a new language (Domain Specific Language, or DSL), which is different for every WMS. As we said earlier, in OpenBio.eu you can write your workflow by using any programming construct (iteration, conditions, ...) that Bash offers. Yet, when executing your workflow you have two options: The first is to run it directly as a Bash script. This will give you the flexibility of Bash but will not give you the.. fanciness of modern WFMs. The second option is to convert your workflow to DAG. A converted to DAG workflow can be saved in a variety of modern WFMs like NextFlow, SnakeMake, Argo and Airflow. This conversion is done with a rather complex algorithm that performs a static analysis on the Bash script of the workflow, locates all the function calls to other steps, and progressively builds a DAG. Of course this method is not guaranteed to succeed. For example if a step is called inside an iteration it will fail. Nevertheless this gives you an amazing liberty: it allows you to compose your workflows in Bash and as long as you do not call other steps inside iterations* and conditions, you can convert these workflows in DAGs in a variety of existing WMFs formats. So you don't have to learn the DSL of other WFMs, write your workflow in Bash and you are good to go. Moreover you can extract your workflow in a DAG in a JSON format and then build your own converter to the DSL of your choice. This is described here in the chapter OpenBio.eu Workflow DAG data model.
* Iteration is actually supported for certain types of iterations (iterate through constant ranges, like for example all chromosome in the human genome). Check the PARALLEL mechanism described below.
Outlook of OpenBio.eu
First of all OpenBio.eu is a Single-page application. You might have already noticed this. Interacting with openbio.eu does not change the links shown in your browser. So technically there isn't any "front page". When entering OpenBio.eu what you see is:
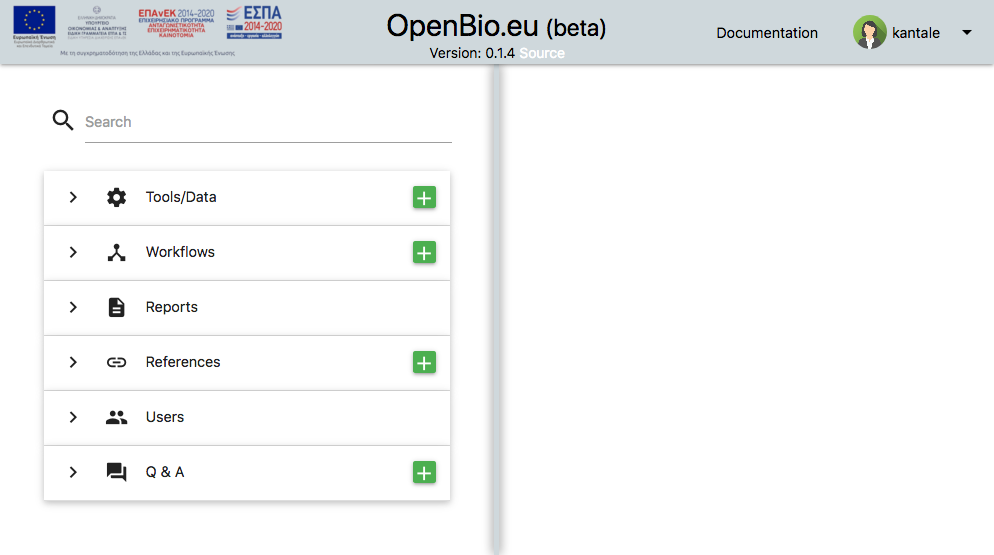
The screen is divided in two parts. The left part is a search panel for various objects. The right panel displays these objects and is also a space for editing and.. experimentation.
Let's start with the first item on the left panel which is Tools/Data.
Tools/Data
Click the green '+' button on the Tools/Data row of the left panel to create a new Tool/Data.
Something like this will show up:
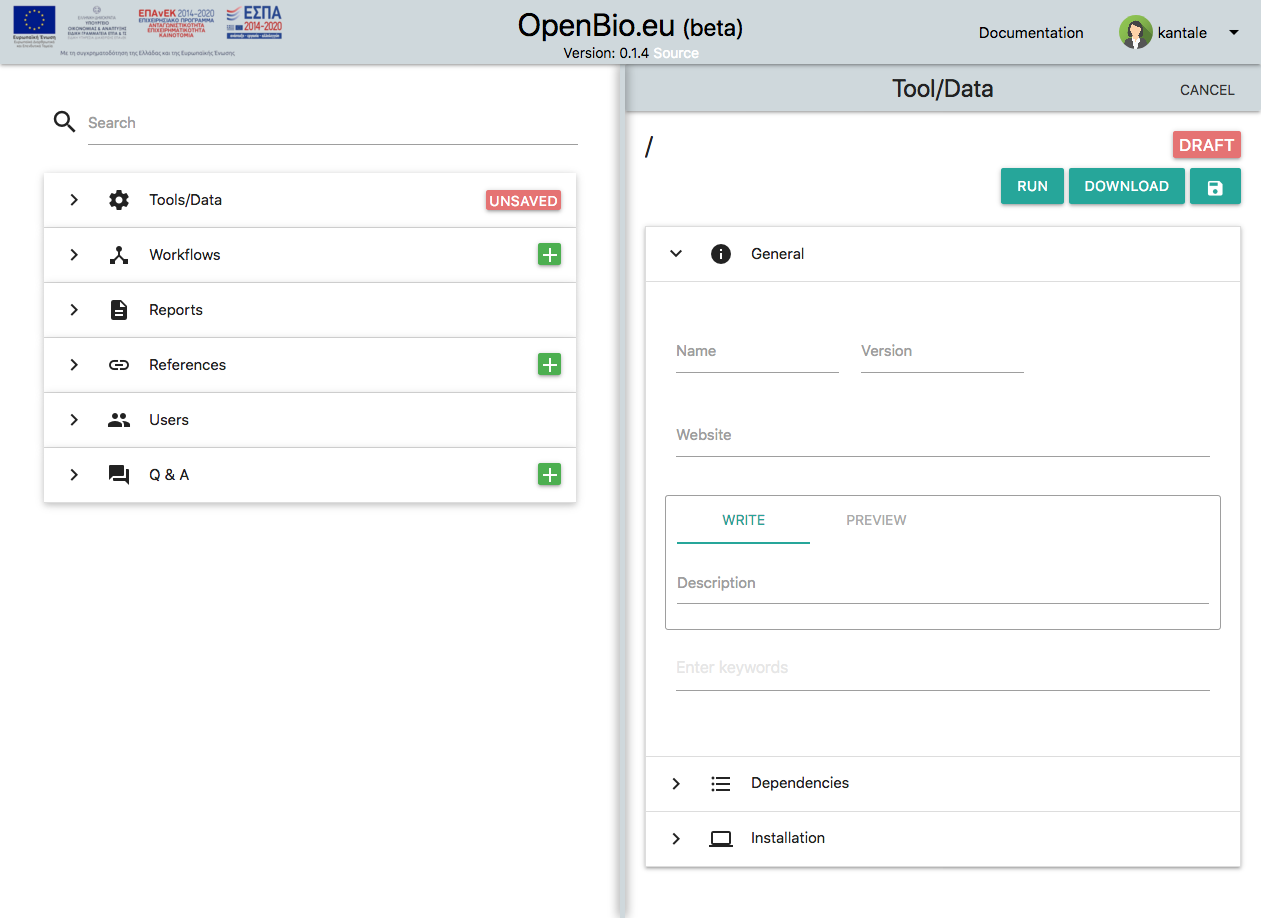
Set a name of your tool (or dataset) and a version. Available characters are a-z, A-Z, 0-9 and _ for both fields. For the purpose of this tutorial let's assume that you entered my_tool as name and "1" as version.
Other fields are:
* Website (Optional). This needs to be a valid URL.
* Description (Obligatory). You can use markdown and you can also preview your edits. For the purpose of this tutorial let's assume you entered "An example tool".
* Keywords (Optional)
Now save the tool/data by pressing the disc icon. Your tool/data is now saved. This is what you will see:
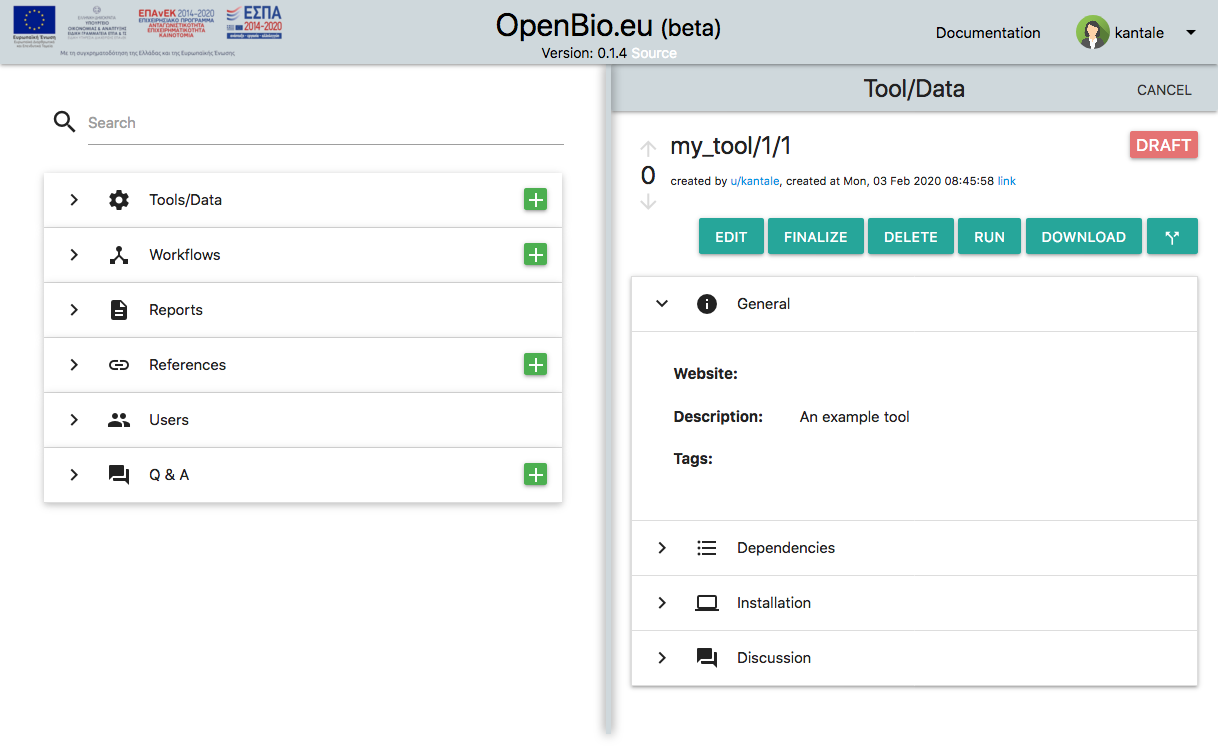
Let's focus on the my_tool/1/1 part (the last digit might be different in your case). What is this?
Each Tool/Data has a unique ID in openbio.eu. This unique ID is comprised by three parts: * The name that you have declared. * The version that you have declared. * A number provided by the system, called "edit". This number is derived so that the Name/Version/Edit of this tool/data is unique.
In OpenBio.eu we refer to a unique tool with the following schema: <Name>/<Version>/<Edit>. For example: my_tool/1/1. This can be interpreted as "tool named my_tool version 1, edit 1".
Here is the philosophy behind this naming/ID-ing scheme. In a repository of scientific objects, we want to store Tools/Data. Tools and Data have names and they also have versions (for Data they might also be called "releases"). An example is Samtools version 1.8 and 1000 Genomes Project data release 20130502. In most scientific Tool/Data repositories these have a unique string based ID. For example could be called "Samtools" or "1000 Genomes Project", but that wouldn't identify precisely the research object at least not for reproducibility standards. Versions need to be part of the names. Then we face another problem which is that OpenBio.eu is a crowdsourced environment where you can name your Tool/Data however you like. This means that under the name/version Samtools/1.9 you can include Bash commands that download 1000 Genomes Project data (or anything else..). The solution here is to let anyone choose whatever name/version they like, but add on the ID of the Tool/Data a number (edit) that is provided by the system. That way we can have Samtools/1.8/1 created from user A and Samtools/1.8/2 created from user B. These two can be two completely unrelated Tool/Data objects. We should also let other users show preferences on which Tool/Data is better. This is possible with upvotes and downvotes that we describe later.
Downloading a Tool/Data
To actually download and run the commands that install and validate a tool you need first to create a workflow with it. This process will be explained in detail later in the manual.
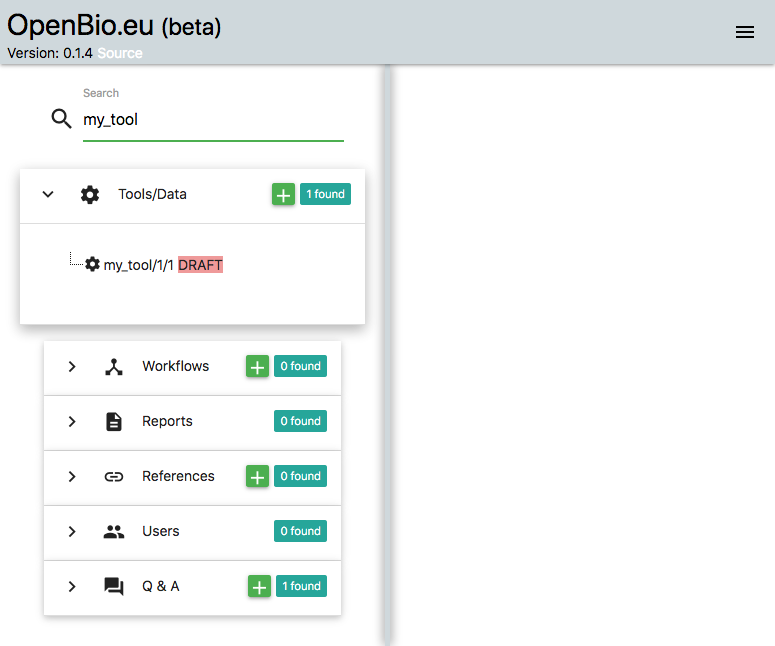
For now you can click the green "+" icon on the left panel next to "Workflows". Enter the name "test" in the "Name" input field and add something in the "Description". Next on the search bar on the left panel enter "my_tool". The tool appears in the Tools/Data section. Now you can drag and drop the my_tool/1/1 icon in the workflow panel in the right part of the screen. Next click "Save" to save this workflow.
On the "Download" dropdown on this Workflow, select "BASH executable". A file named bash.sh gets downloaded. As you might have guessed you can actually execute this file. If you don't know how, there are many online resources to help you on that (just google: run .sh file). Before executing it, you should read carefully the following:
Always execute scripts that you have downloaded from openbio.eu (or from anywhere on the Internet..) in a sandboxed environment. If you don't know what that is then DO NOT RUN IT! OpenBio.eu takes absolutely no liability on damages caused by executing scripts downloaded from openbio.eu.
Now, assuming that you moved the downloaded script in a sandboxed environment, one way to run it is with:
bash bash.sh
The output is:
OBC: Workflow name: test
OBC: Workflow edit: 1
OBC: Workflow report: None
OBC: INSTALLING TOOL: my_tool/1/1
OBC: INSTALLATION OF TOOL: my_tool/1/1 . COMPLETED
OBC: VALIDATING THE INSTALLATION OF THE TOOL: my_tool/1/1
OBC: VALIDATION FOR TOOL: my_tool/1/1 FAILED
OBC: CALLING STEP: step__main__root__None    CALLER: main
OBC: Output Variables:
Let's break this down. When you download a tool a new Workflow is created (we will see more on Workflows, later). Workflows have a name and an edit (similar to Tools/Data having a name a version and an edit). Since here you downloaded a Tool/Data and not a Workflow, a dummy workflow is created that has the name "root" and edit 0. Also the execution of a Workflow creates a "Report" (more on this later as well..). The interesting part is:
OBC: INSTALLING TOOL: my_tool/1/1
OBC: INSTALLATION OF TOOL: my_tool/1/1 . COMPLETED
OBC stands for "OpenBio-C" which is the name of the project. Everything that is printed that is OpenBio.eu specific, has the "OBC" suffix so that you can filter this out easily. Initially the script tries to Install the tool by running the "Installation commands" of the tool. The line OBC: INSTALLATION OF TOOL: my_tool/1/1 . COMPLETED tell us, that the execution of the "Installation commands" has finished. Then it moves to the the execution of the "Validation commands":
OBC: VALIDATING THE INSTALLATION OF THE TOOL: my_tool/1/1
OBC: VALIDATION FOR TOOL: my_tool/1/1 FAILED
Here we notice that the "Validation commands" have failed! Why is that?
Let's move back to the platform. On the left part of the platform, on the search input, we can search for my_tool. The one created by you appears:
On the items that appear, click the one that you created before (i.e. my_tool/1/1). Now on the right panel unfold the "Installation" commands. There you will notice two Bash editors, the one titled "Installation Commands" and the other is called "Validation Commands":
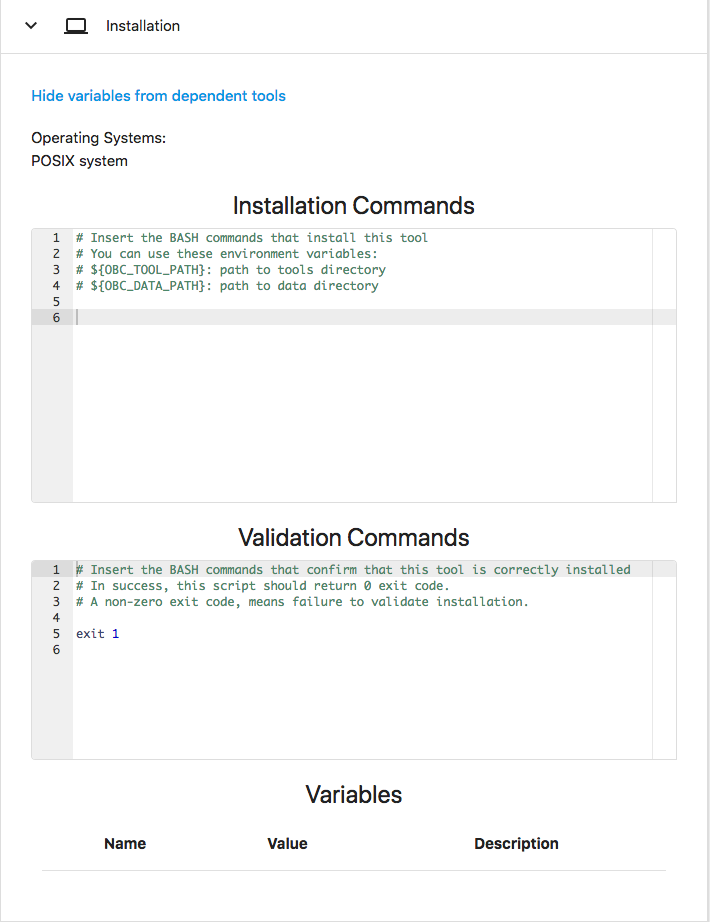
Installation Commands are Bash commands that install this tool/data. For example here you can include commands that download, compile and install a tool or download, decompress and pre-process a dataset.
Validation Commands are Bash commands that validate that this tool/data has been installed correctly. For example here you can add commands that check if the tool can be executed with some simple input or check if the data has the expected checksum.
Here we notice that initially Installation Commands are empty whereas Validation Commands contain an exit 1. The exit code of the Installation Commands is not checked. The exit code of the Validation Commands is checked. On your scripts you should add logic on the Validation Commands so that if the installation of a tool/data cannot be validated, then an exit 1 (or exit with any non-zero number) should be executed.
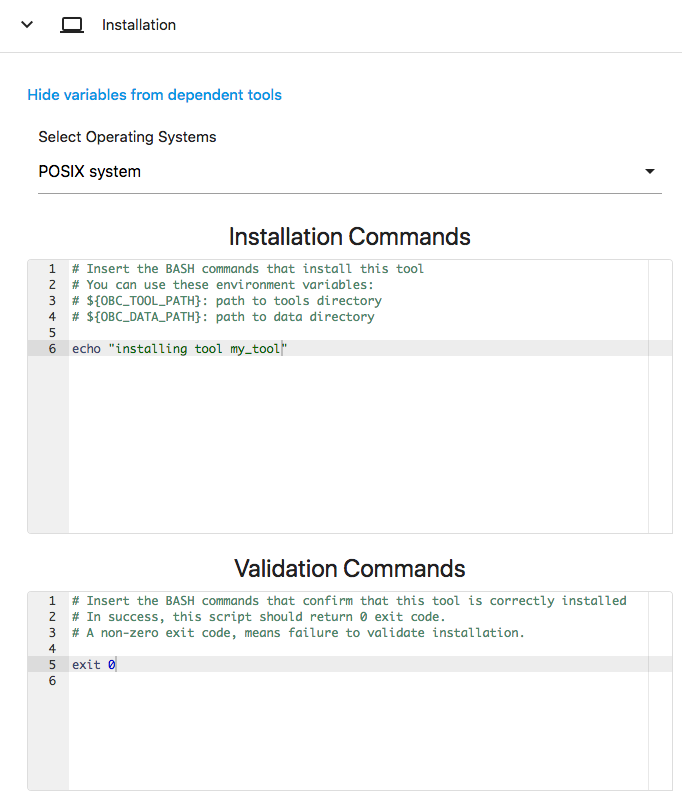
As it is right now, the Installation Commands and the Validation Commands cannot be edited. To do so click on the EDIT button on the top of the page. Upon pressing "EDIT" you will notice that many elements on the page became editable. One of these is the Installation Commands and the Validation Commands. Change the Installation Commands so that it includes the command:
echo "installing tool my_tool"
And change the Validation Commands so that it will always exits 0 (this is actually a bad practice, always do some actual checks before exiting with 0).
exit 0
The environment should look like this:
Now press "SAVE" again, then Download the "BASH executable" as before and run the bash.sh again in a sandboxed environment. Now you will notice that the validation status has changed to SUCCEEDED:
OBC: Workflow name: test
OBC: Workflow edit: 1
OBC: Workflow report: None
OBC: INSTALLING TOOL: my_tool/1/1
installing tool my_tool
OBC: INSTALLATION OF TOOL: my_tool/1/1 . COMPLETED
OBC: VALIDATING THE INSTALLATION OF THE TOOL: my_tool/1/1
OBC: VALIDATION FOR TOOL: my_tool/1/1 SUCCEEDED
OBC: CALLING STEP: step__main__root__None    CALLER: main
Output Variables:
Also notice the output of the "Installation Commands": installing tool my_tool.
So far we have shown that OpenBio.eu is a repository of "download-able" Tool/Data where each one has Installation and Validation commands in Bash language. The next part is to demonstrate the use of tool/data variables.
Tool/Data Variables
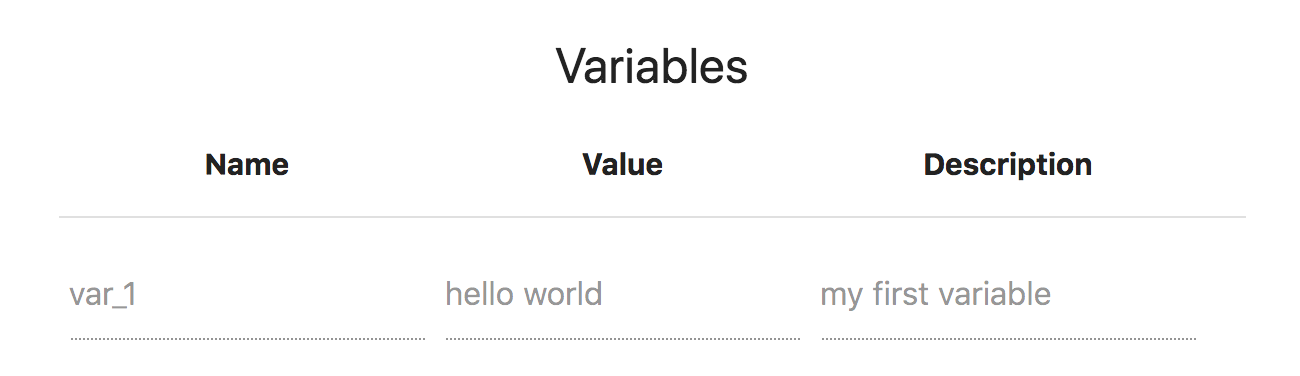
When you have installed a Tool/Data you need to let other scripts know where these tools/data are. Apart from the installation path of the Tool/Data there might be other pieces of information that you want to share with other tools/data or with other workflows. This piece of information can be stored in the Tool/Data Variables section. Each Tool/Data variable has a name, a value and a description.
Let's edit again the my_tool Tool/Data. Click the "EDIT" button, unfold the "Installation" panel and go to the bottom of this panel. There, add a variable with the name: var_1 , value hello world and description: my first variable. Click SAVE. This is what it should look like:
Now download again the BASH Executable, and run it. The output should be:
Workflow name: root
Workflow edit: 0
Workflow report: None
OBC: INSTALLING TOOL: my_tool/1/1
installing tool my_tool
OBC: INSTALLATION OF TOOL: my_tool/1/1 . COMPLETED
OBC: VALIDATING THE INSTALLATION OF THE TOOL: my_tool/1/1
OBC: VALIDATION FOR TOOL: my_tool/1/1 SUCCEEDED
OBC: SET my_tool__1__1__var_1="hello world"   <-- my first variable
OBC: CALLING STEP: step__main__root__None    CALLER: main
Output Variables:
Notice that after validating the tool, it sets the variable named my_tool__1__1__var_1 the value hello world. The name of the variable (my_tool__1__1__var_1) can be interpreted as "variable named var_1 of the tool my_tool with version 1 and edit 1".
Tool/Data dependencies
Suppose that the we have another tool/data which depends from my_tool. Let's call this tool/data 'another_tool' and assume version 1. Since in OpenBio.eu we have to insert the installation / validation Bash commands, we also have to declare the dependencies of this tool/data. Click the '+' button on Tools/Data and add another_tool as name and 1 as version. Also unfold the 'Dependencies panel'
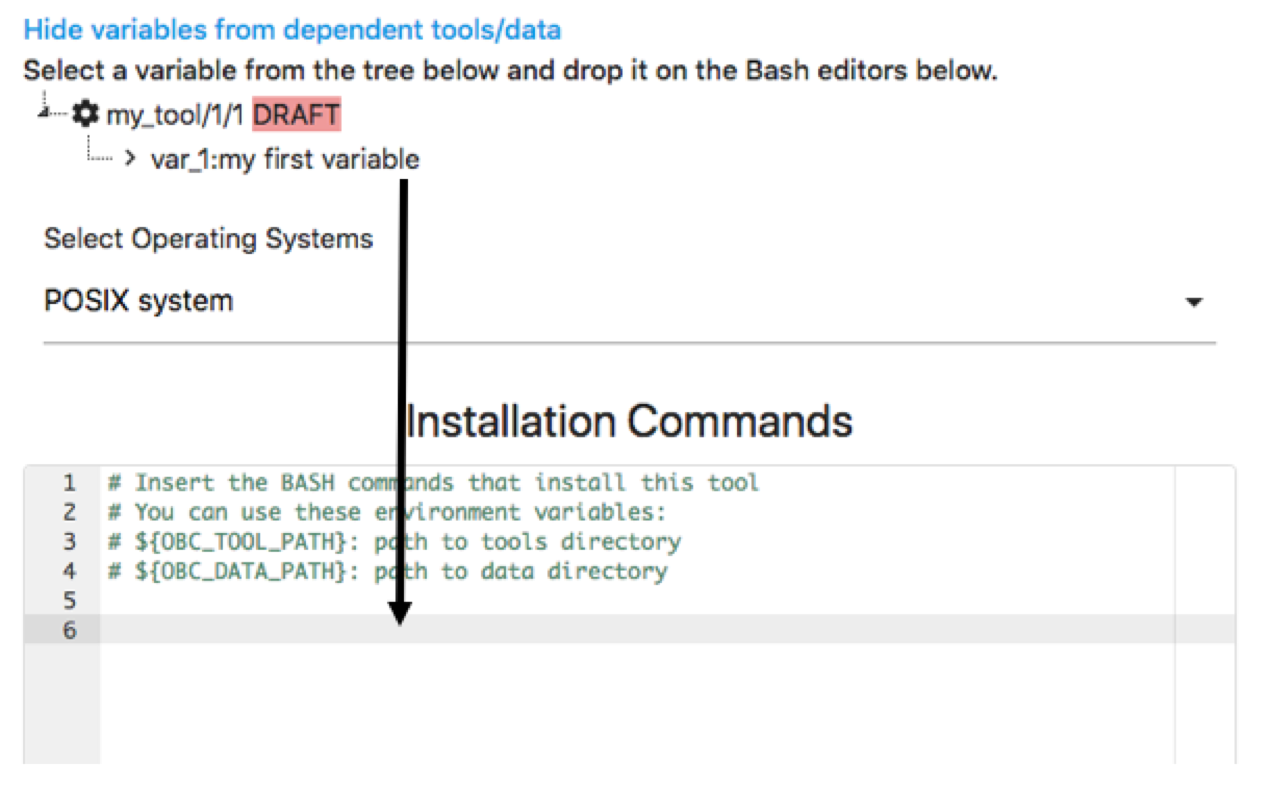
Next, enter my_tool on the search text field on the left and locate the item on the results that you created before. Now drag and drop this item in the Dependencies panel (red border):

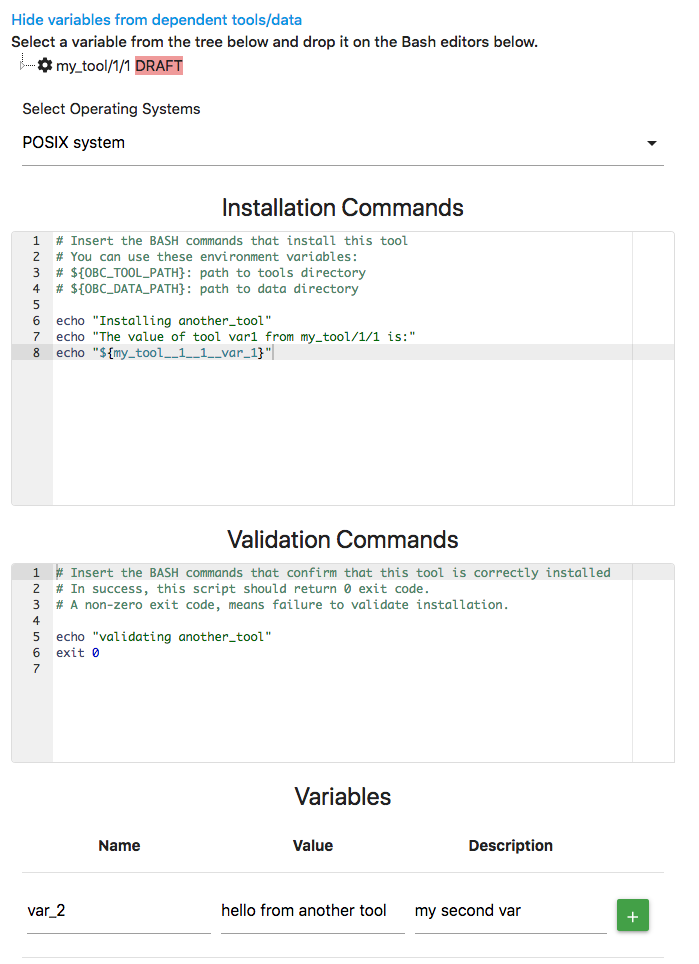
This is how you declare Tool/Data dependencies in OpenBio.eu. It is important to note that during the installation of Tool/Data another_tool, the my_tool will be installed first. Also the variables of my_tool are accessible in the Installation and Validation Commands of another_tool. To use them, simply select them from the tree that appears above the Bash editors and drop them in the Bash editors:
Ta see what has happened we can add some dummy Installation and Validation Commands and we can also add a variable in another_tool. For example add the following in the Installation commands:
echo "Installing another_tool"
echo "The value of tool var_1 from my_tool/1/1 is:"
echo "${my_tool__1__1__var_1}"
And the following in the Validation Commands:
echo "validating another_tool"
exit 0
We can also add a variable named var_2. Now the data on another_tool should look like this:
Now Save my_tool\1\1. The workfow test\1 has been also changed since it includes the tool my_tool\1\1. Go to the test\1 workflow, Download the "Bash Executable", and run it. You will see something like this:
OBC: Workflow name: test
OBC: Workflow edit: 1
OBC: Workflow report: None
OBC: INSTALLING TOOL: my_tool/1/1
installing tool my_tool
OBC: INSTALLATION OF TOOL: my_tool/1/1 . COMPLETED
OBC: VALIDATING THE INSTALLATION OF THE TOOL: my_tool/1/1
OBC: VALIDATION FOR TOOL: my_tool/1/1 SUCCEEDED
OBC: SET my_tool__1__1__var_1="hello world"   <-- my first variable
OBC: INSTALLING TOOL: another_tool/1/1
Installing another_tool
The value of tool var_1 from my_tool/1/1 is:
hello world
OBC: INSTALLATION OF TOOL: another_tool/1/1 . COMPLETED
OBC: VALIDATING THE INSTALLATION OF THE TOOL: another_tool/1/1
validating another_tool
OBC: VALIDATION FOR TOOL: another_tool/1/1 SUCCEEDED
OBC: SET another_tool__1__1__var_2="hello from another tool"   <-- my second var
OBC: CALLING STEP: step__main__root__None    CALLER: main
OBC: Output Variables:
Here we notice a few things:
* my_tool was installed and validated before another_tool. This is because my_tool is a dependency to another_tool.
* During the installation of another_tool, the value of the variable var_1 from my_tool/1/1 is printed. Generally, all tool/data variables, are accessible from any tool/data that is installed after them.
The ${OBC_TOOL_PATH} and ${OBC_DATA_PATH} variables
On your installation scripts, you are encouraged to use the ${OBC_TOOL_PATH} variable as the root path of all the installed tools of OpenBio.eu. For example when you want to download a file, decompress an archive or install a tool you are encouraged to do this in a directoty that lies under ${OBC_TOOL_PATH}. For example you can do:
MY_TOOL_PATH=${OBC_TOOL_PATH}/my_tool
mkdir ${MY_PATH}
wget -O ${MY_TOOL_PATH}/tool.tgz http://www.example.com/tool.tgz
By confirming to this, you can let other users define the desired location they want to install the OpenBio.eu tools. They can do this by simply exporting the variable ${OBC_TOOL_PATH} on bash. Similarly you are encouraged to use the variable ${OBC_DATA_PATH} to define the location of the data downloaded from Bash scripts in OpenBio.eu. These variables can be used as values in the Tool/Data variables. For Example:
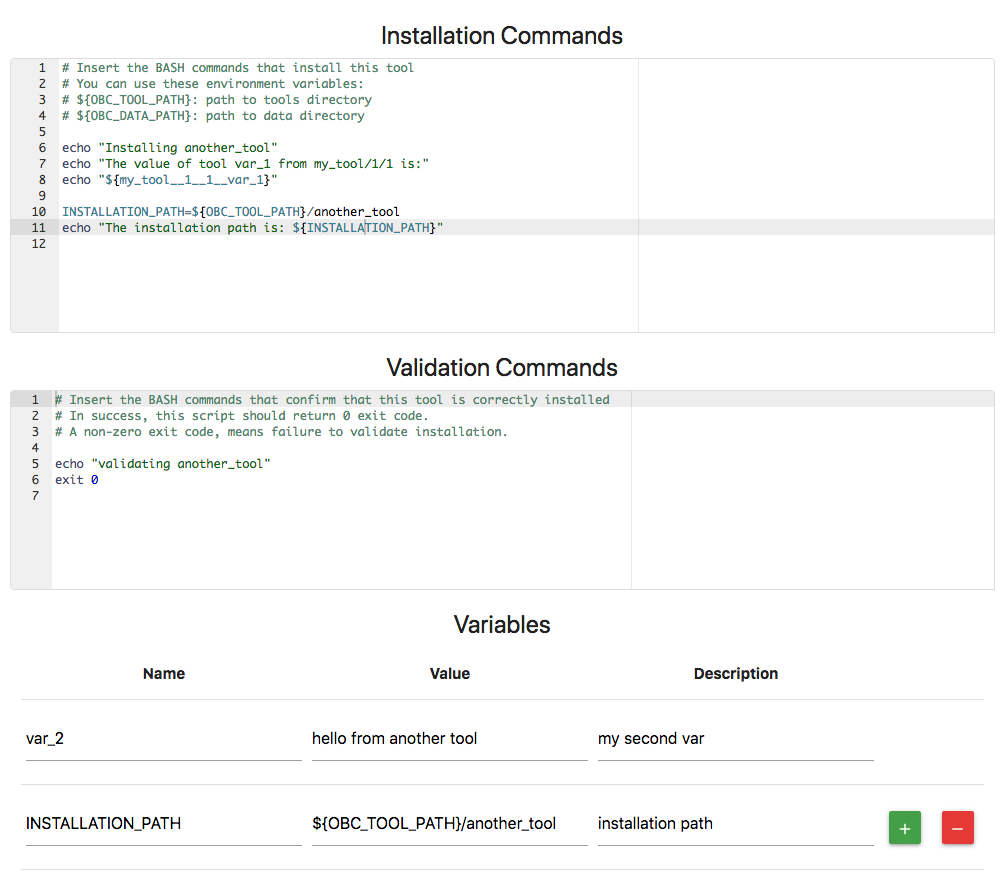
Notice the value of variable INSTALLATION_PATH that includes the ${OBC_TOOL_PATH} variable. Now we can define the value of ${OBC_TOOL_PATH} and then run the bash.sh script. The output is (some lines were removed for brevity):
#> export OBC_TOOL_PATH=/my/precious/location
#> bash bash.sh
The installation path is: /my/precious/location/another_tool
OBC: SET another_tool__1__1__var_2="hello from another tool"   <-- my second var
OBC: SET another_tool__1__1__INSTALLATION_PATH="/my/precious/location/another_tool"   <-- installation path
Finalizing and Forking tool/data
You may have noticed that so far you can save and edit a Tool/Data as many times as you want. Of course only the creator of a Tool/Data is allowed to edit it. This functionality has two side effects:
- Allowing to make changes to a Tool/Data, strips out the "reproducibility" of these objects. What if an experiment is based on a Data and the creator decides to change the installation instructions? This might affect the reproducibility of the experiment.
- Allowing only the creator to edit a Tool/Data strips out the crowdsourcing ability. What if a user wants to make an edit to the tool/data of another user?
To battle these issues, we employ two mechanisms. The first is the "Finalizing". By Finalizing a Tool/Data you permanently "freeze" this object from changes. You cannot edit a Tool/Data that has been finalized. Also Tool/Data that have not been finalized are labeled as DRAFT. It is a good practice to Finalize your Tool/Data after thorough testing. DRAFT Tool/Data should not be used in "serious" analysis since computational reproducibility is not guaranteed. The philosophy behind the "Finalizing" mechanism is to test and experiment with DRAFT tools/data, but once these object are ready to be used as independent components in public scientific pipelines, then they should be finalized.
The second mechanism is "forking". By forking a Tool/Data you can create an identical Tool/Data object that is owned by you. Every forked Tool/Data is by default in a "draft" stage. Both Draft and Finalized Tools/Data can be forked. Let's see how it looks. Select the tool named another_tool that you created before. You can do that by entering another_tool/1 in the search box on the left panel. From all the items that appear under the Tools/Data section, select the one created by you (or anything else that you like and you want to fork..). Once you click this item, a card with the details of this Tool/Data appears on the right. Now click the "Fork" button which is the rightmost button on the top of this card. Now the card becomes editable and you can make whatever changes you like. On this card there is an "Edit Summary" field that is obligatory. Here you should briefly describe the changes that you made from the original object. Once you complete with these changes you can save the new object. This is what it looks like:
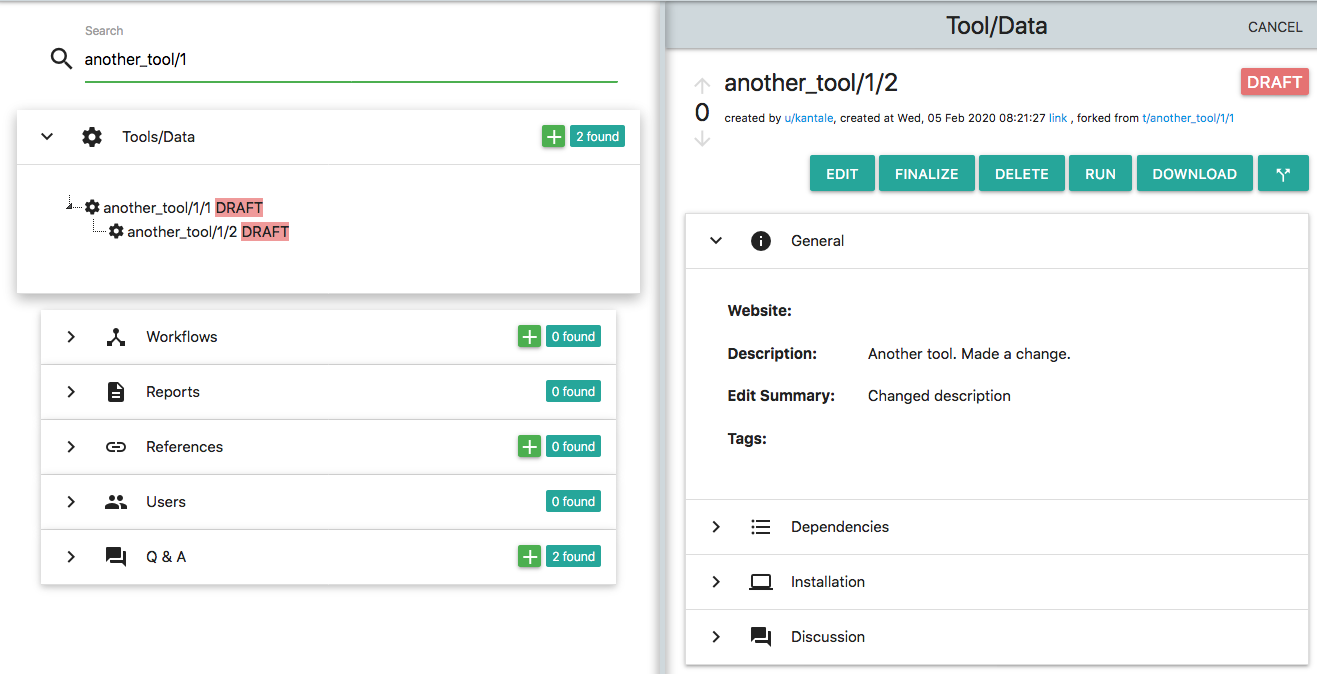
There are a few things to notice here:
* On the left side of the platform, where the search results appear, you can see that there is a new Tool/Data object named another_tool/1/2. This object is "under" the another_tool/1/1. Search results appear as a tree of objects. Parent-Child nodes mean that Children where forked from Parents.
* The platform assigned a new "edit" number to the newly created Tool/Data. Remember that each Tool/Data has a unique ID which is comprised by three parts. A "name", a "version" and an "edit". Although the user sets the "name" and the "version", the "edit" is assigned by the platform. The new object that was created by forking another_tool/1/1 has the same name and the same version, but different edit. This is also shown on the top of the right panel which states "forked from t/another_tool/1/1". Again the edit numbers might be different in your case.
Deleting a Tool/Data
Deleting Tool/Data is possible if: * You own (have created) this Tool/Data. * The Tool/Dats is in Draft stage * There isn't any Tool/Data that uses this Tool as a dependency. * There isn't any workflow that uses this Tool.
The deletion is permanent from the database and there is no action to restore it.
Workflows
Scientific Workflow Management Systems (SWMS) have been around for many decades. This awesome list contains hundreds of frameworks, libraries, platforms, languages, etc for managing and organizing tools and data into pipelines. OpenBio.eu is not exactly "Yet another SWMS". The purpose of OpenBio.eu is not to teach you "the correct language", or "data model" or "abstraction" in order to create scientific pipelines. The purpose is to help you create, publish and share your pipeline in whatever language / model / SWMS you like. There is only one prerequisite. The pipeline should be able to be expressed somehow in Bash. For example if your pipeline is a python script that runs with:
python my_awesome_pipeline.py --input input_file --output output_file
This is good enough for OpenBio.eu since this is valid Bash. But if the pipeline requires a GUI (Graphical User Interface), then chances are that OpenBio.eu is not for you.
Now let's start. On the left part of the platform click the green "+" button on "Workflows" section. This is what you will see:
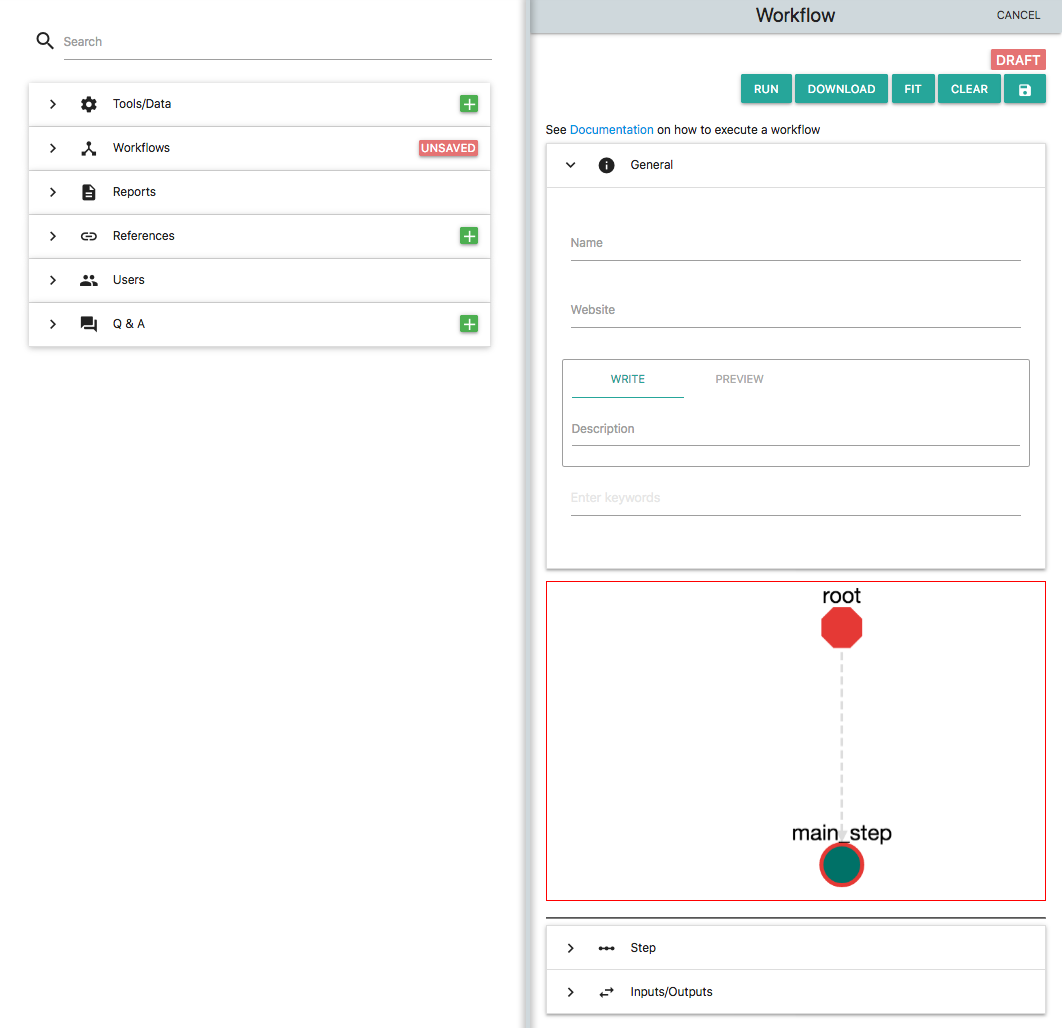
Add a name to the workflow i.e. my_workflow and also add a description (i.e. "my first workflow"). These two fields are obligatory. On the description you can use markdown. By default a new Workflow in OpenBio contains a single "step" which is called "main_step". On the workflow graph click the node "main_step". The Step editor below unfolds. Now you can edit this step. Enter: echo "Hello from my_workflow" and click "UPDATE". Save this new workflow by clicking on the "Save" icon which is the rightmost on the top of this card. With the Workflow saved the platform should look like this:
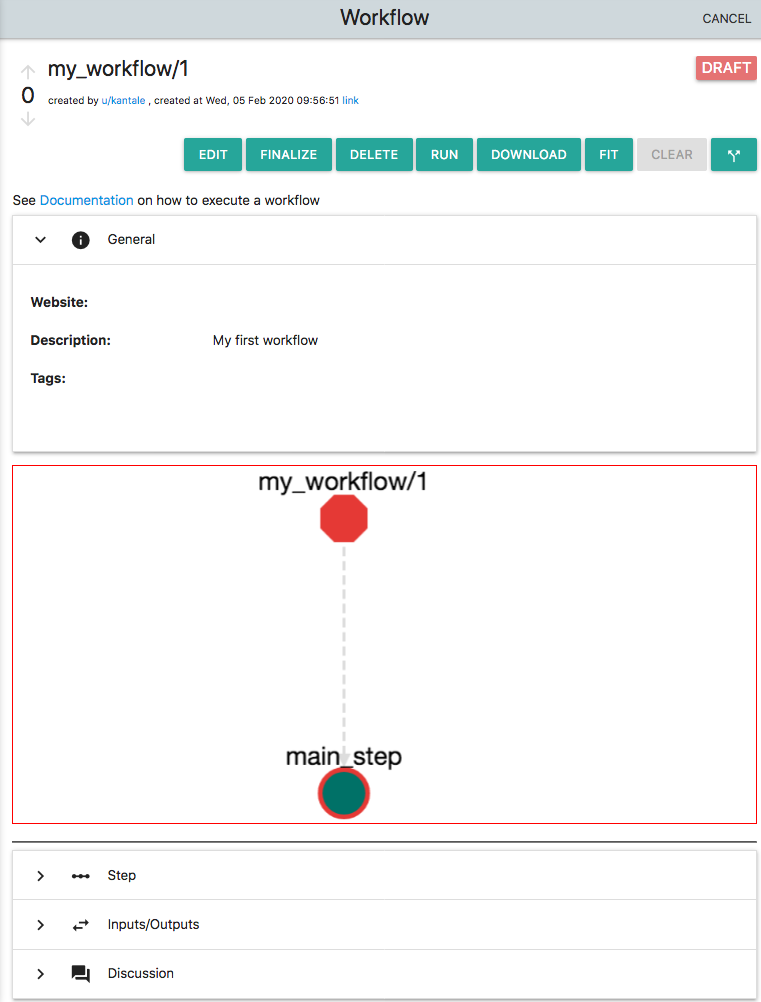
The most important part here is that the name of the workflow appears as my_workflow/1. This is because a unique ID of a workflow is comprised by two parts:
* A "name" provided by the user
* A number called "edit" provided from the platform.
The naming/ID-ing scheme is exactly the same as with Tools/Data. The only difference is that Workflows do not have versions. The idea here is that Tools/Data are items that get "fetched" (i.e. downloaded) from the Internet. They have versions that are maintained externally (outside OpenBio.eu), hence the "version" is part of the identity of a Tool/Data. On the other hand, Workflows are sets of Tool/Data, plus the logic that combines them for the purpose of an analysis. Workflows are merely constructs that exist only in OpenBio.eu this is why they don't have "version". Nevertheless they do have an edit, so it is possible to have multiple Workflows with the same name.
Now, let's download and run this workflow. Select "BASH Executable" from the "Download" dropdown. A file named "bash.sh" gets downloaded. Run this as before (i.e. with bash bash.sh). The output should be:
OBC: Workflow name: my_workflow
OBC: Workflow edit: 1
OBC: Workflow report: None
OBC: CALLING STEP: step__main_step__my_workflow__1    CALLER: main
Hello from my_workflow
OBC: Output Variables:
Notice that unlike before, when we run a Tool/Data object, it shows the Workflow name and Workflow edit. The "report" part will be explained later. Let's break the line: OBC: CALLING STEP: step__main_step__my_workflow__1 CALLER: main:
* OBC: Stands for OpenBio-C (the name of the project).
* step__main_step__my_workflow__1 Means that we are executing the step called "main_step" that belongs to the workflow my_workflow/1.
* CALLER: main means that this step is the "main" step, and it is not called from another step.
The output Hello from my_workflow is the output from the command echo "Hello from my_workflow" that you entered in the main_step earlier.
Creating and Calling Steps
Let's add a new step at the Workflow. First click the "EDIT" button on the my_workflow/1 workflow. Click in the "Step" section, add the name "new_step" and add the following Bash commands:
echo "Hello from new_step"
This is what it should look like:
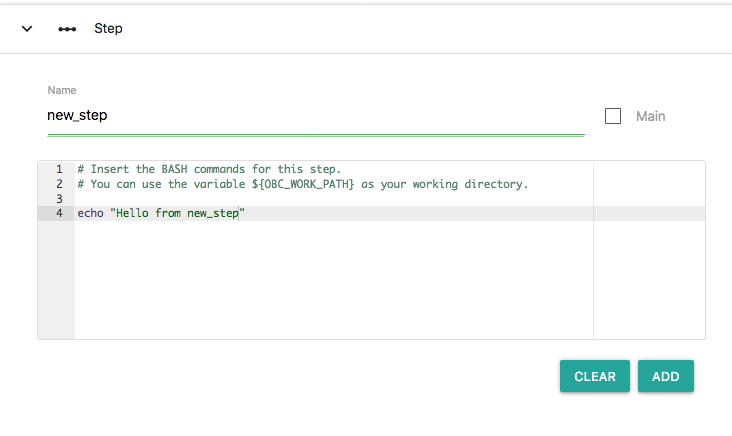
Now press the "ADD" button. A new node has been added on the workflow that represents the new step:
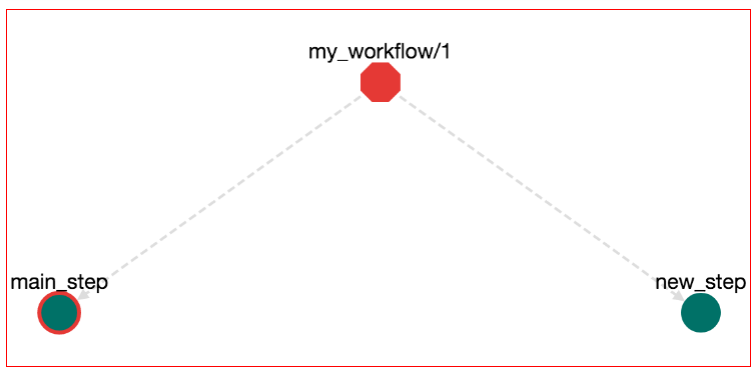
Although we have added a new step, we haven't declared how to call it. Let's alter the workflow so that the step main_step calls the step new_step. Click on the main_step node. The Bash editor for the main_step opens. Then you can change the Bash commands from:
echo "Hello from my_workflow"
to:
echo "Hello from my_workflow"
step__new_step__root__null
But what does the step__new_step__root__null mean? This actually means "call the step new_step that belongs to the root workflow". We will see later that workflows can contain other workflows. Also workflows have steps. A step in a workflow can have the same name with another step in another workflow. Therefore when you call a step you need to declare to which workflow this step belongs. Also root_null is the name of the main workflow, or else the workflow that is being edited right now. Now press the "UPDATE" button to update the main_step. The workflow has been changed and an edge from step main_step to step new_step has been added:

Now we can save these edits (press the save button on top-right), download the workflow (press Download-->Bash Executable) and run the file that gets downloaded (with bash bash.sh). The output is:
OBC: Workflow name: my_workflow
OBC: Workflow edit: 1
OBC: Workflow report: None
OBC: CALLING STEP: step__main_step__my_workflow__1    CALLER: main
Hello from my_workflow
OBC: CALLING STEP: step__new_step__my_workflow__1    CALLER: main_step__my_workflow__1
Hello from new_step
OBC: Output Variables:
Notice that the first step called is the main_step that prints Hello from my_workflow. Then this step calls new_step that prints Hello from new_step. Now it is time to discuss one of the main features of OpenBio.eu and why OpenBio is not a typical Workflow Management System:
In OpenBio.eu steps are called from other steps. Or else in OpenBio.eu you do not define step order, instead you define step logic. In most Workflow Management Systems like Galaxy, Nextflow and Taverna a user has to define two things: The first is steps and the second is Workflows. Steps (or Processes in Nextflow, Tools in Galaxy, Services in Taverna, ...) are independent execution components that can take part in one or many analyses. A workflow is a combination of Steps. A workflow usually defines the order in which the steps have to be executed. This abstraction is fine and has been used for decades in scientific computing. This abstraction is good because it serves a useful isolation between the execution (steps) and the execution flow (Workflow).
There is though a fundamental difference between this abstraction and the typical abstraction used in computer programming. In programming, "steps call other steps" as in "functions call other functions". In programming, you do not use different language syntax to differentiate between the things that can be called (steps) and the things that call them (workflows). In contrast, everything you do in programming "sits" inside a function. This function can call or be called by other functions. Yet in typical Workflow Management Systems, you cannot "call" a step from another step (unless you do something hack-ish like run the workflow execution engine from inside the step). Even worse, in WMS it is difficult (if not possible) to use fundamental programming constructs like conditional executions (if.. else..) and iterations (for.. while..).
In OpenBio.eu, steps belong to workflows. BUT you do not "call" workflows. You call steps. Then.. how did we run my_workflow which is a workflow? Every workflow has one (and only one) main step. When you download a workflow and you execute it, what you actually execute is the main step of this workflow. This is like the main function in c/c++, java or the if __name__ == '__main__': logic in python. So, OpenBio.eu does not have any algorithm to determine the execution order of steps. It simply calls the main step of the workflow and lets.. Bash take it from there. From a step you can call other steps that belong to any workflow. You can even call.. yourself. Also, you can use any Bash construct (if, while, for, ...) to control flow, so conditional execution and iteration is natively supported. Main steps have a red border color on the graph. Also, there is a "main" checkbox in the step editing panel, so that you can change which step is main. If more than one steps have been defined as main, or none, an error will appear upon trying to save the workflow.
The whole point of OpenBio.eu project is to offer a Workflow Management System that has the flexibility of a programming language, does not require installation in your computer to run it, and does not forcing you a new DSL (Domain Specific Language). The following chapters will illuminate more this philosophy.
Workflows in Workflows
Create a new workflow and name it "another_workflow". Click the node with the main_step and edit the Bash commands. Add:
echo "hello from another_workflow"
Click "Update" on this step and save this workflow. Now enter my_workflow on the search input on the left panel and select the workflow that you created before. Then click the Edit button. Here, we want to include the another_workflow into my_workflow. To do that enter another_workflow on the search input of the left panel and locate the another_workflow/1 object that you created before. Drag and Drop this workflow on the graph of my_workflow:
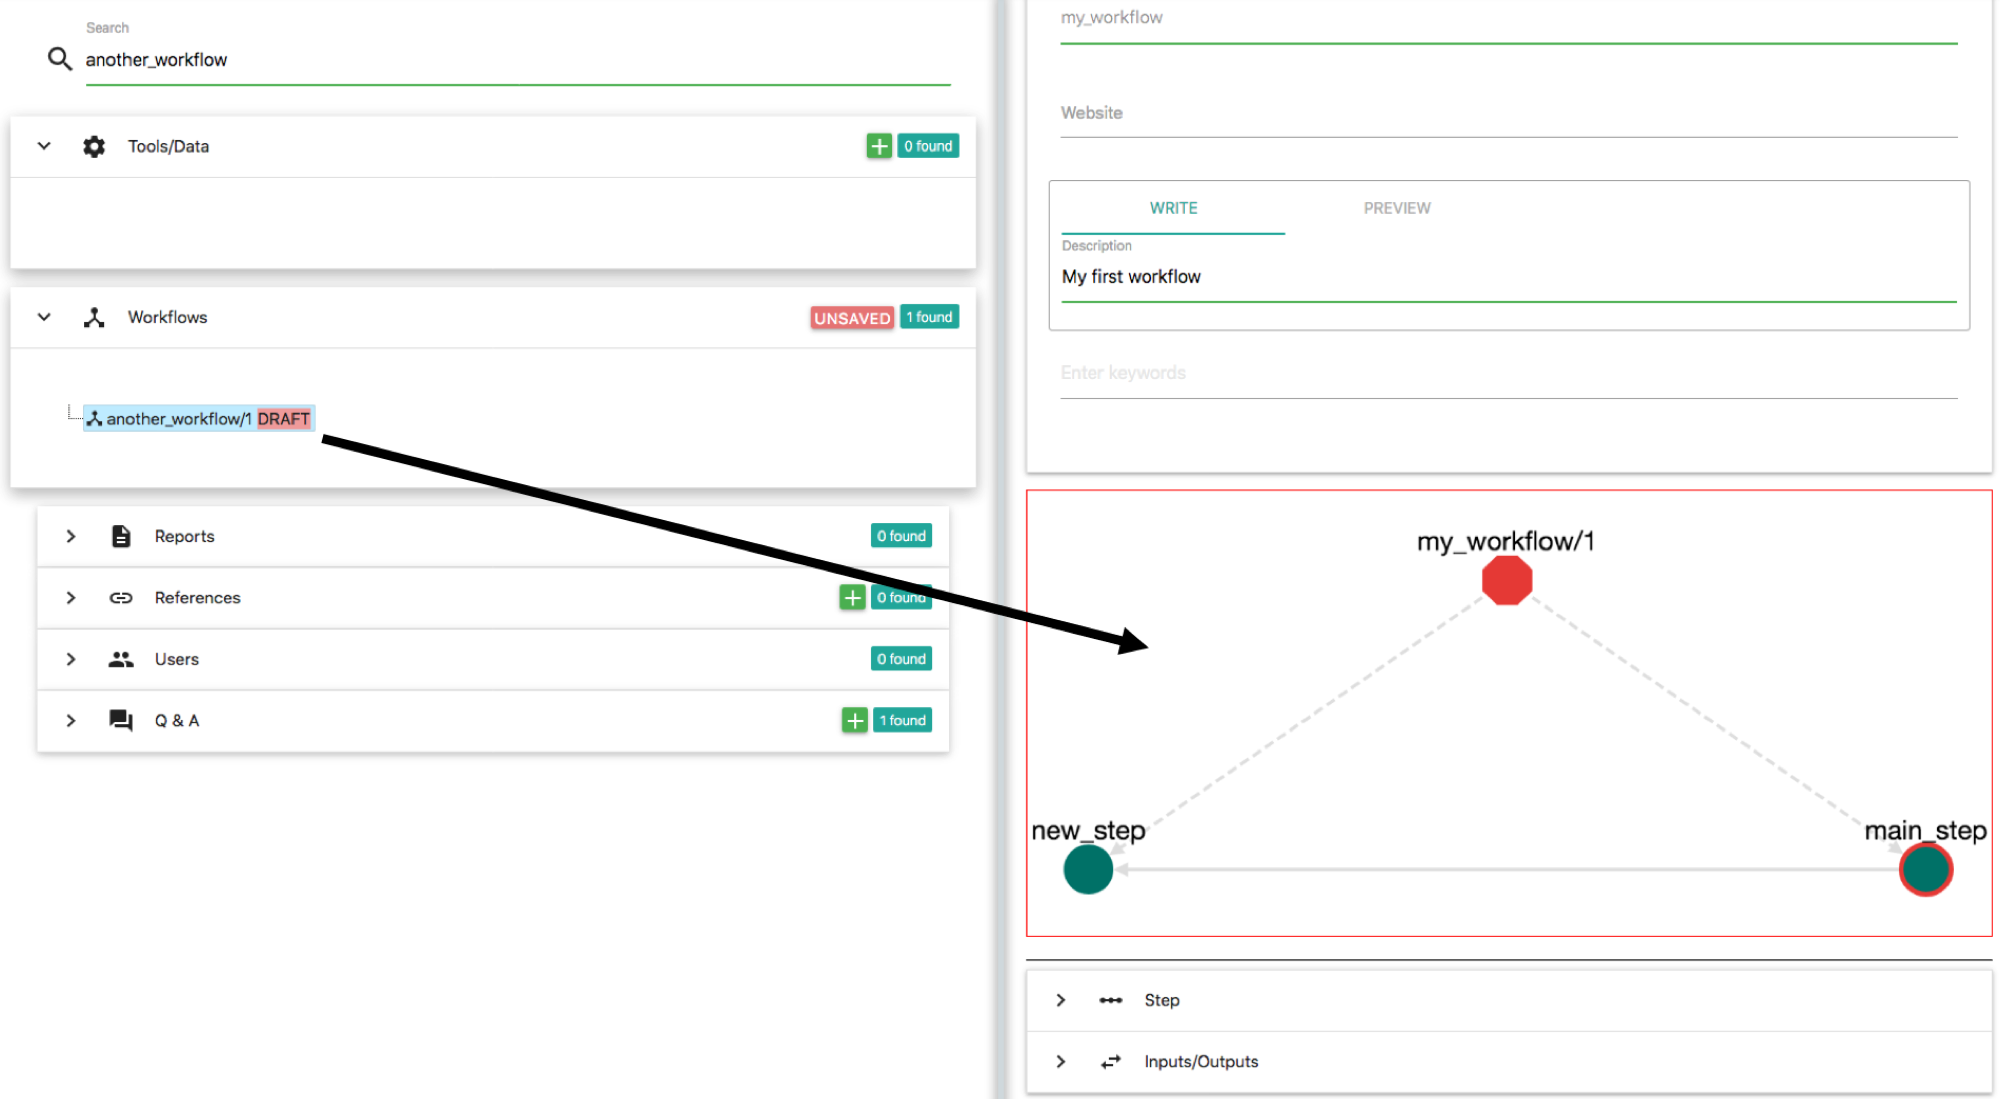
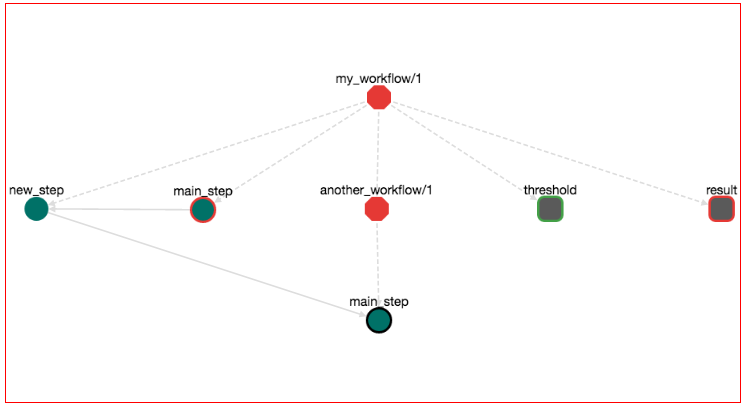
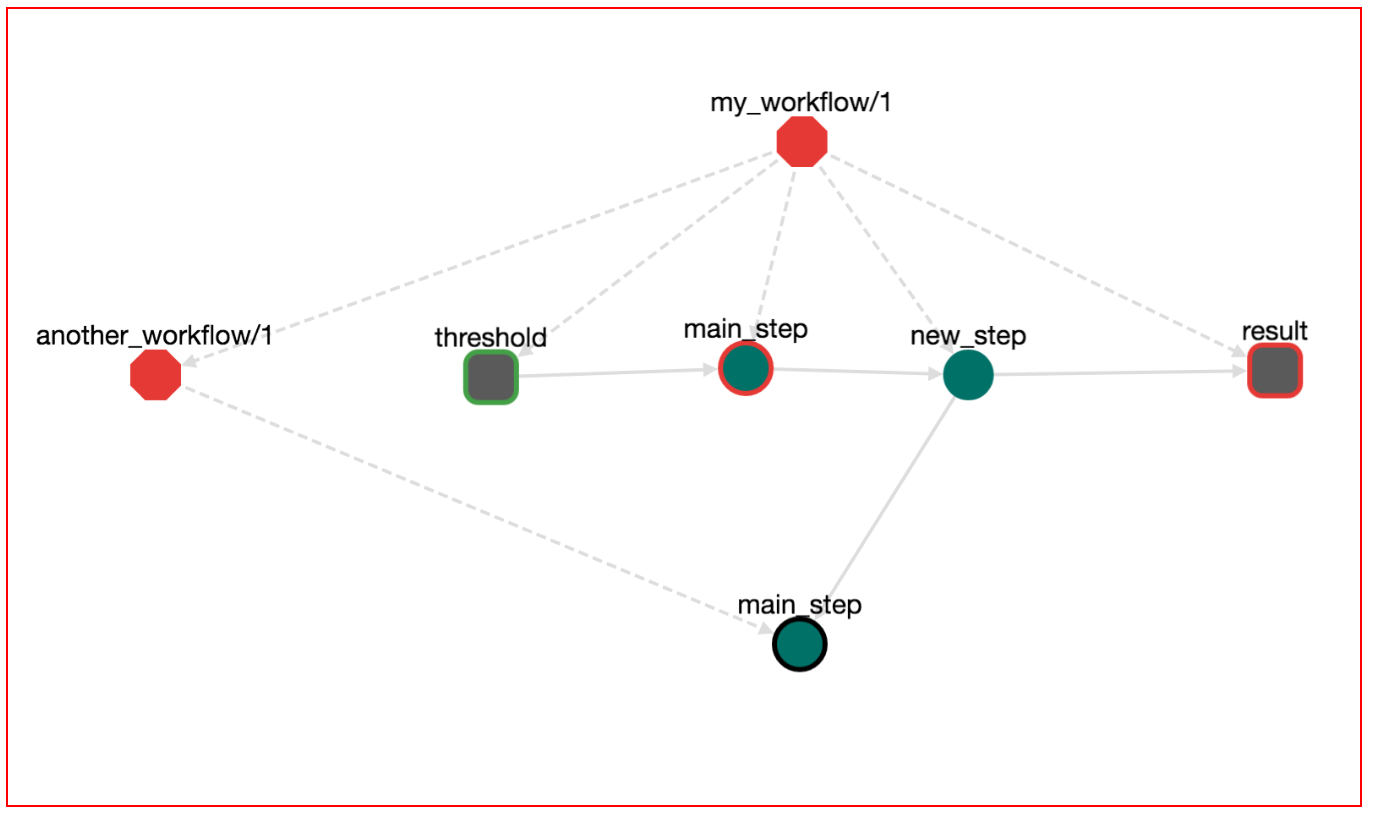
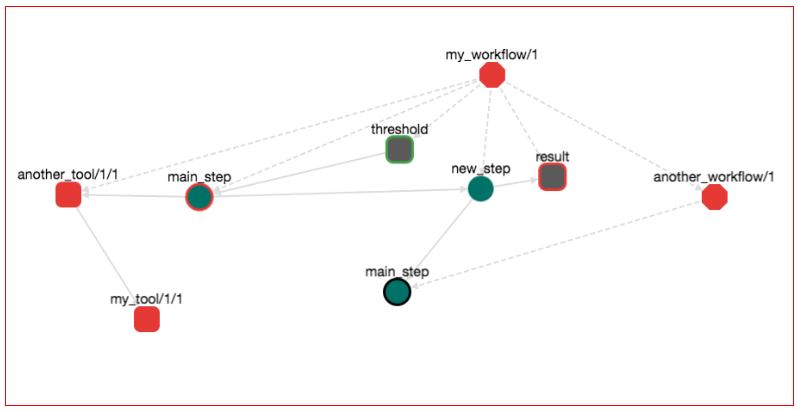
The result should be:
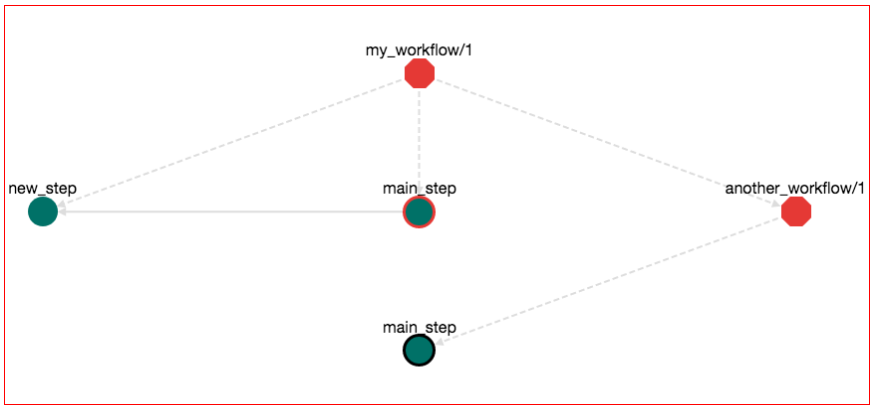
Note: The rendering of the graph might be different on your browser. You might have to move around the another_workflow/1 node so that the graph in your broswer looks exactly like the one in this example.
Let's explore a bit the semantics of this graph. Octagons represent Workflows. Red Octagon means that this workflow is in draft stage. The "root" workflow sits on the top of the graph and its name is my_workflow/1. There are three items that belong to this workflow: (1) the step new_step, (2) the step main_step and (3) the workflow another_workflow/1. This is why there are tree dotted edges from the my_workflow/1 node. Dotted edges mean "contain". From these steps, step main_step calls new_step. This is why there is a normal edge from main_step to new_step. Also main_step that belongs to my_workflow/1 has a red border, meaning that this is the main_step of this workflow (the one that you are editing right now). Workflow another_workflow/1 has one item. This is the step main_step node on the bottom of the graph. This node has a black border meaning that this is the main step of the workflow that it belongs to. Remember that a workflow can have one and only one main step. When you are importing a workflow into another workflow, the main step of the imported workflow stops from being main. Nevertheless, it is shown on the graph (the black border) that it "used to be the main step". This is to help you identify which step calls the rest on this workflow.
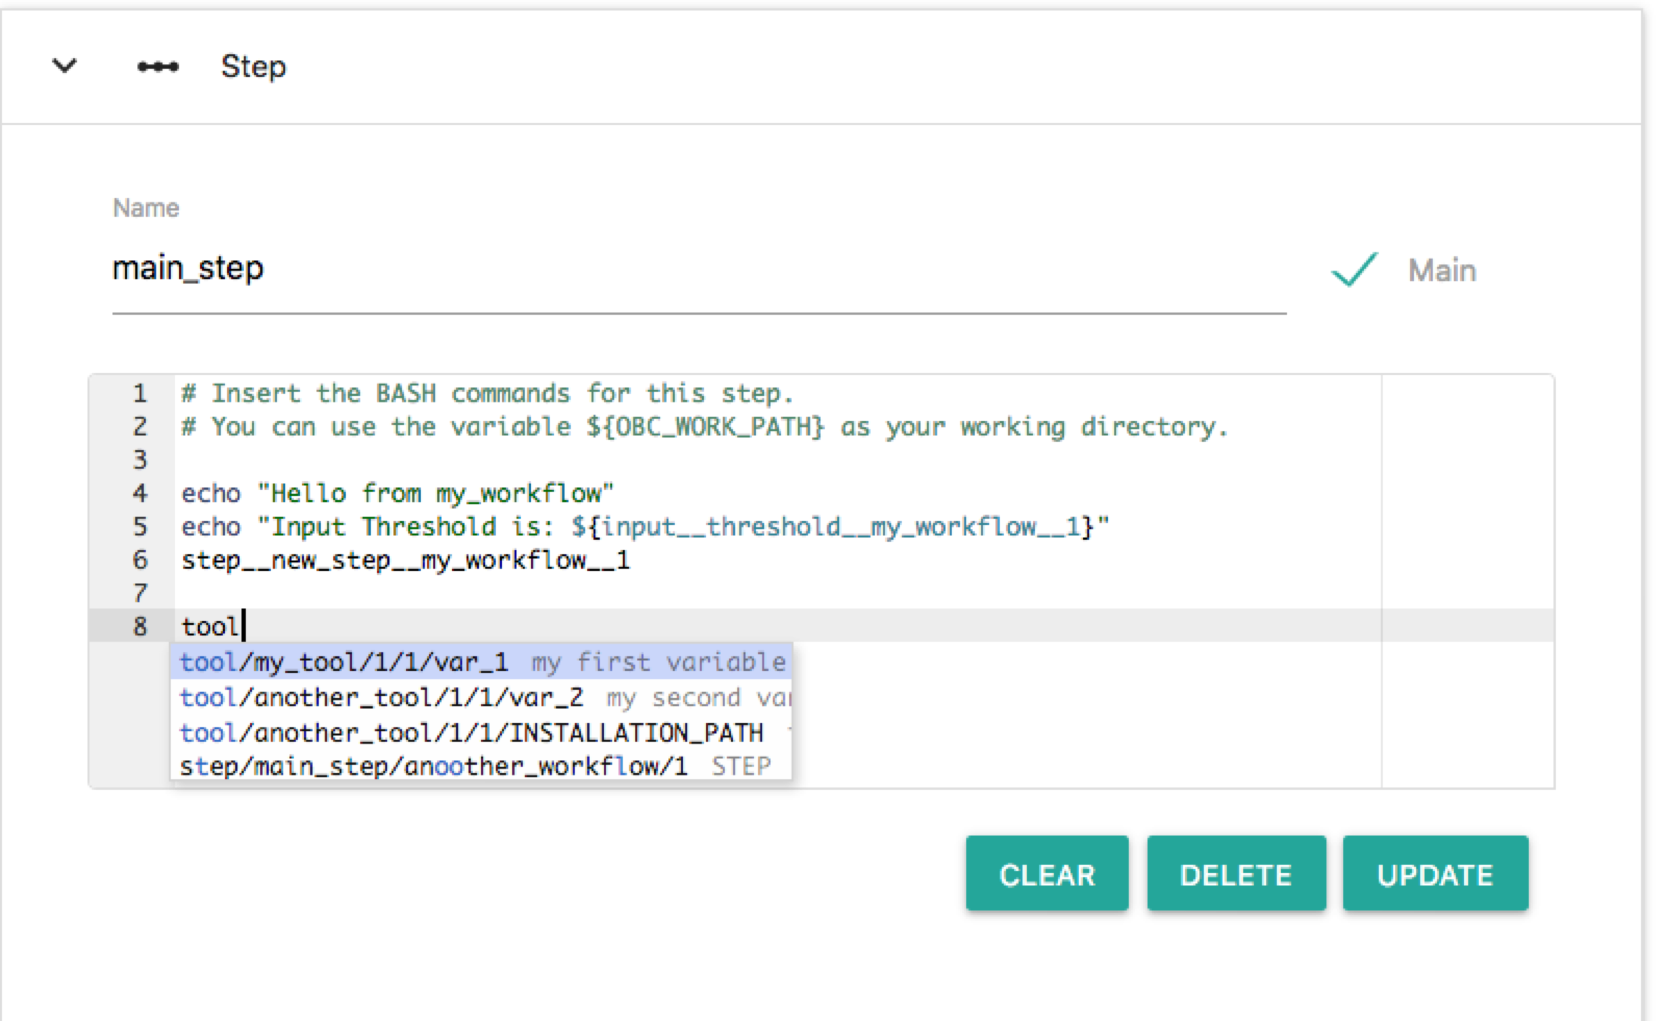
So although we have imported another_workflow/1 we do not call any of its steps. Let's edit new_step and call the main_step of another_workflow/1. Click the node "new_step" and on the Bash editor write: "step". The following auto-completion menu appears:
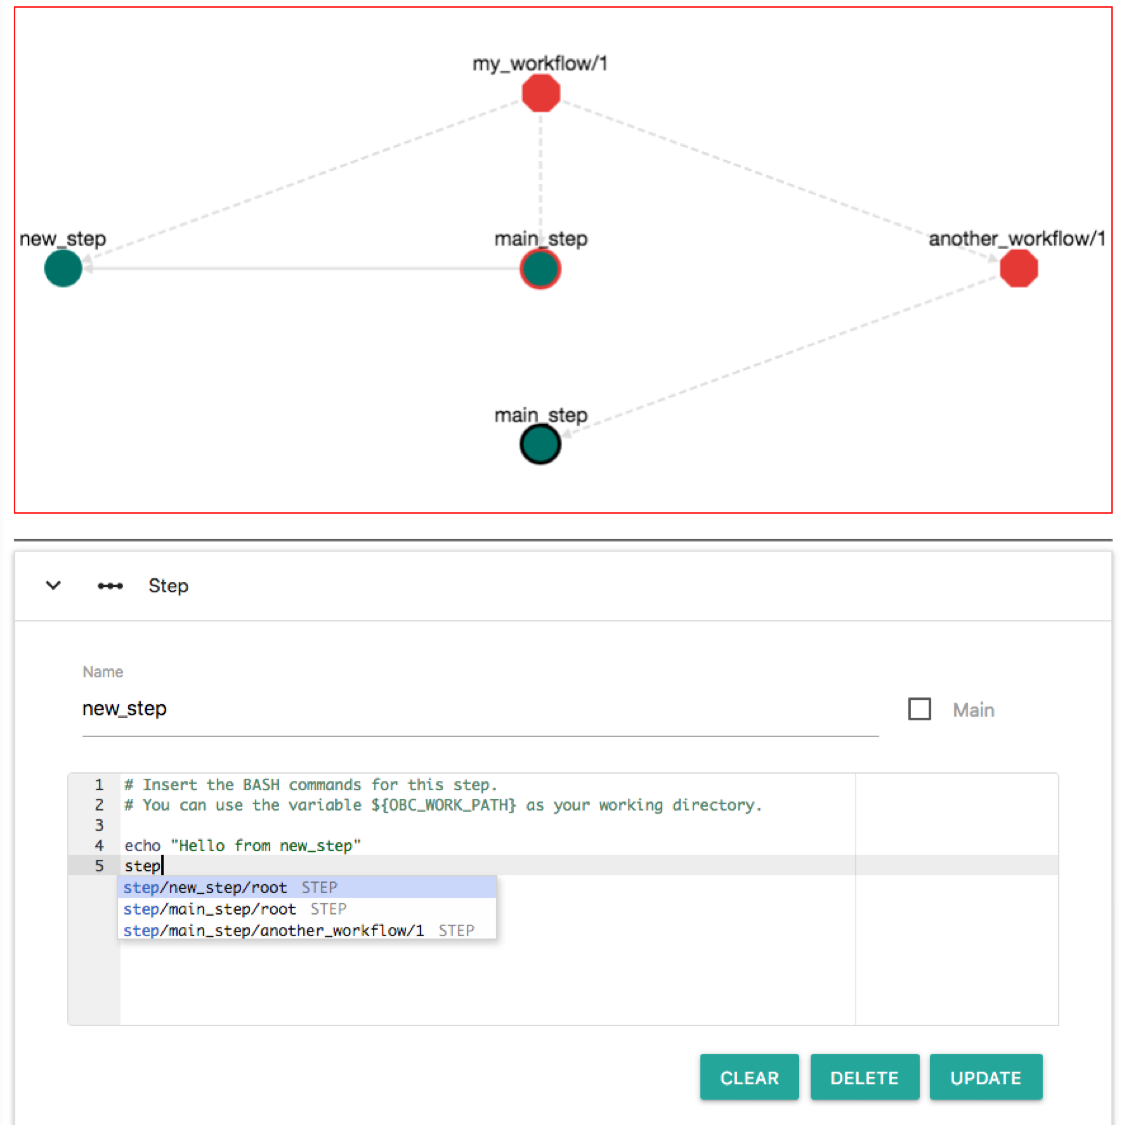
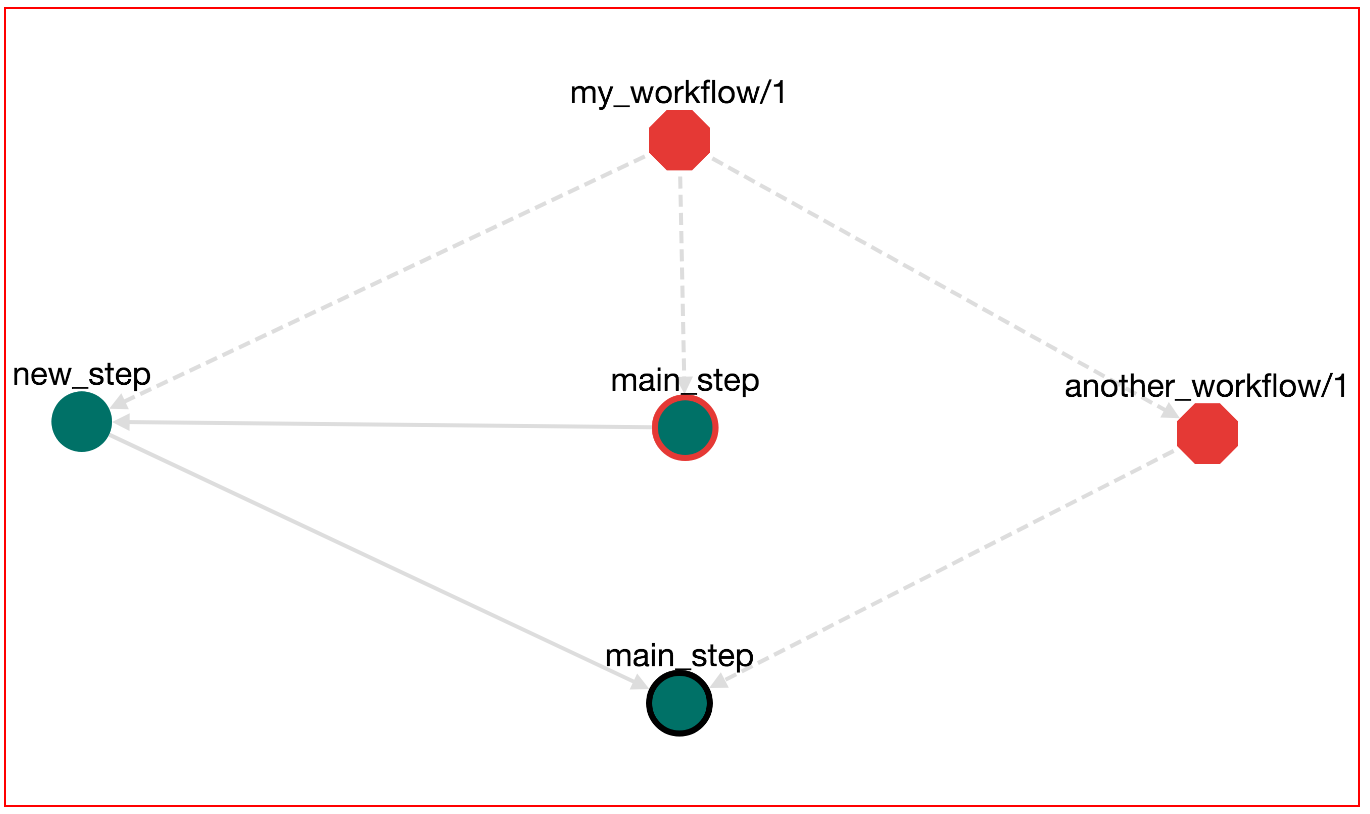
This menu helps you to choose a step. Available options are: step new_step of the root workflow, step main_step of the root workflow and step main_step of the another_workflow/1 workflow. Select the last (step/main_step/another_workflow/1). Then click "UPDATE". Now the workflow becomes:
Save the workflow. We can Download (Button DOWNLOAD-->Bash Executable) and run (bash bash.sh) this workflow. The output of this execution appears:
OBC: Workflow name: my_workflow
OBC: Workflow edit: 1
OBC: Workflow report: None
OBC: CALLING STEP: step__main_step__my_workflow__1    CALLER: main
Hello from my_workflow
OBC: CALLING STEP: step__new_step__my_workflow__1    CALLER: main_step__my_workflow__1
Hello from new_step
OBC: CALLING STEP: step__main_step__another_workflow__1    CALLER: new_step__my_workflow__1
hello from another_workflow
OBC: Output Variables:
Here you see that the execution order is defined from the order of which each step is calling other steps.
Input/Output Parameters of Workflows
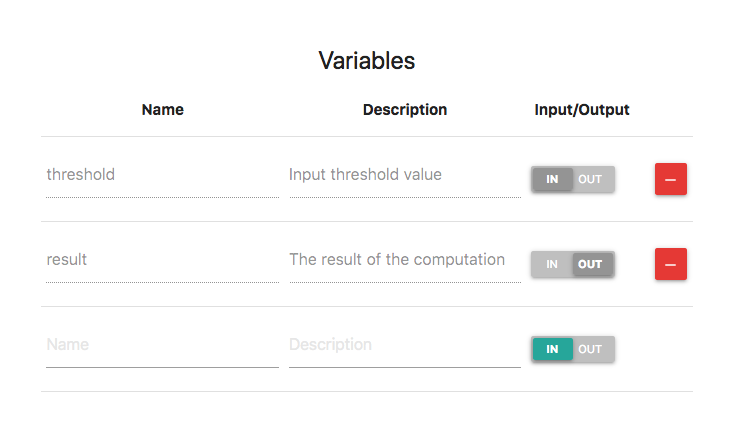
So far you might be wondering: How do I pass input values to a workflow and how do I get the output? You can define input/output variables through the user interface. For example, edit my_workflow/1 and unfold the Inputs/Outputs panel. Then, add an input variable with the name threshold and an output variable with the name result. Also add any description you like. It should look like this:
Input and Output variables are visible also in the workflow graph:
Input variables are rectangles with round corners and green border. Output variables are rectanges with round corners and red border.
Input and output variables behave similar to tool variables. They are Bash variables that can be accessed in any part of the workflow. For example let's read the value of the threshold and print it. This can be done by any step of the workflow. We can do that from main_step of my_workflow/1. Click this node and edit the Bash commands. On any part you can type "input". An autocomplete menu appears that shows all the input nodes:
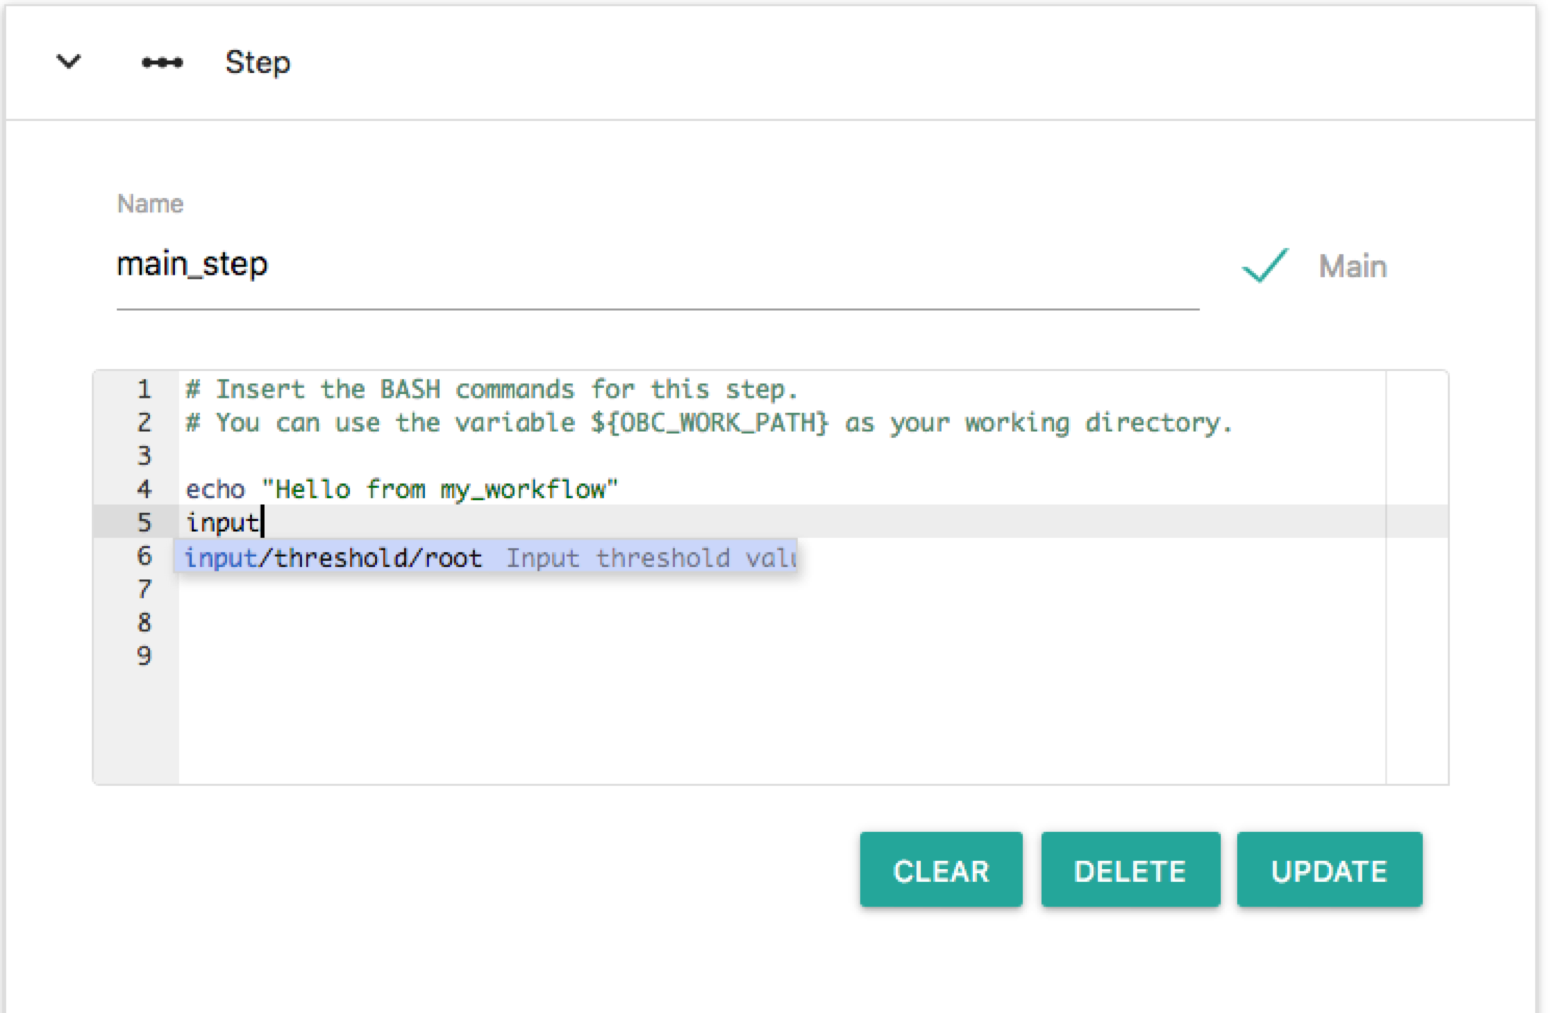
The only option is: input/threshold/root or else the input node named threshold that belongs to the root workflow. Choose this and this node is entered in the Bash editor as a Bash variable. Here we will make some additional edits on the Bash editor so that the script prints the value of input/threshold/root. Change the Bash commands so that it reads like:
echo "Hello from my_workflow"
echo "Input Threshold is: ${input__threshold__root__null}"
step__new_step__my_workflow__1
Press "UPDATE" on the step editor. The graph now has become something like this:
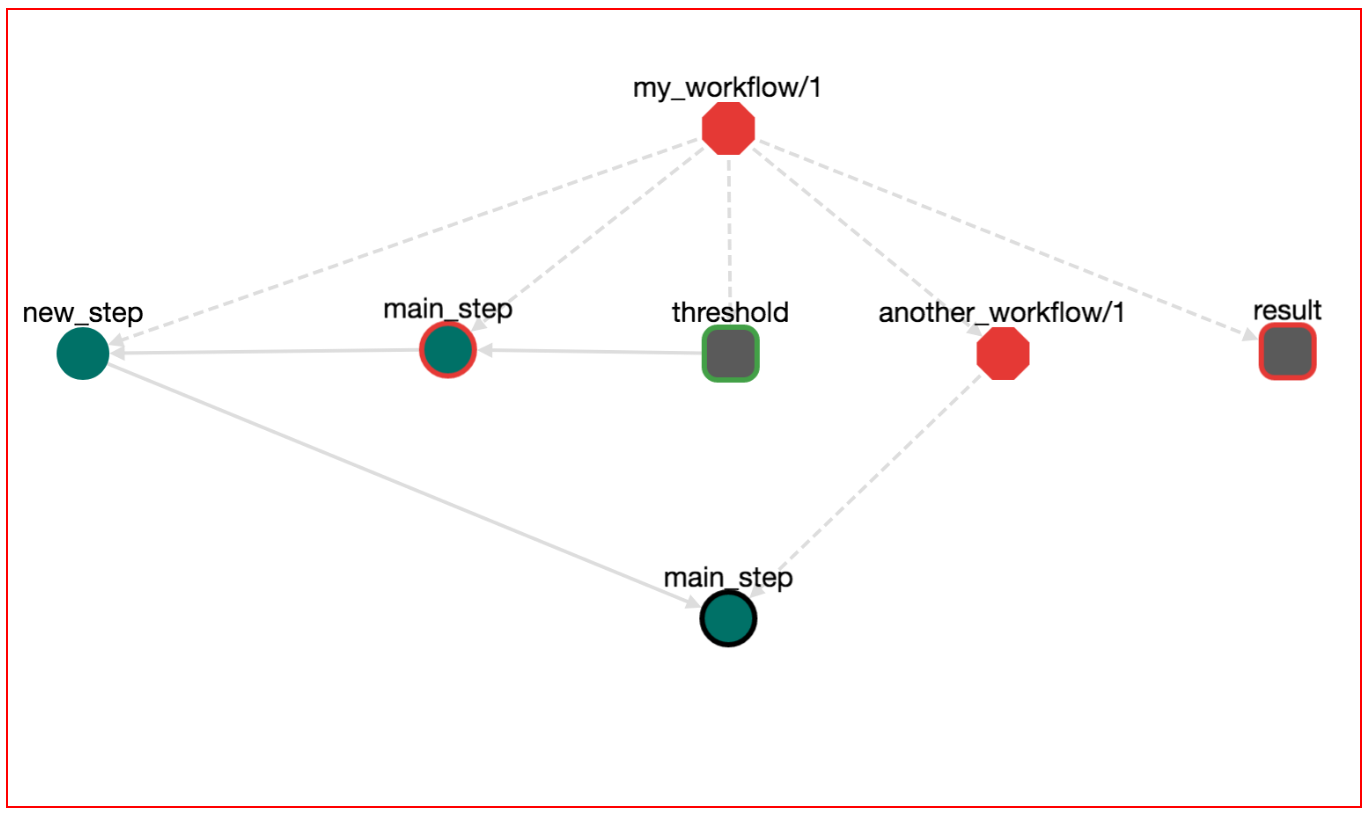
Note the new edge from the input node threshold to step node main_step. Save the workflow (pres the save icon), download (DOWNLOAD-->Bash Executable) and run the workflow (bash bash.sh). You will notice that the execution stops and prompts for a value for the input parameter threshold:
OBC: Workflow name: my_workflow
OBC: Workflow edit: 1
OBC: Workflow report: None
OBC: Input parameter: input__threshold__my_workflow__1 (Input threshold value) has not been set by any step. Enter value:
input__threshold__my_workflow__1=
Or else: "I couldn't get a value for the input parameter named threshold that belongs to my_workflow/1". To continue, enter a value (i.e. 4.5) and press Enter. Now the output is:
OBC: Workflow name: my_workflow
OBC: Workflow edit: 1
OBC: Workflow report: None
OBC: The following input commands have not been set by any step. Please define input values:
OBC: Input parameter: input__threshold__my_workflow__1 (Input threshold value) has not been set. Enter value: 4.5
OBC: CALLING STEP: step__main_step__my_workflow__1    CALLER: main
Hello from my_workflow
Input Threshold is: 4.5
OBC: CALLING STEP: step__new_step__my_workflow__1    CALLER: main_step__my_workflow__1
Hello from new_step
OBC: CALLING STEP: step__main_step__another_workflow__1    CALLER: new_step__my_workflow__1
hello from another_workflow
OBC: Output Variables:
OBC: output__result__my_workflow__1 =
What's new here is that the workflow has a an input parameter. OpenBio.eu checks first to see if this parameter has been set by any step. Since we haven't set a value to this parameter from any step (we are only reading this value), it prompts the user for a value. Halting script execution to prompt for an input value is perhaps an inconvenient way to get parameter inputs. You can also set the value of this parameter from the command line. Run:
bash bash.sh --input__threshold__my_workflow__1=4.5
The script now doesn't halt to get a value for input__threshold__my_workflow__1.
What about output variables? You may have noticed that the output variable named results that we defined before did not get any value from any step. This is why we see the line: OBC: output__result__my_workflow__1 = on the output of bash.sh. Let's change that. Edit again the workflow my_workflow/1 (press the EDIT button), click the new_step and on the BASH editor type: output. You will see the following auto-complete menu:
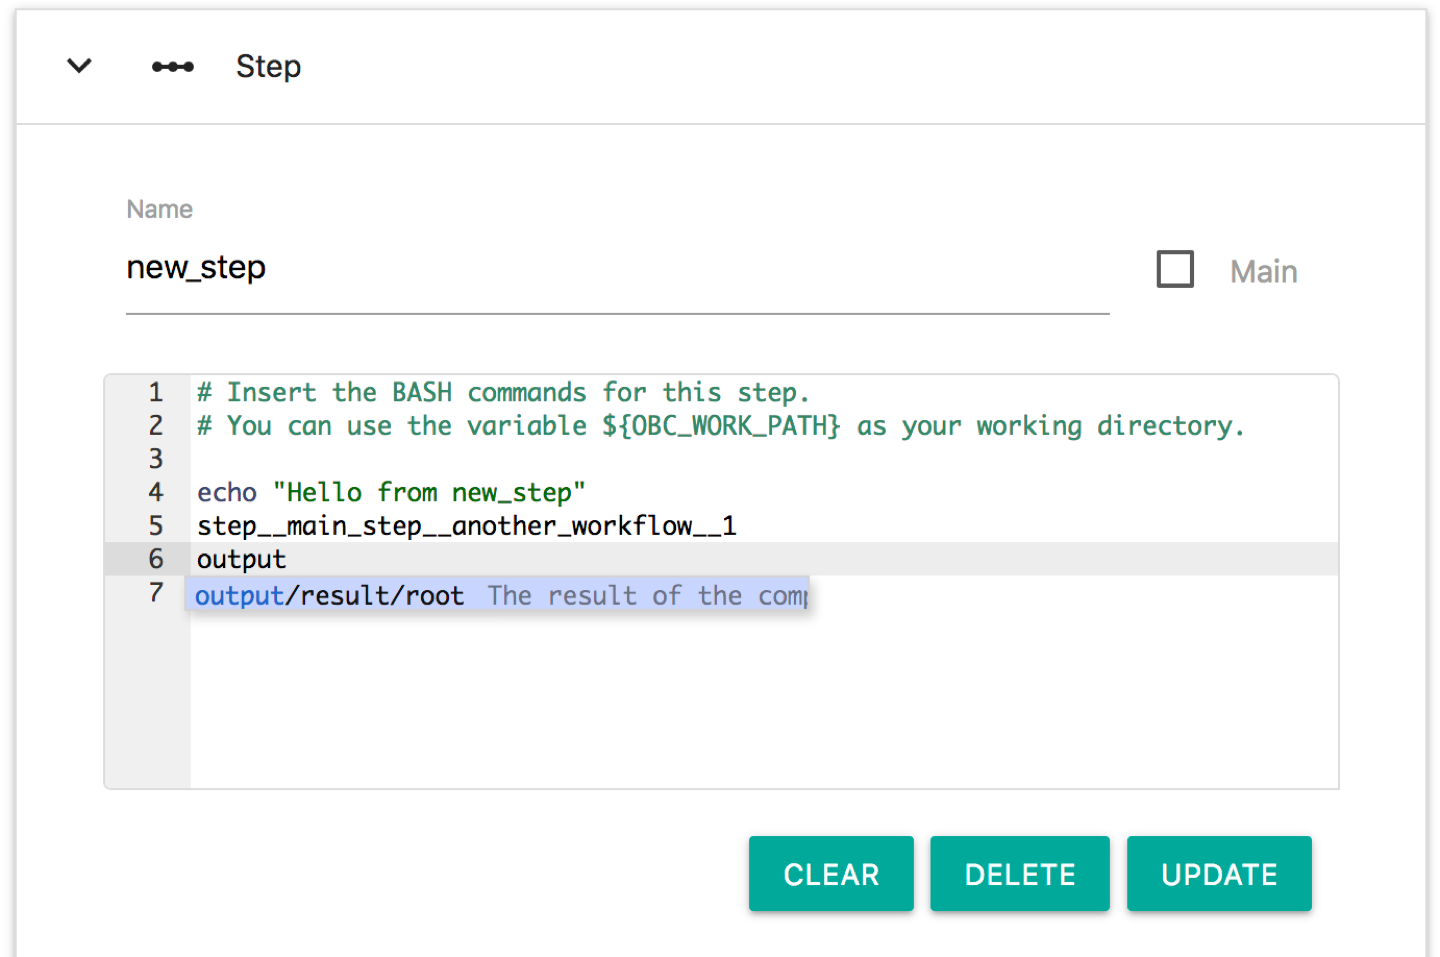
The only output variable is the one named "results" and belongs to the root workflow. Edit the Bash commands of this step so that it looks like this.
echo "Hello from new_step"
step__main_step__another_workflow__1
output__result__root__null=120
Press "UPDATE" on this step. The workflow graph now looks like this:
Notice that a new edge has been created connecting step new_step with the output node results. If we save, download and run the workflow with:
bash bash.sh --input__threshold__my_workflow__1=4.5
The output will be:
OBC: Workflow name: my_workflow
OBC: Workflow edit: 1
OBC: Workflow report: None
OBC: CALLING STEP: step__main_step__my_workflow__1    CALLER: main
Hello from my_workflow
Input Threshold is: 4.5
OBC: CALLING STEP: step__new_step__my_workflow__1    CALLER: main_step__my_workflow__1
Hello from new_step
OBC: CALLING STEP: step__main_step__another_workflow__1    CALLER: new_step__my_workflow__1
hello from another_workflow
OBC: Output Variables:
OBC: output__result__my_workflow__1 = 120
The difference here is that the values of the output variables are printed at the end.
Reading/Writing Input/Output variable between workflows
The input/output variables in OpenBio.eu have a different meaning than that of typical Workflow Management Systems. Let's break it down a bit. Assume a workflow that has the following steps:
- Step A has input input K and output M
- Step B has input M and output L
- Step C has input L and output N
With this information it is easy to figure out that the workflow structure should be: A --> B --> C. Actually most WMS do exactly this. The execution order of steps is determined by matching the output of step S1 to the input of step S2. If they match then the step S1 should run before S2 and this is usually shown in Workflow graphs as S1 --> S2.
As we mentioned before, OpenBio.eu takes a different stance in determining step order. The step creator mentions explicitly which step to call. Therefore the step order is not determined implicitly by input/output variables but explicitly by call statements. Therefore in OpenBio.eu the same workflow should be written (in pseudocode, this is not Bash) as:
M = Step_A(K)
L = Step_B(M)
N = Step_C(L)
Notice how this form is more intuitive, especially if you have basic programming knowledge in any language. To summarise:
In typical WMS, input/outputs are used to determine execution order. In OpenBio.eu input/output variables behave like function arguments (inputs) and return statements (outputs). Execution order is defined explicitly by the user.
Of course every approach has its own merits. What is best is up to you to decide, but let's experiment a bit with this idea. Remember that my_workflow/1 has an input called threshold. Suppose that we want to build a workflow that will contain the workflow my_workflow/1 and will always use the value 5.5 on the threshold input variable. Or else we want to call my_workflow/1 with threshold=5.5 from another workflow. Create the workflow constant_threshold and add on the graph the workflow my_workflow/1. To do that, search my_workflow/1 on the left panel, locate this workflow object and drag and drop it on the graph of the right panel. Click the main_step node that belongs to the constant_workflow/1 and add the following Bash commands:
input__threshold__my_workflow__1=5.5 # Setting the input value
step__main_step__my_workflow__1 # Calling the step main_step of the workflow my_workflow/1
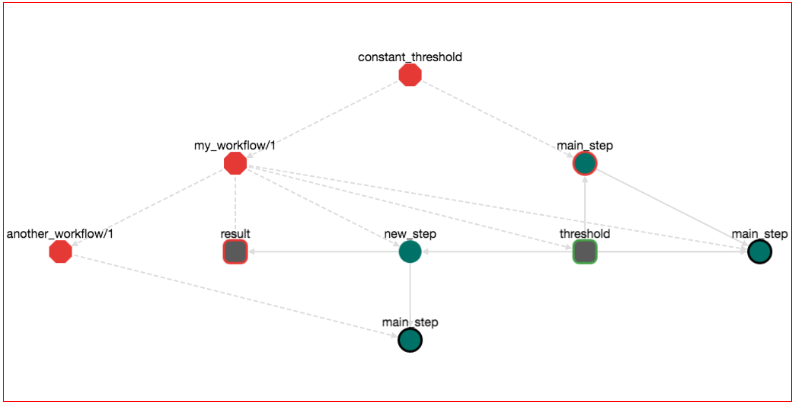
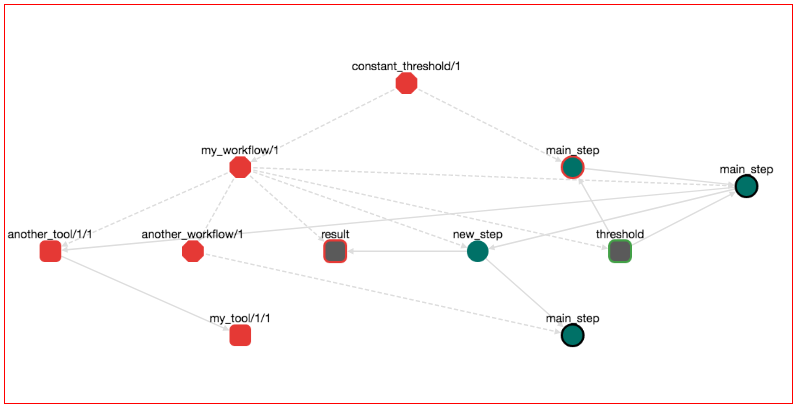
Practically here we set the input value of the workflow my_workflow/1 to 5.5 and then we call it. Press UPDATE, the workflow now looks like this:
If we save, download and run the workflow, the output is:
OBC: Workflow name: constant_threshold
OBC: Workflow edit: 1
OBC: Workflow report: None
OBC: CALLING STEP: step__main_step__constant_threshold__1    CALLER: main
OBC: CALLING STEP: step__main_step__my_workflow__1    CALLER: main_step__constant_threshold__1
Hello from my_workflow
Input Threshold is: 5.5
OBC: CALLING STEP: step__new_step__my_workflow__1    CALLER: main_step__my_workflow__1
Hello from new_step
OBC: CALLING STEP: step__main_step__another_workflow__1    CALLER: new_step__my_workflow__1
hello from another_workflow
OBC: Output Variables:
Notice that, when executing the bash.sh script, we don't have to provide a value of the input variable threshold of the my_workflow/1 workflow. This input is set from the step main_step of the constant_threshold/1 workflow. Practically we called a workflow after setting its input value.
Let's see another example. Create a workflow with the name A, that has an input K and an output M. Add the following Bash command on the main_step:
output__M__A__1=$(expr ${input__K__A__1} + 3) # M = K + 3
Create another workflow with the name B, that has an input M and an output L. Add the following commands on the main_step:
output__L__B__1=$(expr ${input__M__B__1} \* 5) # # L = M * 5
Create another workflow with the name C, that has an input L and an output N. Add the following commands on the main_step:
output__N__C__1=$(expr ${input__L__C__1} - 2) # N = L - 2
These three workflows, each contains a single step. The step performs a simple mathematical operation on the input variable and saves the output on the output variable. Now we can combine these three workflows in a forth workflow. Create a workflow with the name combine. For each of one of the workflows A, B, C, locate them via search on the left panel and drag and drop them on the graph of the combine workflow. On the combine workflow add a input variable K and an output variable N. Finally, On the main_step of the combine workflow add the following Bash commands:
input__K__A__1=${input__K__combine__1} # Set the input of the A workflow as the input of the root workflow
step__main_step__A__1 # Call main_step of the A workflow
input__M__B__1=${output__M__A__1} # Set the input of the B workflow as the output of the A workflow
step__main_step__B__1 # Call main_step of the B workflow
input__L__C__1=${output__L__B__1} # Set the input of the C workflow as the output of the B workflow
step__main_step__C__1 # Call main_step of the C workflow
output__N__combine__1=${output__N__C__1} # Set the output of the root workflow as the output of the C workflow
The workflow looks like this:
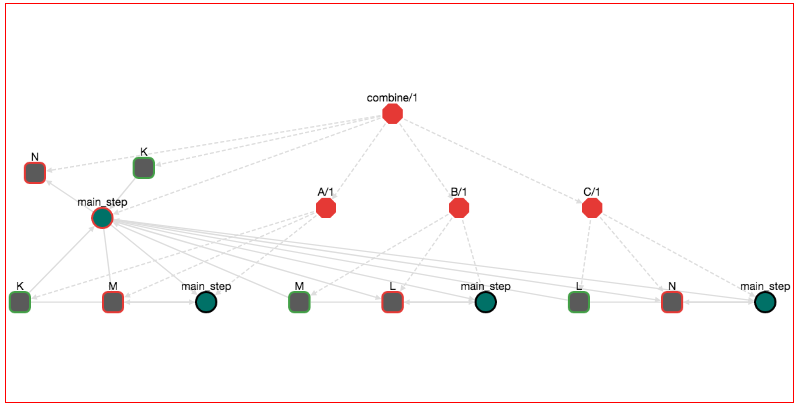
Actually here we have "chained" three workflows. In pseudocode, what we have done is:
K : input

M = step_a(K) # Calls M = K + 3
L = step_b(M) # Calls L = M * 5
N = step_c(L) # Calls N = L - 2

N: output
If we save, download and run this workflow with:
bash bash.sh --input__K__combine__1=2
the output will be:
OBC: Workflow name: combine
OBC: Workflow edit: 1
OBC: Workflow report: None
OBC: CALLING STEP: step__main_step__combine__1    CALLER: main
OBC: CALLING STEP: step__main_step__A__1    CALLER: main_step__combine__1
OBC: CALLING STEP: step__main_step__B__1    CALLER: main_step__combine__1
OBC: CALLING STEP: step__main_step__C__1    CALLER: main_step__combine__1
OBC: Output Variables:
OBC: output__N__combine__1 = 23
The output is 23 since the input is 2 and we applied the pseudocode presented above. To recap, in OpenBio.eu the user has to explicitly set (1) the input/output of each step and (2) define which steps call which. To illustrate how this is different from other Workflow Management Systems let's take a look from this workflow from Common Workflow Language tutorial:
#!/usr/bin/env cwl-runner

cwlVersion: v1.0
class: Workflow
inputs:
  tarball: File
  name_of_file_to_extract: string

outputs:
  compiled_class:
    type: File
    outputSource: compile/classfile

steps:
  untar:
    run: tar-param.cwl
    in:
      tarfile: tarball
      extractfile: name_of_file_to_extract
    out: [extracted_file]

  compile:
    run: arguments.cwl
    in:
      src: untar/extracted_file
    out: [classfile]
What is described here is a workflow that has two inputs (tarball, name_of_file_to_extract) and one output compile/classfile. The workflow has two steps:
* Step untar has inputs tarball, name_of_file_to_extract and output extracted_file.
* Step compile has input extracted_file and output compile/classfile.
Notice that nowhere in this description is mentioned which step will run first and which second. This is implied from input/output variables. Here it is trivial to deduce that step untar will run first and step compile will run second. Yet in complex workflows the resolution of execution order requires special algorithms. Also sometimes this complexity makes workflow editing and maintaining a difficult and error-prone procedure. In Computer Science terminology, OpenBio.eu is an effort to bring workflows closer to the structured programming paradigm as opposed to the flow-based programming paradigm that are mostly modeled today.
Adding Tools/Data in workflows
Adding Tools/Data in workflows is easy as adding other Workflows. For example let's locate the workflow my_workflow/1 that we have created in the previous steps on the left panel. Select it and then press "EDIT". Now on the left panel, locate the tool another_tool/1. Drag and drop another_tool/1 to the graph of my_workflow/1. The graph should look like this:
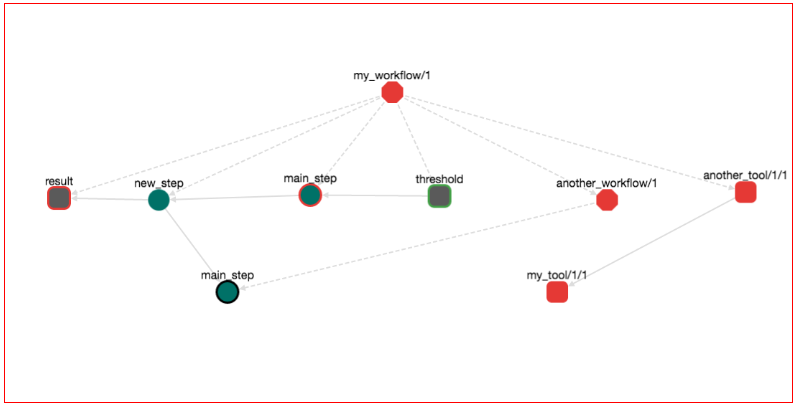
Notice that the graph has two additional nodes: another_tool/1/1 and my_tool/1/1. Both are red rectangles with round edges. Round rectagles are nodes that represent tools/data. Red means that these tools/data are in draft stage. Notice also that there is edge from another_tool/1/1 to my_tool/1/1. This means that another_tool/1/1 depends from my_tool/1/1. Save the workflow, download it and run it with:
bash bash.sh --input__threshold__my_workflow__1=4.5
The output is:
OBC: Workflow name: my_workflow
OBC: Workflow edit: 1
OBC: Workflow report: None
OBC: INSTALLING TOOL: my_tool/1/1
installing tool my_tool
OBC: INSTALLATION OF TOOL: my_tool/1/1 . COMPLETED
OBC: VALIDATING THE INSTALLATION OF THE TOOL: my_tool/1/1
OBC: VALIDATION FOR TOOL: my_tool/1/1 SUCCEEDED
OBC: SET my_tool__1__1__var_1="hello world"   <-- my first variable
OBC: INSTALLING TOOL: another_tool/1/1
Installing another_tool
The value of tool var_1 from my_tool/1/1 is:
hello world
The installation path is: /another_tool
OBC: INSTALLATION OF TOOL: another_tool/1/1 . COMPLETED
OBC: VALIDATING THE INSTALLATION OF THE TOOL: another_tool/1/1
validating another_tool
OBC: VALIDATION FOR TOOL: another_tool/1/1 SUCCEEDED
OBC: SET another_tool__1__1__var_2="hello from another tool"   <-- my second var
OBC: SET another_tool__1__1__INSTALLATION_PATH="/another_tool"   <-- installation path
OBC: CALLING STEP: step__main_step__my_workflow__1    CALLER: main
Hello from my_workflow
Input Threshold is: 4.5
OBC: CALLING STEP: step__new_step__my_workflow__1    CALLER: main_step__my_workflow__1
Hello from new_step
OBC: CALLING STEP: step__main_step__another_workflow__1    CALLER: new_step__my_workflow__1
hello from another_workflow
OBC: Output Variables:
OBC: output__result__my_workflow__1 = 120
The important thing to notice here is that the installation and validation Bash commands of the tools/data that take part in a workflow are execute before the Bash commands of any step. Or else, first we install tools/data and then we execute the rest parts of a workflow. Remember also that the tool another_tool/1/1 has a variable named INSTALLATION_PATH. We can access this variable at any step of the workflow. For example, edit the workflow my_workflow/1, click on the step node main_step of this workflow and at the Bash editor, at any part type: "input" the following auto-complete menu appears:
This is to help you locate the variable of a Tool/Data that you want to use. Select the INSTALLATION_PATH variable and print it. The Bash commands should look like this:
echo "Hello from my_workflow"
echo "Input Threshold is: ${input__threshold__my_workflow__1}"
step__new_step__my_workflow__1

echo "The value of INSTALLATION_PATH variable of another_tool/1/1 is:"
echo ${another_tool__1__1__INSTALLATION_PATH}
Press UPDATE and then save the workflow. The workflow now looks like this:
Notice the new edge from the main_step of my_workflow/1 to the tool another_tool/1/1. Or else, this step is using the tool another_tool/1/1. Save the workflow, download it and run it with:
export OBC_TOOL_PATH=my/favorite/path
bash bash.sh --input__threshold__my_workflow__1=4.5
The output is:
OBC: Workflow name: my_workflow
OBC: Workflow edit: 1
OBC: Workflow report: None
OBC: INSTALLING TOOL: my_tool/1/1
installing tool my_tool
OBC: INSTALLATION OF TOOL: my_tool/1/1 . COMPLETED
OBC: VALIDATING THE INSTALLATION OF THE TOOL: my_tool/1/1
OBC: VALIDATION FOR TOOL: my_tool/1/1 SUCCEEDED
OBC: SET my_tool__1__1__var_1="hello world"   <-- my first variable
OBC: INSTALLING TOOL: another_tool/1/1
Installing another_tool
The value of tool var_1 from my_tool/1/1 is:
hello world
The installation path is: my/favorite/path/another_tool
OBC: INSTALLATION OF TOOL: another_tool/1/1 . COMPLETED
OBC: VALIDATING THE INSTALLATION OF THE TOOL: another_tool/1/1
validating another_tool
OBC: VALIDATION FOR TOOL: another_tool/1/1 SUCCEEDED
OBC: SET another_tool__1__1__var_2="hello from another tool"   <-- my second var
OBC: SET another_tool__1__1__INSTALLATION_PATH="my/favorite/path/another_tool"   <-- installation path
OBC: CALLING STEP: step__main_step__my_workflow__1    CALLER: main
Hello from my_workflow
Input Threshold is: 4.5
OBC: CALLING STEP: step__new_step__my_workflow__1    CALLER: main_step__my_workflow__1
Hello from new_step
OBC: CALLING STEP: step__main_step__another_workflow__1    CALLER: new_step__my_workflow__1
hello from another_workflow
The value of INSTALLATION_PATH variable of another_tool/1/1 is:
my/favorite/path/another_tool
OBC: Output Variables:
OBC: output__result__my_workflow__1 = 120
Notice the output:
The value of INSTALLATION_PATH variable of another_tool/1/1 is:
my/favorite/path/another_tool
This is printed from the main_step of my_workflow/1. You might wonder why it is printed under the line hello from another_workflow. Remember that the lines:
echo "The value of INSTALLATION_PATH variable of another_tool/1/1 is:"
echo ${another_tool__1__1__INSTALLATION_PATH}
are after the line:
step__new_step__my_workflow__1
so OpenBio.eu first calls new_step from my_workflow/1 and then prints the value of the INSTALLATION_PATH variable.
Also open the workflow constant_threshold/1. You will notice that the graph has changed!
Both another_tool/1/1 and my_tool/1/1 have been entered in the graph. But if we didn't edit constant_threshold/1, how the graph was chaged? Workflow constant_threshold/1 contains workflow my_workflow/1 and we changed my_workflow/1 by adding these two tools. Hence, constant_threshold/1 also has changed. Remember that only draft workflows and tools/data can be changed. So if your pipeline contains only finalized entities, it is guaranteed that it will not change in the future.
The ${OBC_WORK_PATH} variable
Similar to variables OBC_TOOL_PATH and OBC_DATA_PATH, you can use the OBC_WORK_PATH. OpenBio.eu expects that this Bash variable has been set externally in you environment. You are encouraged to use this variable to refer on the path that is used during the analysis. For example to store you temporary data or your final results.
Finalizing a workflow
If you try to finalize the constant_threshold/1 workflow you will receive an error: This workflow cannot be finalized. It contains 2 draft workflow(s). For example: another_workflow/1. A finalized workflow cannot be changed, so it cannot contain a draft workflow or a draft tool/data. So first finalize the draft components of a workflow and then finalize the workflow. To finalize a workflow click the "FINALIZE" button on the top of the page.
Disconnecting a Tool/Data or a Workflow
You might have noticed that workflows in OpenBio.eu are dynamically edited. Multiple users can take part on editing different parts of a workflow. For example let's say that you are creating a workflow. In this workflow you have imported a Tools/Data or Workflows created by other users and these imported elements are in draft stage. Every change that happens on these imported elements are automatically applied on your workflow. Importing draft elements from other users means that changes on these elements are also affecting your workflow. Sometimes this behaviour is desired but sometimes it isn't. For example when you are co-editing workflows with a peer of users that you trust, this behaviour is desired. On the other hand you might have created a workflow with elements from other users, you have tested this workflow and you are happy with how it behaves. Yet, you cannot use this workflow for reproducible science since the elements of this workflow can change anytime from other users, thus its behaviour might change in the future. On that case you can edit your workflow and disconnect an imported Tool/Data or Workflow. By disconnecting a Tool/Data or a Workflow, you are simply stating that you do not desire any changes that happen on these elements to affect your workflow any more. A disconnected Tool/Data or Workflow is a persistent and immutable object and exists only in your workflow. No other user can change them. To perform this action right click a Tool/Data or Workflow from a workflow graph and from the menu that appears choose "Disconnect". A modal appears that asks you if you are sure since you cannot undo this action. If you press "Yes", then the disconnected elements (Tool/Data or Workflows) are turned blue. If you disconnect a Workflow, then all other Workflows, Tool/Data that belong to this workflow are also disconnected. If you disconnect a Tool/Data all other Tool/Data that are dependencies of this Tool/Data are also disconnected.
For example here:
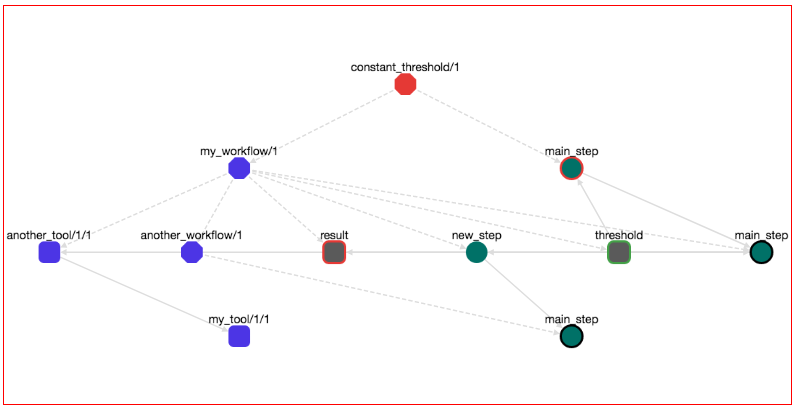
We have disconnected the workflow my_workflow/1 from the workflow constant_threshold/1. All Tool/Data and Workflow elements that belong to my_workflow/1 have turned to blue.
Worfklow graph, node semantics
Here we list the different types of nodes on the workflow graph: * Red Octagon: a fraft Workflow * Blue Octagon: a disconnected Workflow * Grey Octagon: A finalized workflow * Green Circle: Step * Green Circle with RED Border: A main step * Green Circle with BLACK Border: A step that it is main in a sub-workflow * Red Round Rectangle: A draft tool * Blue Round Rectangle: A disconnected tool * Grey Round Rectangle: A finalized tool * Grey Round Rectangle with green border: A workflow input * Grey Round Rectangle with red border: A workflow output
Parallel execution
The PARALLEL command is included in every generated script. With this command you can run steps in parallel. There are two ways to use this command.
Running multiple steps in parallel
So far all the executions that we have describe, run in a sequential order. When a step calls another step, this happens sequentially. For example, assume that there are four steps in a workflow: S1, S2, S3, S4. Each one of these performs a simple echo command for example: echo "S1" for S1 and on:
Let's call these steps in order:
step__S1__parallel_test__1
step__S2__parallel_test__1
step__S3__parallel_test__1
step__S4__parallel_test__1
The pipeline looks like this:

If we save, download and execute this pipeline the output will be:
OBC: CALLING STEP: step__main_step__parallel_test__1    CALLER: main
OBC: CALLING STEP: step__S1__parallel_test__1    CALLER: step__main_step__parallel_test__1
S1
OBC: CALLING STEP: step__S2__parallel_test__1    CALLER: step__main_step__parallel_test__1
S2
OBC: CALLING STEP: step__S3__parallel_test__1    CALLER: step__main_step__parallel_test__1
S3
OBC: CALLING STEP: step__S4__parallel_test__1    CALLER: step__main_step__parallel_test__1
S4
The execution workflow can be written as:
   S1
   |
   S2
   |
   S3
   |
   S4
But what if we want to run steps 2 and 3 in parallel? To do that, we can use the PARALLEL command. The syntax is:
PARALLEL STEP_NAME_1 STEP_NAME_2 ...
The PARALLEL commands takes as input the names of an arbitrary number of steps and runs them in parallel. For example let's change the BASH commands of the step: main_step:
step__S1__parallel_test__1
PARALLEL step__S2__parallel_test__1 step__S3__parallel_test__1
step__S4__parallel_test__1
Now the order of execution will be: first step__S2__parallel_test__1 runs, then the steps step__S2__parallel_test__1 and step__S3__parallel_test__1 run in parallel. After both these steps finish, the step step__S4__parallel_test__1 starts to run. To validate this, save, download and run this workflow multiple times. In some runs you will notice that the output is:
OBC: CALLING STEP: step__main_step__parallel_test__1    CALLER: main
OBC: CALLING STEP: step__S1__parallel_test__1    CALLER: step__main_step__parallel_test__1
S1
OBC: CALLING STEP: step__S3__parallel_test__1    CALLER: step__main_step__parallel_test__1
S3
OBC: CALLING STEP: step__S2__parallel_test__1    CALLER: step__main_step__parallel_test__1
S2
OBC: CALLING STEP: step__S4__parallel_test__1    CALLER: step__main_step__parallel_test__1
S4
Notice here that the "S3" is printed before the "S2". The execution workflow now is:
   S1
  /  \
S2    S3
  \  /
   S4
Running the same step in parallel with different variables.
Let's assume that that we want to run a step multiple times in parallel and for each run we want the step to have a different set of parameters. For this purpose, the PARALLEL command can be used with the following syntax:
VARIABLE_WITH_PARAMETERS="
VAR_1,VAR_2,VAR_3,...
VALUE_11,VALUE_12,VALUE_13,...
VALUE_21,VALUE_22,VALUE_23,...
VALUE_31,VALUE_32,VALUE_33,...
VALUE_41,VALUE_42,VALUE_43,...
VALUE_51,VALUE_52,VALUE_53,...
...
"

PARALLEL step_name "${VARIABLE_WITH_PARAMETERS}"
IMPORTANT: The double quotes (") in "${VARIABLE_WITH_PARAMETERS}" are necessary for this syntax to work
This command will run the step step_name as many times as the lines in the CSV data that is defined in the VARIABLE_WITH_PARAMETERS variable. The CSV data should be comma separated and the data should have a header. The first run will have the parameters:
VAR_1=VALUE_11
VAR_2=VALUE_12
VAR_3=VALUE_13
the second run will have the parameters:
VAR_1=VALUE_21
VAR_2=VALUE_22
VAR_3=VALUE_23
the third run:
VAR_1=VALUE_31
VAR_2=VALUE_32
VAR_3=VALUE_33
and so on..
For example let's create the following workflow:
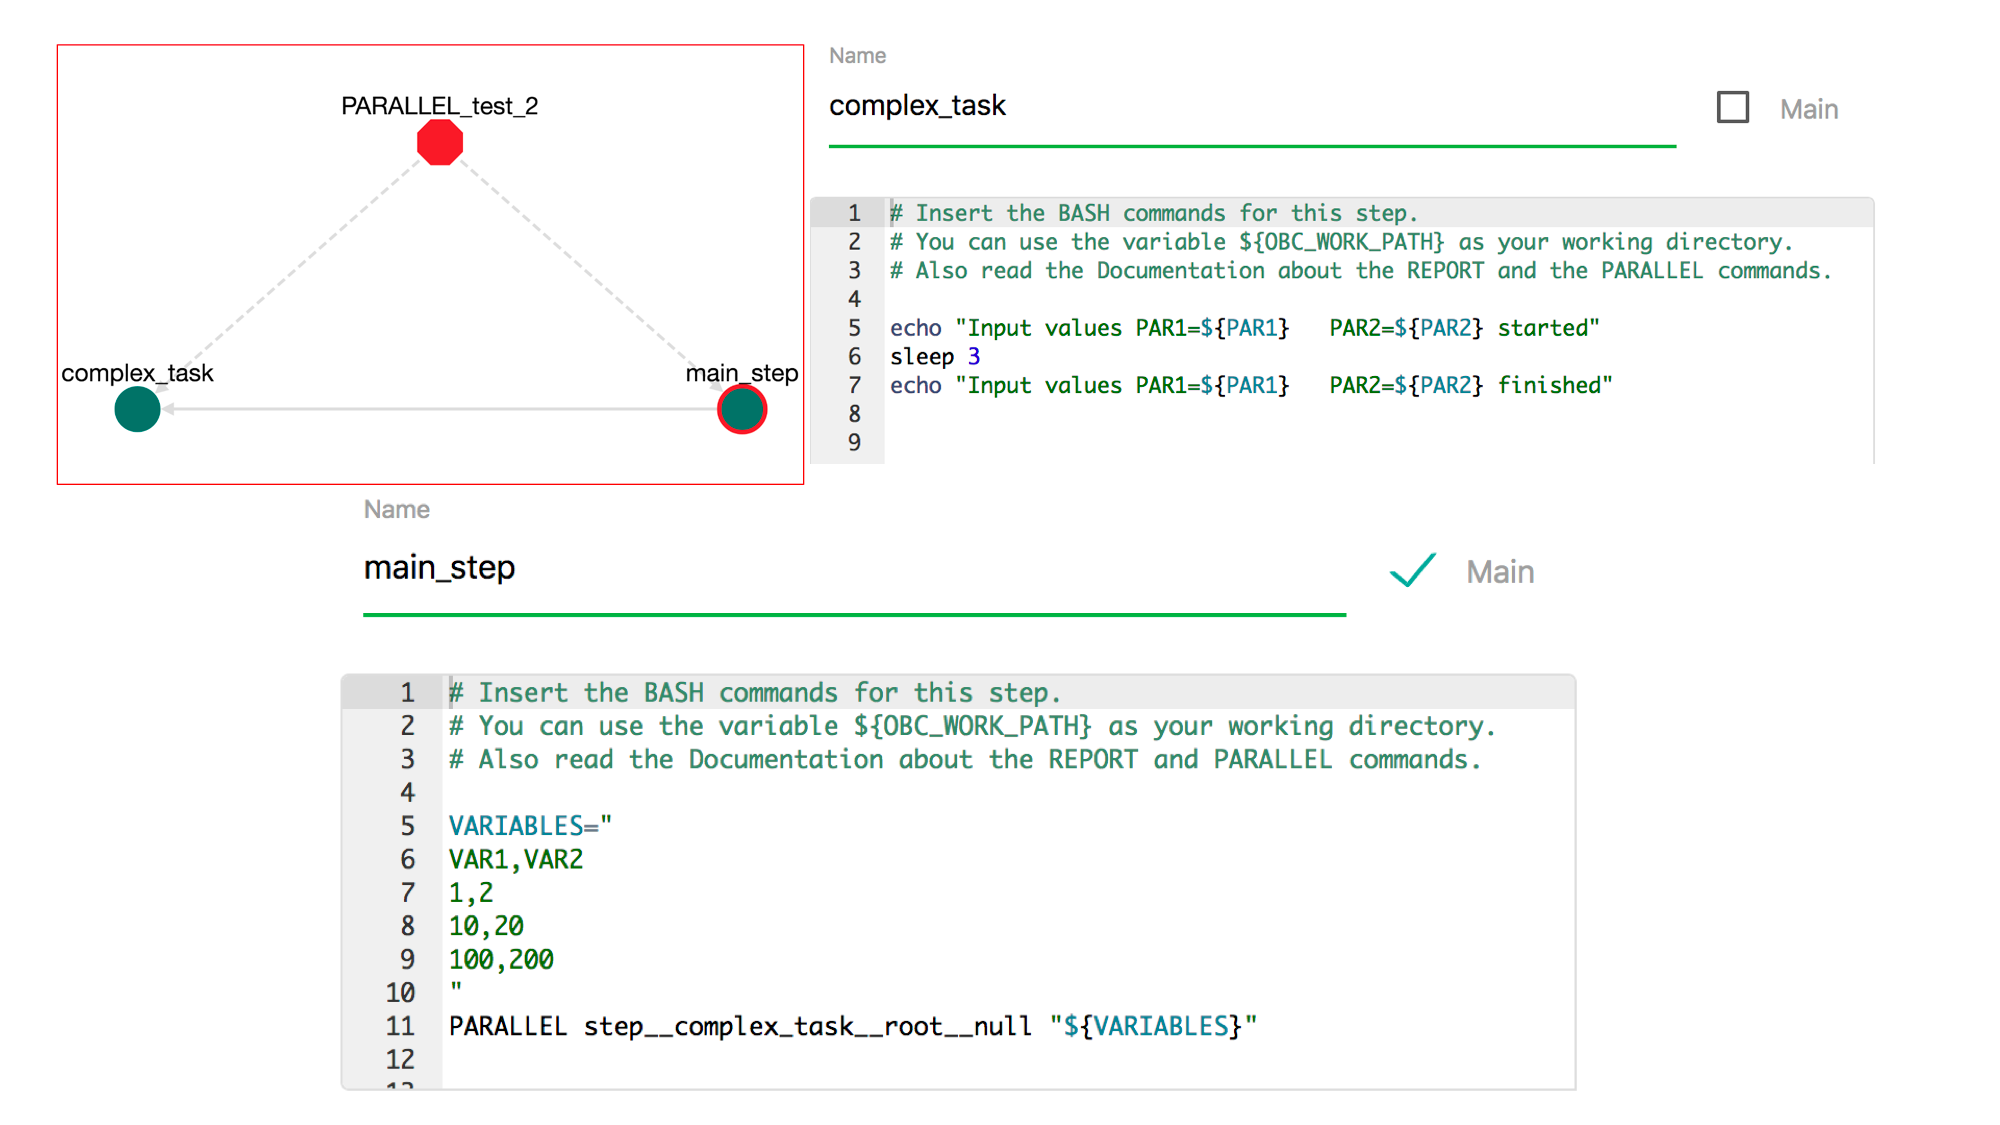
This pipeline contains a step called complex_task that contains the commands:
echo "Input values PAR1=${PAR1}   PAR2=${PAR2} started"
sleep 3
echo "Input values PAR1=${PAR1}   PAR2=${PAR2} finished"
and the main_step contains the commands:
VARIABLES="
PAR1,PAR2
1,2
10,20
100,200
"
PARALLEL step__complex_task__PARALLEL_test_2__1 "${VARIABLES}"
If we save, download and execute the workflow, the output will be:
OBC: CALLING STEP: step__main_step__PARALLEL_test_2__1    CALLER: main
OBC: CALLING STEP: step__complex_task__PARALLEL_test_2__1    CALLER: step__main_step__PARALLEL_test_2__1
Input values PAR1=1   PAR2=2 started
OBC: CALLING STEP: step__complex_task__PARALLEL_test_2__1    CALLER: step__main_step__PARALLEL_test_2__1
Input values PAR1=10   PAR2=20 started
OBC: CALLING STEP: step__complex_task__PARALLEL_test_2__1    CALLER: step__main_step__PARALLEL_test_2__1
Input values PAR1=100   PAR2=200 started
Input values PAR1=1   PAR2=2 finished
Input values PAR1=10   PAR2=20 finished
Input values PAR1=100   PAR2=200 finished
As you notice the step complex_task run 3 times in parallel, each with different set of parameters.
Run PARALLEL steps with ranges.
You can also define ranges of variables:
VARIABLES="
PAR1,PAR2
5:6,10:12
"

PARALLEL step__complex_task__PARALLEL_test_2__1 "${VARIABLES}"
The step step__complex_task__PARALLEL_test_2__1 will run for the cartesian product of the ranges that are defined in the variable. For this particular example the step step__complex_task__PARALLEL_test_2__1 will run 6 times in parallel for the following values:
PAR1,PAR2
5,10
5,11
5,12
6,10
6,11
6,12
Ranges can be mixed with simple keywords for example:
VARIABLES="
PAR1,PAR2
10:15,test
"
This defines a parallel set of 6 steps where PAR1 takes values from 10 to 15 and PAR2 takes the value test in all steps.
The LIMITS command
With the LIMITS command you can assign certain computatonal limts in a tool execution. The format of the command is:
LIMITS " <LIMITS> " ${tool_variable} PAR1 PAR2 ...
For example suppose that Tool_A has the variable Tool_A_executable and we want to run it under the requirement of 2 CPUs and 3Gi of memory. Then we could write:
LIMITS " cpu 2 memory 3Gi " ${tool_A_executable} PAR1 PAR2 ...
This declaration will add the apropriate annotation in the decomposed JSON DAG. The format of the "<LIMITS>" string has been taken from kubernetes' relative documentation.
Some limitations of.. LIMITS:
* LIMITS and PARALLEL cannot be combined in a single command.
* LIMITS will not work in bash execution.
* According to Argo standard, if the mem limit has been defined, the cpu limit has to be defined as well.
The LIMITS variable
If we want to run all commands of a step under some computational limits we can use the LIMITS variable. The format isQ
LIMITS=" cpu XXX memory YYY "
The format of the string defined in the LIMITS variable is the same as the LIMITS command (see above). For example:
LIMITS=" cpu 2  memory 10G "

echo "hello"
echo "world"
These commands will run in an instance that has 2 CPUs and 10GB of memory. A LIMITS variable defines the computational resources of this step and only this step. It does not define the resources of the steps called from this step. Moreover if the step is decomposed a LIMITS variable has to be defined explcitly in every decomposed steps. For example:
LIMITS=" cpu 1 memory 10G "
echo "hello"

${tool_A_executable} PAR1 PAR2

echo "world"
Since this step is decomposed and the command calling the tool (${tool_A_executable} PAR1 PAR2) belongs to an isolated step, the limits declaration does not affect it. Neither it affects the command below this (echo "world"). An other example is:
LIMITS=" cpu 1 memory 10G "

echo "hello"

LIMITS "cpu 2 memory 20G" ${tool_A_executable} PAR1 PAR2

LIMITS=" cpu 3 memory 30G "

echo "world"
In this example:
* The echo "hello" will run with in a cpu 1, mem 10G environment
* The ${tool_A_executable} PAR1 PAR2 will run in a cpu 2, mem 20G envionment
* The echo "world" will run in a cpu 3. mem 30G environment.
Attention: Setting multiple times the LIMITS variable works only in decomposed steps. If multiple LIMITS declarations are set in a non-decomposable step, then only the first will be evaluation. For example:
LIMITS=" cpu 1 memory 10G "

echo "hello"

LIMITS=" cpu 3 memory 30G "

echo "world"
Since this step is not decomposed (does not call any tool or any other step), all commands will run in the same instance. In this instance only the first LIMITS declarion will be used (cpu 1 memory 10G).
The REPORT command
During the execution of the workflow an html file that contains logs and results is generated. The path of this file is ${OBC_WORK_PATH}/<NICE_ID>.html and is printed at the end of the execution. The REPORT is another reserved word (aside from PARALLEL) with which you can add data in this file. You can use this command at any place in your BASH scripts. The syntax of the REPORT command is:
REPORT <LABEL> <TEXT or FILENAME>
For example:
PROGRESS=0.75

REPORT CURRENT_PROGRESS ${PROGRESS}
This will add the following entry in the report:
<timestamp> <name_of_step> CURRENT_PROGRESS=0.75
Another example is:
FILENAME=${OBC_WORK_PATH}/current_results.png
REPORT CURRENT_GRAPH ${FILENAME}
This will add the following entry in the report:
<timestamp> <name_of_step> CURRENT_PROGRESS:
<the image that is contained in ${OBC_WORK_PATH}/current_results.png>
Public / Private Research Objects
Tools/Data and Workflows can be either public or private. You can set this "visibility" option through the user interface upon creating or editing a Tool/Data or Workflow (ROs = Research Objects). The semantics of this private / public setting are: * Public ROs are visible to all users including anonymous users. * Private ROs are visible only to the users that created them. * A public Tool/Data cannot have a Private tool as a dependency. * A private Tool/Data cannot be a dependency to a public Tool/Data. * A private Tool/Data cannot take part in a public Workflow. * A private Workflow cannot take part in a public Workflow. * You can change the visibility status from public to private and vice versa as long as you are not violating the above restrictions. * Comments in private ROs are not accessible to users others than the creators of these ROs.
Downloading a Workflow
We have already seen that on every Tool/Data and on every Workflow there is a "DOWNLOAD" button. We have already used the BASH option in order to download a Tool/Data/Workflow as a standalone bash script. Here we will explore all the other options.
Download a Workflow in CWL format.
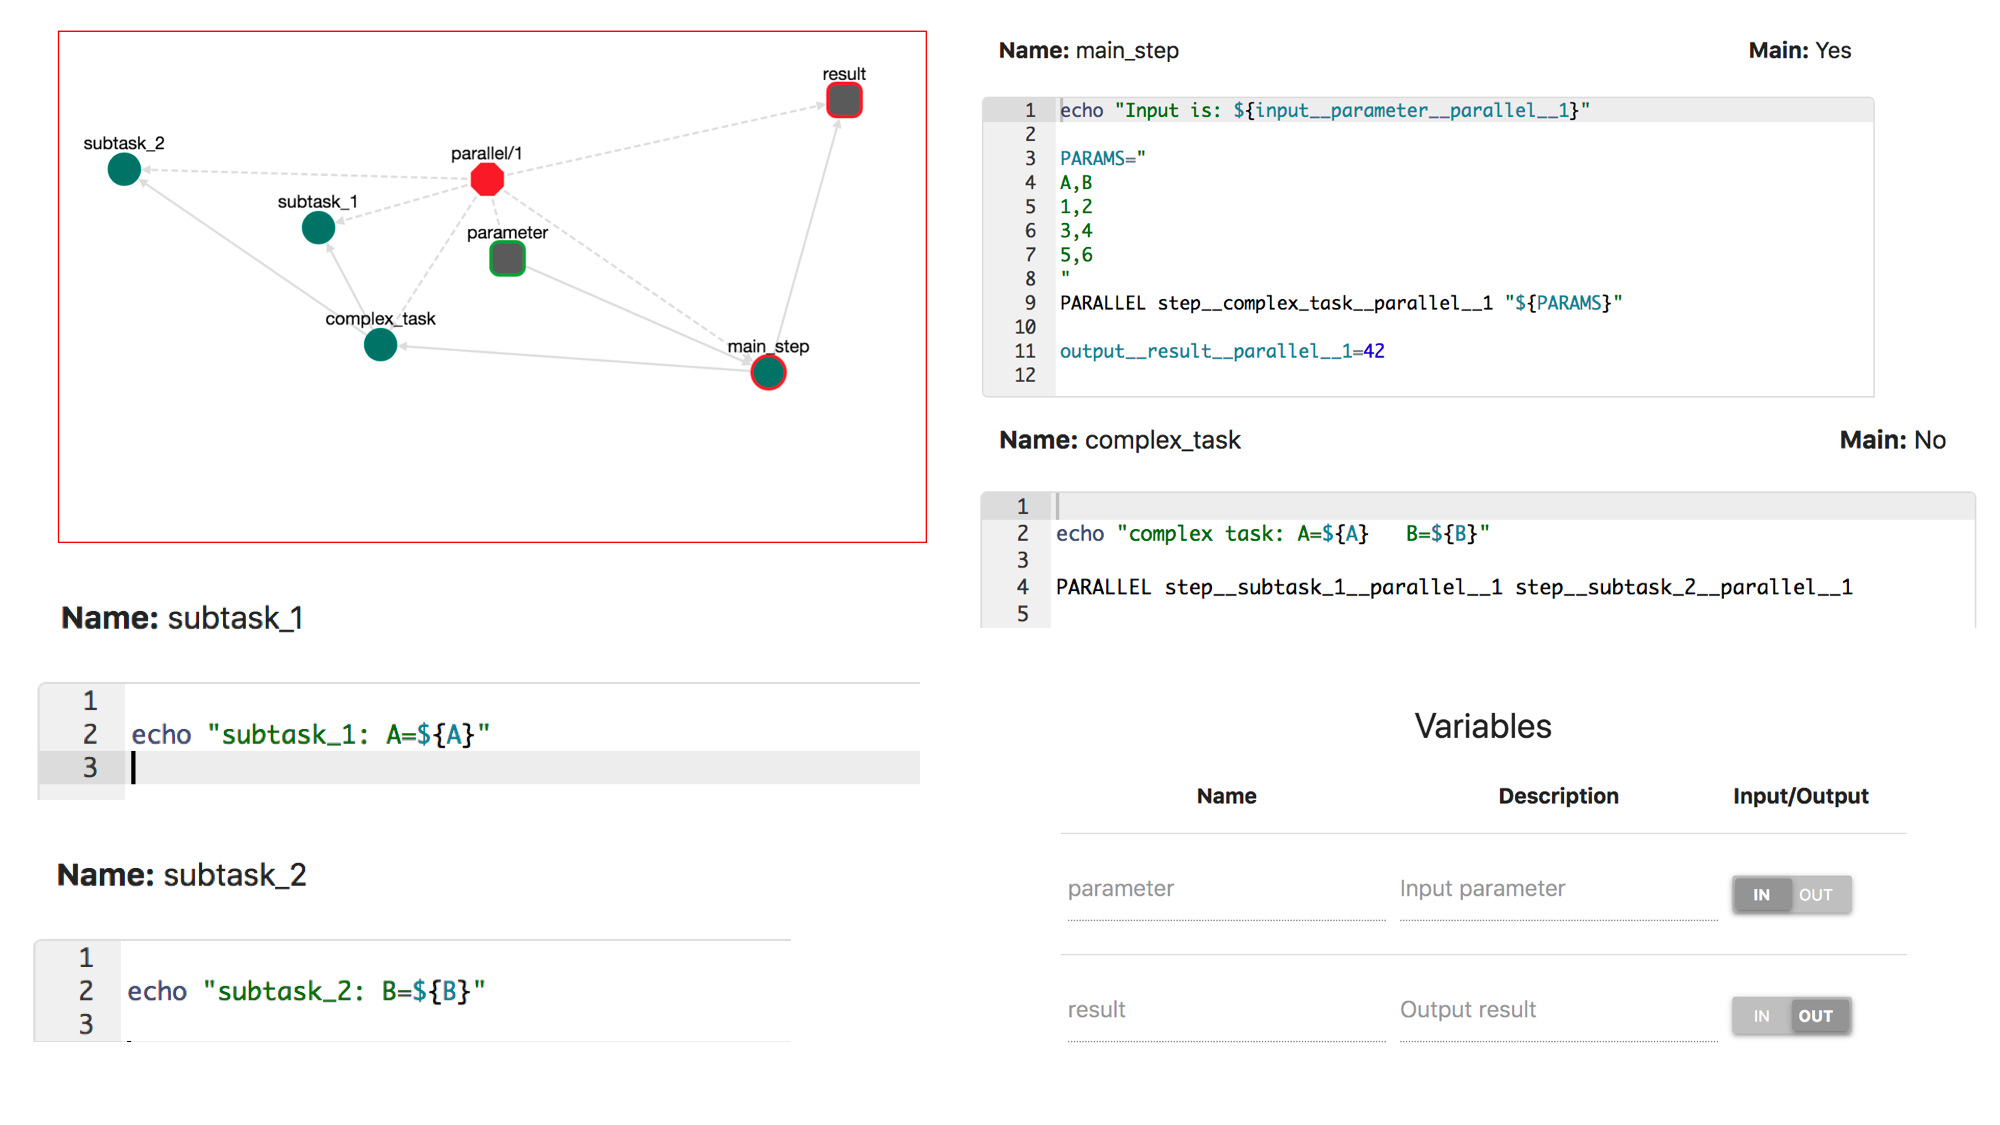
CWL (Common Workflow Language) is one of the most known formats for workflow description. OpenBio exports workflows in CWL. To examine this ability, first let's create a workflow named parallel/1 that has an input named parameter and an output named result. The workflow will have the following steps:
step: main_step:
echo "Input is: ${input__parameter__parallel__1}"

PARAMS="
A,B
1,2
3,4
5,6
"

PARALLEL step__complex_task__parallel__1 "${PARAMS}"

output__result__parallel__1=42
step: complex_task:
echo "complex task: A=${A}   B=${B}"

PARALLEL step__subtask_1__parallel__1 step__subtask_2__parallel__1
step: subtask_1:
echo "subtask_1: A=${A}"
step: subtask_2
echo "subtask_2: B=${B}"
Notice that this workflow uses both different types of PARALLEL syntax presented before. The workflow should look like this:
Now we can download the workflow in CWL format either in zip or in .tar.gz compression. If we download and decompress the workflow we will notice that it contains a lot of files. The inputs.yml is a file in YAML format and contains the input parameters of the workflow. The contents are:
# OBC_TOOL_PATH: "" # Please set this environment variable
# OBC_DATA_PATH: "" # Please set this environment variable
# OBC_WORK_PATH: "" # Please set this environment variable

# Please set this input parameter!
# input__parameter__parallel__1: "" # Input parameter
The OBC_TOOL_PATH, OBC_DATA_PATH, OBC_WORK_PATH are the environment variables that have been presented before. The input__parameter__parallel__1 is the input parameter with the name parameter of the workflow. Set the OBC_* variables with the desired path in your system and the input__parameter__parallel__1 with a random constant. An example could be:
OBC_WORK_PATH: "/myfavorite_path/WORK"
OBC_DATA_PATH: "/myfavorite_path/DATA"
OBC_TOOL_PATH: "/myfavorite_path/TOOL"

# Please set this input parameter!
input__parameter__parallel__1: "hello" # Input parameter
Notice that the paths in the OBC_* variables should exist! You can execute this workflow with any environment that supports CWL files. For example we can install cwltool and run the command:
cwl-runner workflow.cwl inputs.yml
After a long output you will see the result:
INFO [workflow ] completed success
{
    "output__result__parallel__1": "42"
}
INFO Final process status is success
(
At this points you might be wondering why there are so many steps in this workflow. To examine this we can visualize the execution flow graph of the workflow. Run the following command:
cwl-runner --print-dot workflow.cwl inputs.yml
This will generate the execution flow of the workflow in dot format
digraph {compound=true
"workflow.cwl#step__subtask_2__parallel__1__1" [label="step__subtask_2__parallel__1__1"]
"workflow.cwl#step__complex_task__parallel__1__4" [label="step__complex_task__parallel__1__4"]
"workflow.cwl#step__complex_task__parallel__1__5" [label="step__complex_task__parallel__1__5"]
"workflow.cwl#step__complex_task__parallel__1__2" [label="step__complex_task__parallel__1__2"]
"workflow.cwl#step__main_step__parallel__1__2" [label="step__main_step__parallel__1__2"]
"workflow.cwl#step__subtask_1__parallel__1__2" [label="step__subtask_1__parallel__1__2"]
"workflow.cwl#step__subtask_2__parallel__1__2" [label="step__subtask_2__parallel__1__2"]
"workflow.cwl#OBC_CWL_FINAL" [label="OBC_CWL_FINAL"]
"workflow.cwl#step__complex_task__parallel__1__1" [label="step__complex_task__parallel__1__1"]
"workflow.cwl#step__complex_task__parallel__1__3" [label="step__complex_task__parallel__1__3"]
"workflow.cwl#step__subtask_1__parallel__1__1" [label="step__subtask_1__parallel__1__1"]
"workflow.cwl#step__subtask_1__parallel__1__3" [label="step__subtask_1__parallel__1__3"]
"workflow.cwl#OBC_CWL_INIT" [label="OBC_CWL_INIT"]
"workflow.cwl#step__complex_task__parallel__1__6" [label="step__complex_task__parallel__1__6"]
"workflow.cwl#step__subtask_2__parallel__1__3" [label="step__subtask_2__parallel__1__3"]
"workflow.cwl#step__main_step__parallel__1__1" [label="step__main_step__parallel__1__1"]
"workflow.cwl#step__complex_task__parallel__1__1" -> "workflow.cwl#step__subtask_1__parallel__1__1" []
"workflow.cwl#step__subtask_1__parallel__1__2" -> "workflow.cwl#step__complex_task__parallel__1__4" []
"workflow.cwl#step__complex_task__parallel__1__6" -> "workflow.cwl#step__main_step__parallel__1__2" []
"workflow.cwl#OBC_CWL_INIT" -> "workflow.cwl#step__main_step__parallel__1__1" []
"workflow.cwl#step__complex_task__parallel__1__3" -> "workflow.cwl#step__subtask_1__parallel__1__2" []
"workflow.cwl#step__main_step__parallel__1__2" -> "workflow.cwl#OBC_CWL_FINAL" []
"workflow.cwl#step__subtask_1__parallel__1__3" -> "workflow.cwl#step__complex_task__parallel__1__6" []
"workflow.cwl#step__main_step__parallel__1__1" -> "workflow.cwl#step__complex_task__parallel__1__3" []
"workflow.cwl#step__complex_task__parallel__1__2" -> "workflow.cwl#step__main_step__parallel__1__2" []
"workflow.cwl#step__main_step__parallel__1__1" -> "workflow.cwl#step__complex_task__parallel__1__5" []
"workflow.cwl#step__complex_task__parallel__1__4" -> "workflow.cwl#step__main_step__parallel__1__2" []
"workflow.cwl#step__subtask_1__parallel__1__1" -> "workflow.cwl#step__complex_task__parallel__1__2" []
"workflow.cwl#step__main_step__parallel__1__1" -> "workflow.cwl#step__complex_task__parallel__1__1" []
"workflow.cwl#step__complex_task__parallel__1__3" -> "workflow.cwl#step__subtask_2__parallel__1__2" []
"workflow.cwl#step__subtask_2__parallel__1__1" -> "workflow.cwl#step__complex_task__parallel__1__2" []
"workflow.cwl#step__subtask_2__parallel__1__3" -> "workflow.cwl#step__complex_task__parallel__1__6" []
"workflow.cwl#step__complex_task__parallel__1__5" -> "workflow.cwl#step__subtask_1__parallel__1__3" []
"workflow.cwl#step__complex_task__parallel__1__5" -> "workflow.cwl#step__subtask_2__parallel__1__3" []
"workflow.cwl#step__complex_task__parallel__1__1" -> "workflow.cwl#step__subtask_2__parallel__1__1" []
"workflow.cwl#step__subtask_2__parallel__1__2" -> "workflow.cwl#step__complex_task__parallel__1__4" []
}
We can visualize the graph either by using the dot tool:
dot -Tpng graph.dot > graph.png
Or by simply copy-pasting the graph in the amazing GraphvizOnline tool. The graph is:
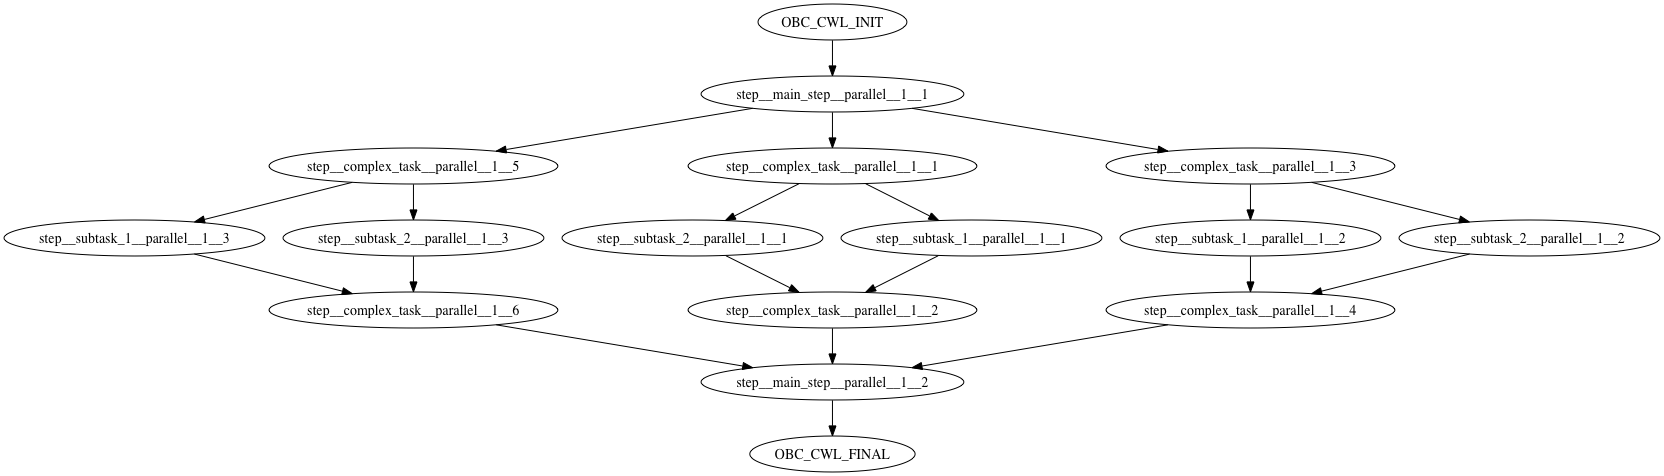
If you inspect the graph you will notice that every parallel execution has been split in a different step. The parallel steps then are merged in a single step. The workflow lies between a OBC_CWL_INIT step and a OBC_CWL_FINAL step. Basically, the OBC_CWL_INIT step sets the input parameters and the OBC_CWL_FINAL collects the output parameters. If you inspect the .cwl and .sh generated files you can get many insights regarding this split.
Downloading a workflow in Nextflow format.
By selecting to download a workflow in Nextflow format a file named: workflow.nf gets downloaded. You can run this with:
nextflow run workflow.nf
Executing a Workflow
You can execute a Workflow directly from OpenBio.eu. To do that you need to install the "OpenBio Execution Environment" (OEE) to a computer of your own. That means that the actual execution happens to the computer that you have installed the OEE. The "OpenBio Execution Environment" is comprised by tree components:
* A resource manager. This is a framework that monitors the resources (memory, CPU, hard disk, bandwidth) that are used by the OEE. We use netdata for this purpose.
* An execution manager. This is a framework that monitors the progress of the workflow. It provides a visual indication of which steps are currently running, it gives access to the logs and it allows you to pause/restart the workflow. Currently we are using airflow for this purpose, although we are planning to support multiple environments in the future (priorities are nextflow and galaxy).
* The "OpenBio client". This is a client that uses flask. This client acts as the mediator between the OpenBio.eu website and the rest of the components. When you click the "RUN" button in OpenBio.eu, the site communicates with this client, the client acquires the workflow and submits it to airflow. It also performs some secondary jobs like providing the resource manager and execution manager URLs to the server and deleting the workflows when requested.
Both three components are installed in separate virtualized containers through docker. This means: * The workflow that is executed does not have access to any file in your system. Even if malicious code is somehow injected in the workflow, it will not have access to files in your system and it will not be able to permanently make any changes. * The software installed is completely isolated with the rest of your system. The installation will not alter any of your existing libraries or software. * The workflow will use the resources of your computer, therefore its execution time depends on them.
Installation
The source of the OpenBio Execution Environment is here. To install it download the install script and run it with:
bash install.sh
The script attempts to also install docker and docker-compose in your system if they are not already installed. If docker and docker-compose are already installed and require sudo access you will have to run the script with:
sudo bash install.sh
After installation you will see a message like this:
 Successful installation


 Netdata url : http://52.58.167.29:19998/ff508b0b0283078ce6aea8d55e7e059c
**IMPORTANT**

    Copy this link below in OpenBioC Settings to confirm the connection:

http://52.58.167.29:5000/236f1e291a052b4f8c4ebd395e7e059c

    The executor already running on your system. If you like to kill the service simply run:
        $ docker-compose -f /home/root/obc_executor_main down
        or, if you like to make some changes on docker-compose.yml or on airflow.cfg file:
        $ cd /home/root/obc_executor_main
Next step is to insert the link that appears last (in this case: http://52.58.167.29:5000/236f1e291a052b4f8c4ebd395e7e059), in OpenBio.eu. To do that login in OpenBio.eu, and on the upper-right side of the page where it shows your username click on the dropdown and select Profile. On the bottom of the page there is a section called: Execution Environment:
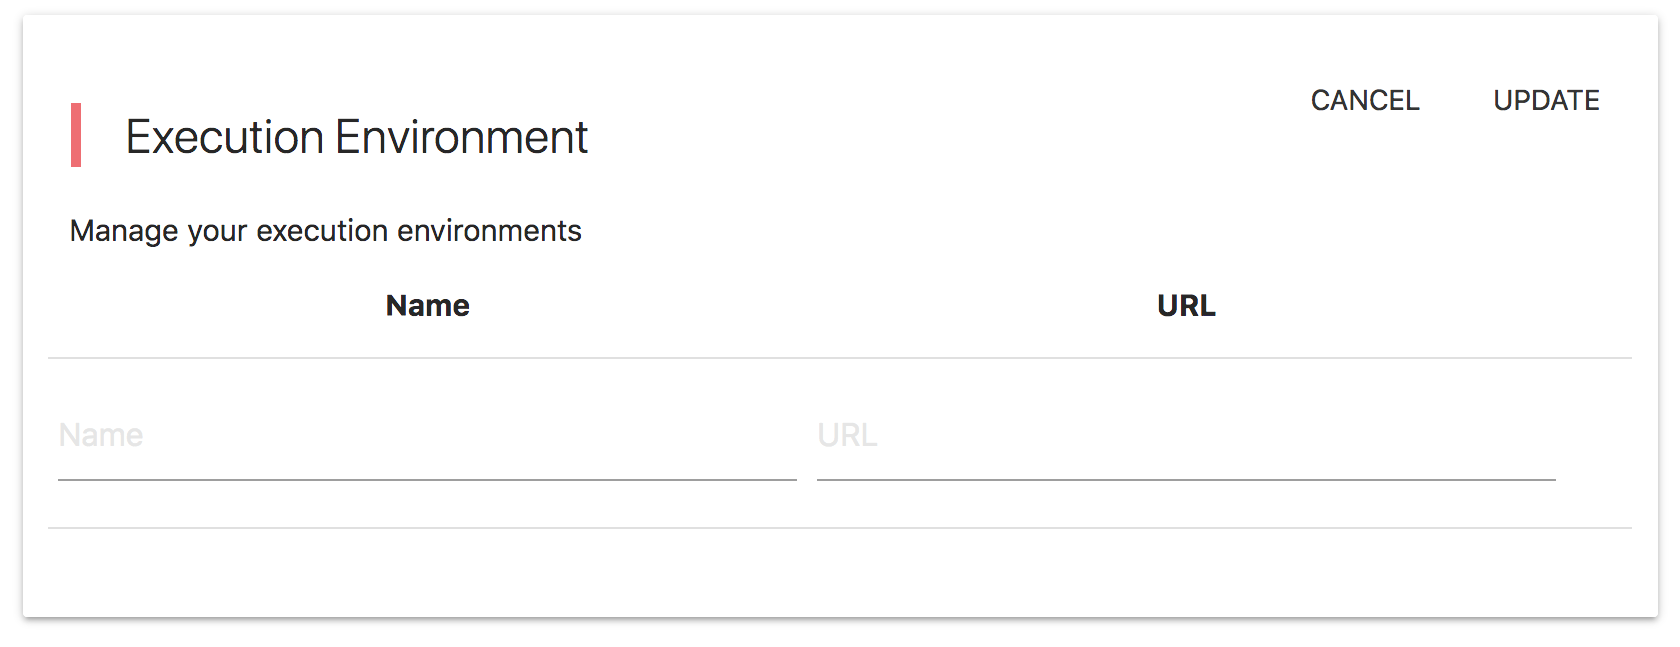
On this section you can insert this link and associate it with a name (i.e. my_cluster):
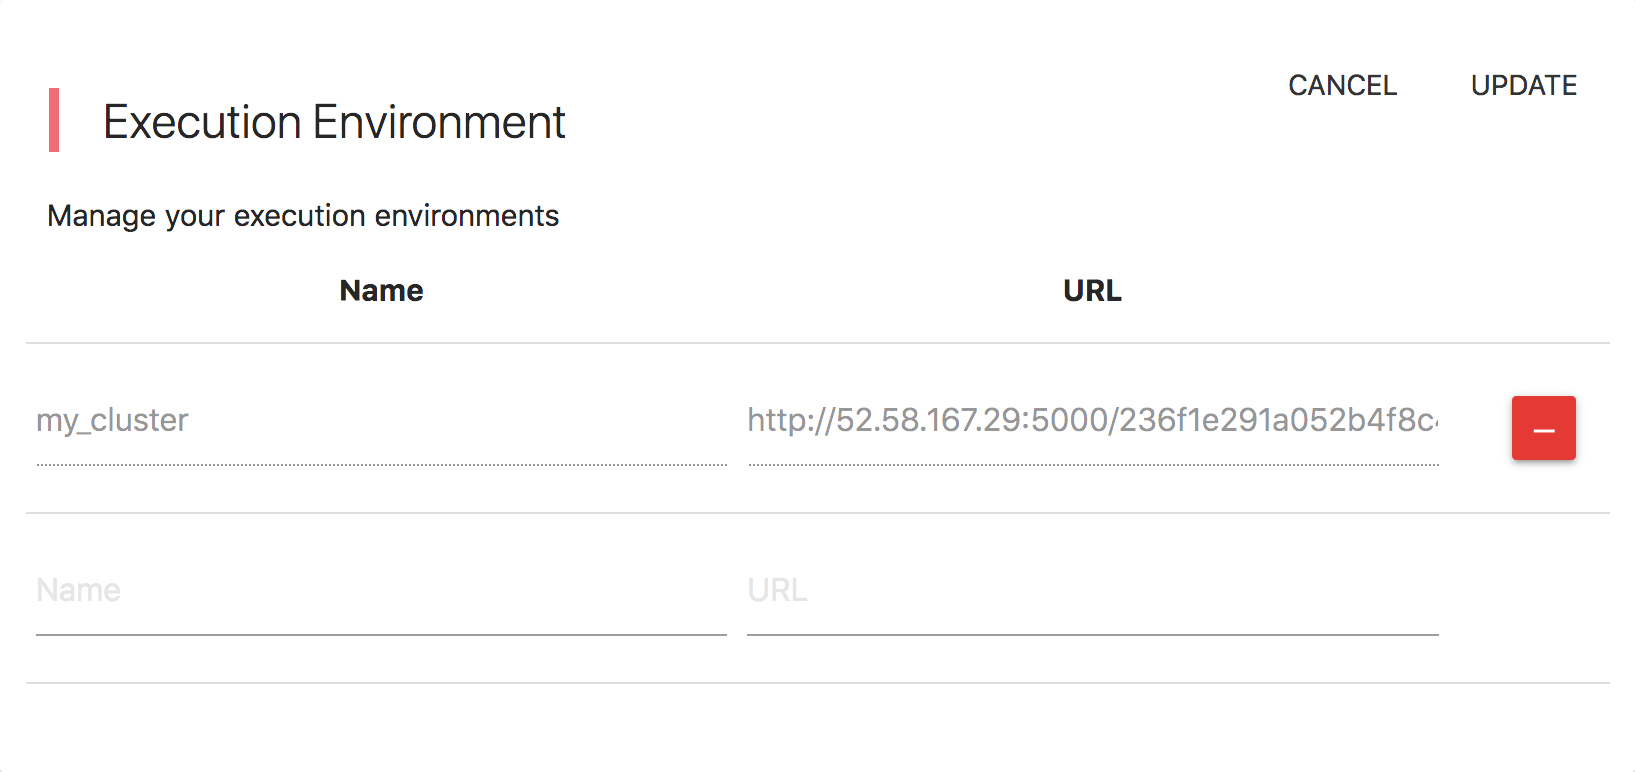
Important: Anyone with this link can submit workflows in this computer. Do not share this link. Different accounts in OpenBio can share the same link and submit workflows in the same Execution Environment.
Using the RUN button
After submitting at least one OEE in OpenBio, you can submit workflows directly for execution. For example we can submit the Workflow presented in the previous chapter (regarding CWL output). This workflow is accessible here: https://www.openbio.eu/platform/w/parallel/1. First notice that this workflow has an input parameter (called parameter). We can set a value to this input parameter (although this is not obligatory). To do that, right click on the parameter node in the graph and select Set. An input dialog appears, where you can set a value:
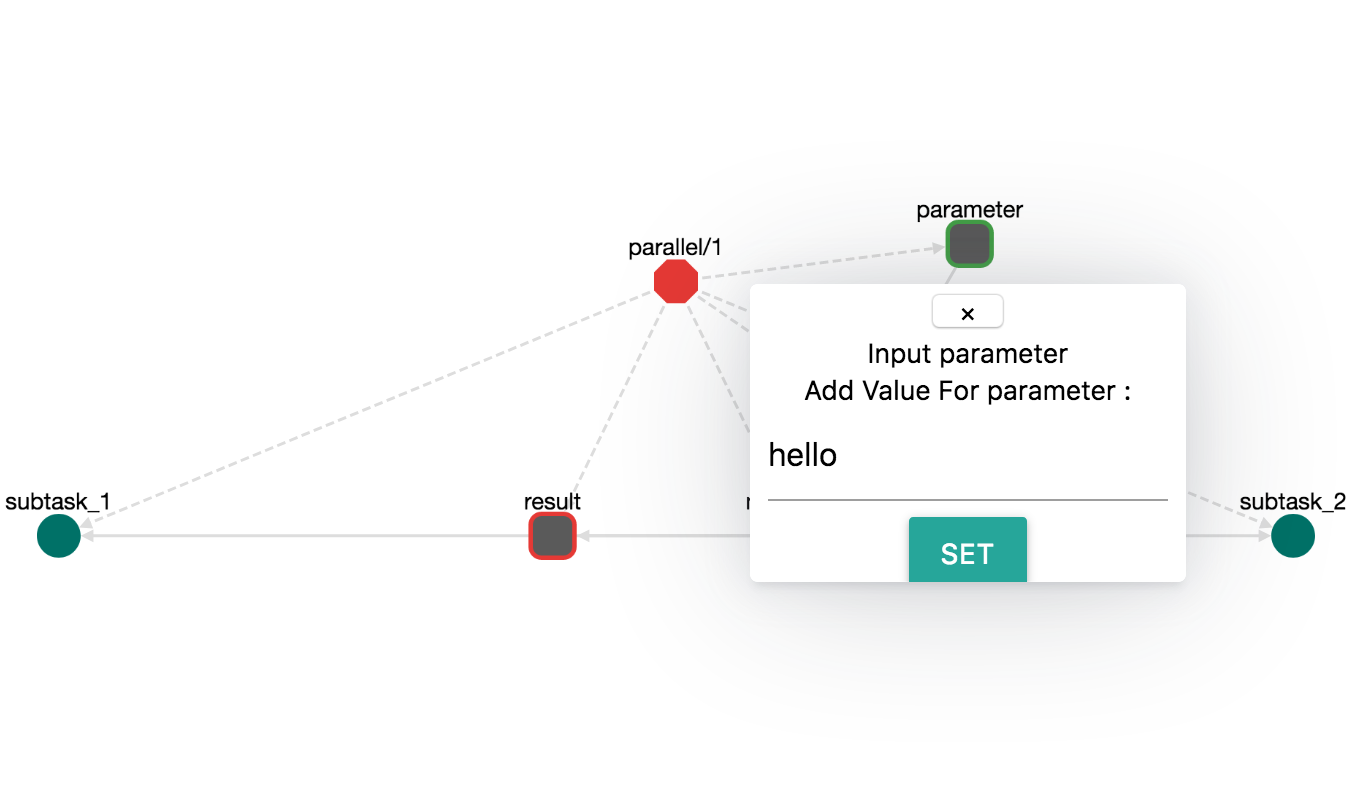
Now if we press the "RUN" button on the top, a dropdown appears with all OEEs that you have submitted. Select the one where you want this workflow to be submitted for execution. If everything goes well you will see two messages:
Please wait while the workflow is submitted for execution..
Workflow submitted for execution with a Report id: kge7p
The last message means that a new report has been generated. In OpenBio.eu a Report is an object that represents a Workflow that has been submitted for execution. Reports carry information regarding the execution status of the Workflow. A Report has an ID that contains 5 random letters, in this case kge7p. Only the creator of a Report has access to this Report. To access the details of this report you can enter this ID on the search input. On the Reports section on the left panel you can see that a new item has been generated:
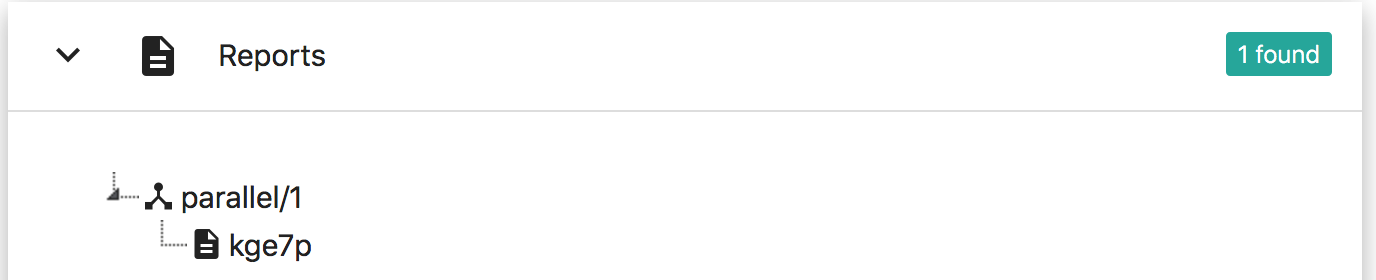
If you click it, you can access all information regarding this report:
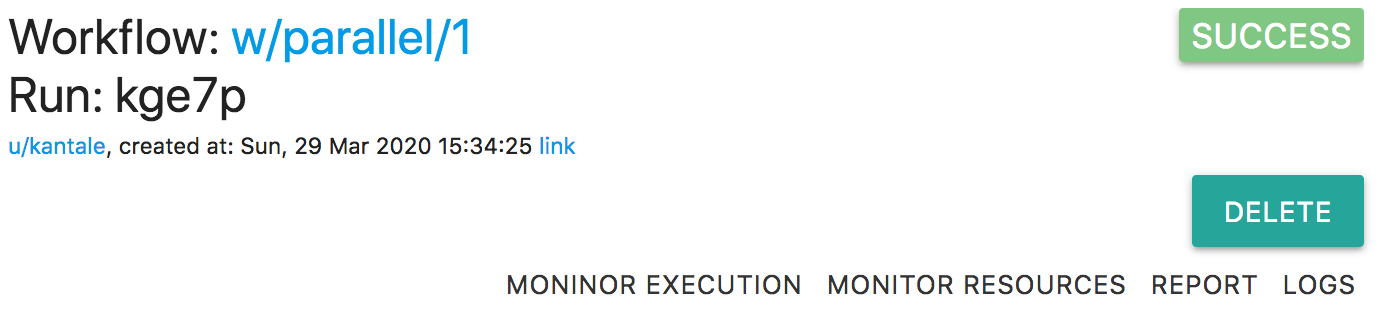
The MONITOR EXECUTION is a link to the execution manager (currently: airflow). For example the airflow DAG (Directed Acyclic Graph) representation of this Workflow is:

Notice how this graph is the same with the DOT graph generated from CWL.
The MONITOR RESOURCES is a link to the resource manager (currently: netdata). It might look like this:
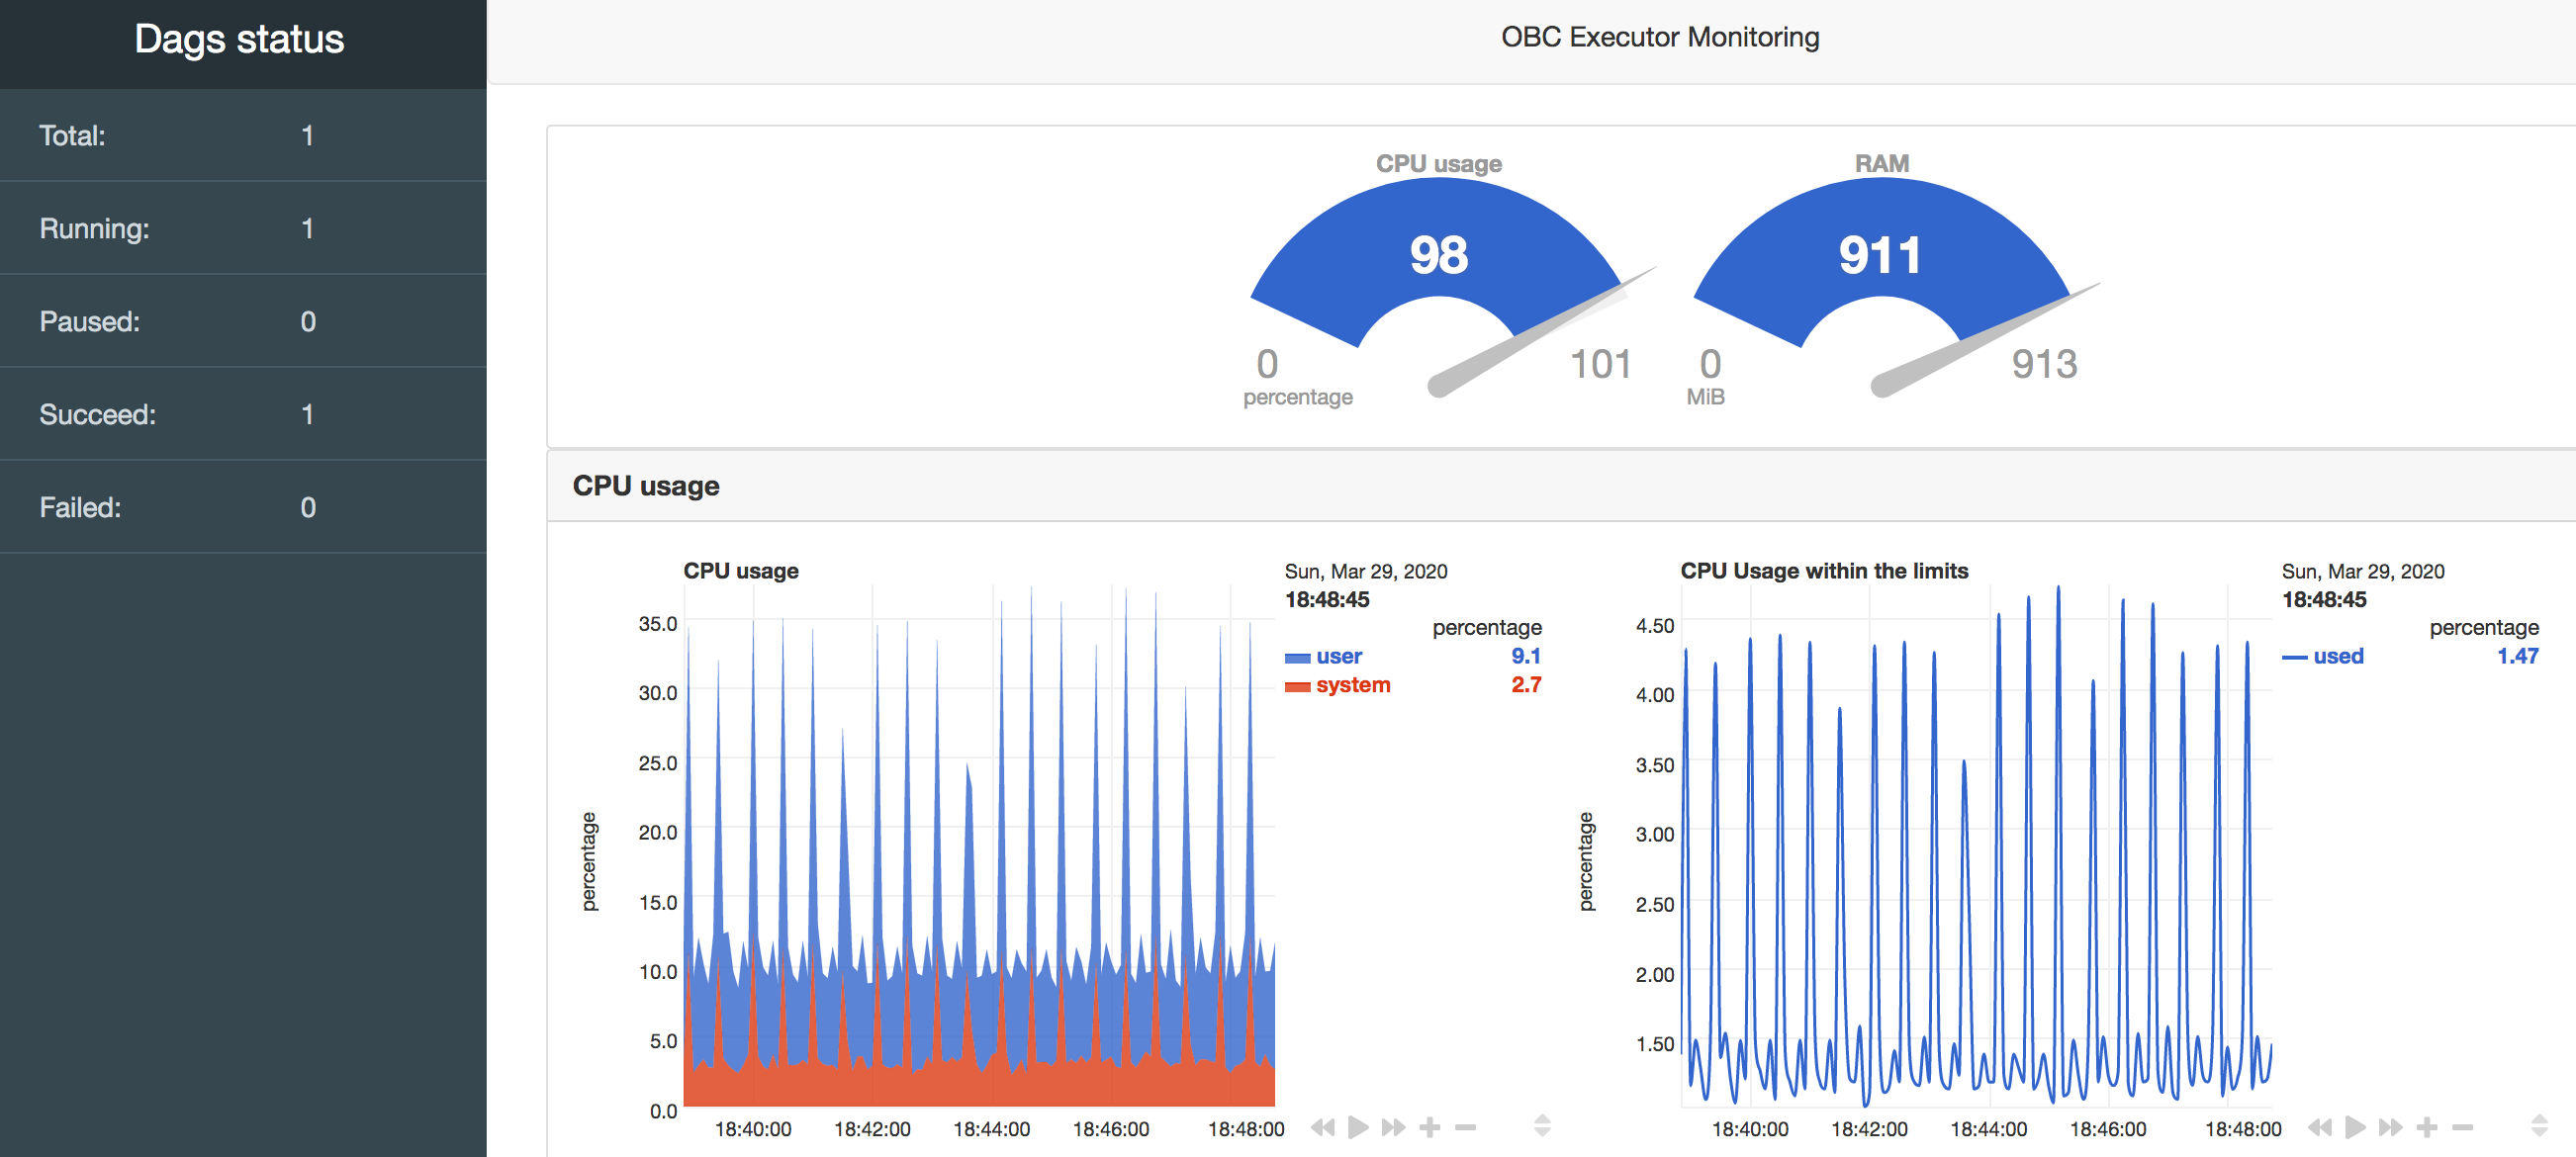
After execution you can have access to the generated logs and to the HTML report that the workflow creates by default. You can also delete a report.
Argo Workflows and the Knot integration
One of the Execution environments that OpenBio.eu supports is Knot. Knot is a frontend for cluster management through kubernetes which uses Argo as a workflow execution engine. In this setup, every step in a workflow should run in some docker container. So in order for an OpenBio.eu workflow to run in Knot, it has to "declare" the containers where each tool should be installed. Moreover it has to declare the containers where each command in the steps of a workflow should be executed. Notice that workflows in OpenBio.eu are "container agnostic", meaning that the user isn't declaring any container in any place. This means that there should be a heuristic that splits tools in containers in order to make Knot work with OpenBio.eu.
The general philosophy of this heuristic is that tools are grouped according to their dependency tree and each group is running in a different docker container. In this documentation (and also in the source code) we call these groups as "environments". Let's explore this. Suppose that we have the following tool dependencies:
Tool_A --> Tool_B
Tool_A --> Tool_C
Tool_D --> Tool_E
Here --> means "depends from". If we form the dependency tree of this set of tools we will notice that it contains two disjoint graphs:
Graph 1:
Tool_B --> Tool_A <-- Tool_C
Graph_2:
Tool_D --> Tool_E
This means that when running in Knot, the tools: Tool_A, Tool_B, Tool_C will run in a single container (let's call it environment_1) and the tools Tool_D, Tool_E in another (let's call it environment_2). This has happened to reduce the overhead of creating containers for each different tools. Some tools (i.e. simple scripts) are very small, and dedicating a complete container would clutter the execution environment.
Now suppose that we have a step in a workflow that invokes any of these tools. Knot needs to know in which container this tool exists. In order to do this, it checks each command in the bash script of the step for the name of the command that it invokes. If this command matches the name of a tool's variable, then it runs this command in the container where this tool has been installed. If this command does not match any tool's variable then this command runs in a "generic" container (currently Ubuntu:18.04) which is called environment_generic.
Let's see an example. Suppose that Tool_A has the variable Tool_A_executable and Tool_D has the variable Tool_D_executable. Also suppose that a step in a workflow has the following commands:
echo "hello 1"
${Tool_A_executable} --params_1
${Tool_D_executable} --params_2
echo "hello 2"
echo "hello 3"
${Tool_B_executable} --params_3
echo "hello 4"
echo "hello 5"
when this step is converted to a DAG, the DAG will be split in the following sub-steps:
sub_step_1will contain the 1st command (echo "hello 1") and it will run in theenvironment_genericcontainer.sub_step_2will contain the 2nd command (${Tool_A_executable} --params_1) and it will run in theenvironment_1container.sub_step_3will contain the 3nd command (${Tool_D_executable} --params_2) and it will run in theenvironment_2container.sub_step_4will contain the 4th and 5th commands (echo "hello 2" ; echo "hello 3") and it will run in theenvironment_genericcontainer.sub_step_5will contain the 6th command (${Tool_B_executable} --params_3) and it will run in theenvironment_1container.sub_step_6will contain the 7th and 8th commands (echo "hello 4" ; echo "hello 5") and it will run in theenvironment_genericcontainer.
Some notes on this approach
Notice that by implementing this heuristic, the container-agnostic status of OpenBio.eu is preserved. Users do not have to make dockerfiles, orchestrate containers, etc. Also the full power of the kubernetes / Argo orchestration can be used.
An important consideration is that in order to use/invoke a tool from a step, users have to explicitly use a variable of this tool as the first word of a command. For example suppose that tool_wget installs the tool wget with the apt-get install -y wget command. Also suppose that in a step of a workflow you have the following command wget http://www.example.com. These two command (apt-get and wget) will run in different containers! The first will run in environment_1 (assuming only 1 group of tool dependencies) and the second will run in environment_generic. This is because the first word of the latter command (wget) is not a variable of any tool.
To compensate for this you will have to declare a variable (see chapter Tool/Data Variables) in tool tool_wget that contains the path to the executable of wget inside the container. For example the name of this variable can be executable and the value can be /usr/bin/wget (the result of which wget). Now instead of wget http://example.example.com the command should be ${wget__1__1__executable} -O ${OBC_WORK_PATH}/myfile http://www.example.com. Now Knot knows in which container to run this command, judging from its first word. Notice also that you have to make sure that the files that are generated from this command are saved outside of the container in a directory in which this command is running. Otherwise the files will be lost once the command has finished running.
In general this approach requires a complete change of philosophy when writing workflows. You have to think of tools as completely isolated components that run on their own machine.
BASH script
The BASH script is a directly executable file. Assuming the BASH script filename is bash_7Lt2o.sh and you are in a BASH shell you can type:
bash script_7Lt2o.sh
JSON Graph
This method will download a file workflow.json that contains all the information required to execute the workflow in a local environment. In order to execute it, you need to convert this file into an executable BASH script. To do this, you need to download the file executor.py. This file requires python 3 and has no other dependencies. After you have downloaded this file, you can run the command:
python executor.py -W workflow.json
This will generate the file: script.sh that you can execute as described above. Both methods will print some information regarding the attempted execution:
Workflow Name: myworkflow
Edit: 1
Report: 7Lt2o
This information contains the name (i.e. myworkflow), edit (i.e. 1) and the id of the generated Report (i.e. 7Lt2o). During the execution, the script attempts to inform the server (by default: openbio.eu) on the execution status. To access this information simply search for the Report id (i.e. 7Lt2o) on the main search. Then you can click the relevant report that appears.
Important: If you have downloaded as an unregistered user, or it is a Tool/Data, or the Workflow is in draft stage, then the execution will not generate a report.
Troubleshooting: In environments where curl cannot validate the SSL certificate of openbio.eu, you can pass the option --insecure to executor.py
API
The API is currently under heavy development.
The main endpoint of the REST api is at: https://openbio.eu/platform/rest/
Request A Workflow
The GET parameters to request a workflow are:
https://openbio.eu/platform/rest/workflows/<workflow_name>/<workflow_edit>/?workflow_id=<workflow_id>&format=<format>&<input_parameter_1>=<value_1>&<input_parameter_2>=<value_2>
workflow_name: The name of a workflow.workflow_edit: The edit of a workflowworkflow_id: Some workflow management systems, need to have a unique id in the workflow representation. An example is airflow that expects to have adag_idvalue. This field can take any string. Also, this is optional, if you don't set this, then theworkflow_idwill be:<workflow_name>__<workflow_edit>input_parameter_1: The name of an input parameter of a workflowvalue_1: The value of the input parameter.format. The format of the workflow. So far accepted values are:jsongraph: The graph of the workflow as it is shown in the UI, in JSON format (see chapter: JSON GRAPH).jsondag: The DAG (directed acyclic graph) representation of the workflow in JSON format (see chapter: JSON DAG)bash: A directly executable bash version of the workflowairflow: An airflow representation of the workflow that uses the BashOperator.cwltargz: The workflow in CWL format (current v. 1.0). Since this representation is split in many files it returns a tar gzip file. Uncompress it with :tar zxvf workflow.tar.gz.cwlzip: Some as above but returns a singe zip file.nextflow: A representation of the workflow in nextflow format.snakemake: A representation of the workflow in snakemake format.argo: An experimental representation of the workflow in Argo.break_down_on_tools: (optional, default: False). Whether to perform split on tool invocation. (see thebreak_down_on_toolschapter)
If the chosen format is not a binary file: (json, bash, airflow), then the result is a JSON object. This object contains the following fields:
{
    "success": true,
    "name": "test",
    "edit": 1,
    "format": "BASH",
    "workflow": "..."
}
The workflow is on the workflow field of the returned JSON object.
The return object of the REST API can be one of the following:
* A binary file if the format is cwltargz, cwlzip
* Text in HTML format if the format is not a binary file (default Django-REST API html format)
* Text in JSON format if the format is not a binary file and the header Accept: application/json exists in the request.
* Text in plain text format if the format is not a binary file and the header Accept: application/text exists in the request.
* IMPORTANT if the format is "bash" and the Accept: application/text is present then the REST API will fetch an executable BASH file. It will not contain additional information shown above such as success, name, edit.
For example you can do:
curl -H 'Accept: application/json' "https://openbio.eu/platform/rest/workflows/hapmap3_pca/1/?workflow_id=xyz&format=json"
curl -H 'Accept: application/text' "https://openbio.eu/platform/rest/workflows/hapmap3_pca/1/?workflow_id=xyz&format=bash"
If the chosen format is a binary file (cwltargz, cwlzip), then the REST-API directly downloads a file with filename: workflow.tar.gz or workflow.zip depending on the requested format. For example you can do:
curl "https://openbio.eu/platform/rest/workflows/hapmap3_pca/1/?workflow_id=xyz&format=cwltargz" -o workflow.tar.gz
Access credentials
Workflows in OpenBio can be public or private. In order to get a private workflow through the API you need to provide a valid access token. For example the following command requests the workflow w/1 assuming that a user has the access token: 11203cc7c93f32a9a0b0e9961177a41f4fe833d3.
curl -H 'Accept: application/json' -H 'Authorization: Token 11203cc7c93f32a9a0b0e9961177a41f4fe833d3' "https://www.openbio.eu/platform/rest/workflows/w/1/?workflow_id=xyz&format=json"
You can get your access token by visiting your profile page.
OpenBio.eu Workflow graph data model
One of the formats in which a workflow can be downloaded is in a JSON format that describes its graph structure. This format describes basically a graph according to the cytoscape graph specifications (see below for more details). The graph that is described is the same as the one shown in the user interface when this workflow gets loaded. Below we document all the elements of this JSON format:
arguments: The arguments of the workflow (See section: "Setting input values for workflows")- This is a dictionary. Keys are in the format
input__<NAME_OF_PARAMETER>__<NAME_OF_WORKFLOW>__<EDIT_OF_WORKFLOW>. This is the id of the input node in the cytoscape graph (see below). Values are the values that the user inserted. workflow: The cytoscape graph of the workflow (see below for a detailed explanation)token: The report access token (experimental feature which is not described in this documentation yet)nice_id: The id of the generated report (experimental feature which is not described in this documentation yet)
The value in the workflow key is compatible with the cytoscape json format. OpenBio stores all additional information in the data key of all elements (nodes and edges) of cytoscape graphs. Specifically:
* elements : Contains the following keys
* nodes: Contains a list with the nodes of the graph. See below.
* edges: Contains a list with the edges of the graph. See below.
* style: Contains the styling of the nodes and elements.
* data: This is always empty
* zoomingEnabled, userZoomingEnabled, zoom, minZoom, maxZoom, panningEnabled, userPanningEnabled, pan, boxSelectionEnabled, renderer. These keys are left unchanged from cytoscape. It contains rendering parameters for the graph as it was when the workflow was fetched.
Node elements
The node elements in the graph (location workflow --> elements --> nodes in the JSON file) are dictionaries which all contain a key named data. This data contains the following keys (in alphabetical order):
* bash: For step nodes only. The bash commands of this step.
* belongto: The workflow to which this element belongs to. Some notes:
* For the root workflow this value is null.
* For all other elements this is a dictionary with the following keys:
* name: The name of the workflow to which it belongs.
* edit: The edit (integer) of the workflow to which it belongs.
* dep_id: For tool nodes only. If this tool is a dependency of another tool in the workflow, it contains the ID of this tool. Otherwise it contains the string: '#'. This field is purely for visualization reasons and developers should not used it to get the semantics of the workflow. The reason is that this field contains at most one Tool. Yet, a tool might be the dependency of more than one tools. In this case this field contains only the first tool. Developers should use the dependencies field to get reliably get the dependency graph of a tool.
dependencies: For tool nodes only. A list of the labels of the tools that this tool depends from. Attention! it contains the labels* of the tools, not the IDs of the tools.
* description: For Tools, Workflows, Inputs and Outputs. The user provided description of this object. For Tools and Workflows it may contain markdown.
* disconnected: For Tools and Workflow only. True if this object is disconnected from its parent workflow, False otherwise. If this is the root workflow, then this is always False.
* draft: For Tools and Workflows only. True if the object is in DRAFT stage, False otherwise.
* edit: For Tools and Workflows only. This is the edit number of the object (int)
* foldit. For Tools nodes only. True if this node can be hidden if clicked or not. In cytoscape, tool dependencies can be hidden (folded) if a tool gets clicked. This makes sense only in the UI.
* id: The unique id for the node in the graph. Its values is:
* For workflows: <NAME_OF_WORKFLOW>__<EDIT_OF_WORKFLOW>
* For steps: step__<NAME_OF_STEP>__<NAME_OF_WORKFLOW>__<EDIT_OF_WORKFLOW>
* For inputs: input__<NAME_OF_INPUT>__<NAME_OF_WORKFLOW>__<EDIT_OF_WORKFLOW>
* installation_commands: For tools nodes only. The Bash installation commands of this tool.
* inputs: For steps nodes only. A list of the IDs of the input nodes that are read from this step.
* keywords: For Tools and Workflows. This is list of the user probided keywords.
* label: The label that appears in the cytoscape graph for this node. Its value depending on the node type is:
* For workflows: <NAME_OF_WORKFLOW>/<EDIT_OF_WORKFLOW>
* For steps: NAME_OF_STEP
* For inputs: NAME_OF_INPUT
* main: For steps nodes only. True if this is the main step of the root workflow, False otherwise.
* name: All workflow nodes regardless type have a name.
* os_choices: For tool nodes only. A list of the OSs that the user selected as suitable for this tool.
* outputs: For steps nodes only. a list of this IDs of the output nodes that are set from this step.
* steps: For steps nodes only. A list of the IDs of the step nodes that are called from this step.
* sub_main: For steps that do not belong to the root workflow. True if this is the main step of the workflow which it belongs to, False otherwise. If this step belongs to the root workflow, then this is False.
* tools: For steps node only. A list of the IDs of the tool nodes that are called (or used) from this step
* type: Depending on the type of node this can be one of: workflow, step, input, output, tool.
* validation_commands: For Tool nodes only. The bash commands that validate the installation of this tool.
* variables: For Tool nodes only. A list with the variables of this tool. Each variable is a dictionary with the following fields:
* name: The name of the variable
* description: The description of the variable
* value: The value of the variable
* type: This is always variable.
* website: For Tools and Workflows. The user provided website of this object.
Apart from the data field each node has the following fields which are cytoscape specific and used only for visualization: position, group, removed, selected, selectable, locked, grabbable, pannable classes.
Edge elements
As with nodes, each edge contains a data field which is a dictionary with the following fields:
* source: The ID of the source node
* target: The ID of the target node
* id: This is: <SOURCE_ID>..<TARGET_ID>
* edgebelongto. True if this edge signifies that an element belongs to a workflow, False otherwise. Edges in an OpenBio.eu workflow graph can signify one of the following things:
* An element belongs to a WF.
* An tool depends from a tool.
* A step calls a step.
* A step calls a tool.
* A step reads the value from an input node.
* A step sets the value to an output node.
The first category "holds the workflow together" as it links workflow nodes with "inside elements" (i.e. tools, steps). The other types of edges has a special semantic and show some type of function. The value of the edgebelongto is True only if the edge belongs to the first category.
As with nodes apart from the data field, all edges have the following fields which are cytoscape specific: position, group, removed, selected, selectable, locked, grabbable, pannable, classes.
OpenBio.eu Workflow DAG data model (JSON DAG)
Besides the graph data model, described before, a workflow can be extracted and downloaded in a JSON format that contains the DAG decomposition of the workflow. But how does this work? As we seen before the complete workflow composing of many steps, tools, tool dependencies and other workflows can be exported in a single Bash script. The OpenBio.eu attempts to convert this script to a DAG. In order to do that it needs to break the script in independent components that will compose the nodes in the DAG. To do that OpenBio.eu parses the Bash script with the bashlex library. Then it identifies all bash commands that are actually function calls to other steps. Every function call generates three independent steps: (i) the step that includes the commands before the function call, (ii) the step that includes the commands in the step that is called and (iii) the steps that are included after the function call. This is performed recursively throughout the complete Bash script of the workflow. Below we show some examples.
Example 1
Assume the following workflow:
STEP__1:
echo "hello from step 1 before step 2"
step__2
echo "hello from step 1 after step 2"
STEP__2:
echo "hello from step 2"
This will create the following DAG:
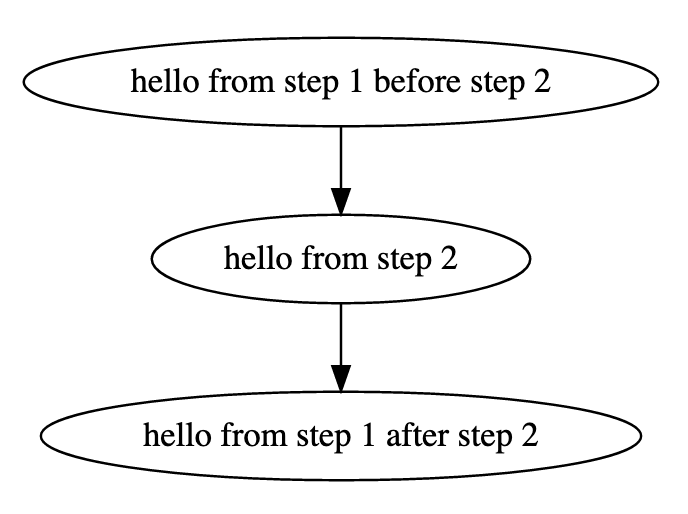
Example 2
Assume the following workflow:
STEP__1
echo "hello from step 1 before step 2"
step__2
echo "hello from step 1 after step 2"
echo "hello from step 1 before step 4"
step__4
echo "hello from step 1 after step 4"
STEP__2
echo "hello from step 2 before step 3"
step__3
echo "hello from step 2 after step 3"
STEP__3
echo "hello from step 3"
STEP__4
echo "hello from step 4"
This will create the following DAG:
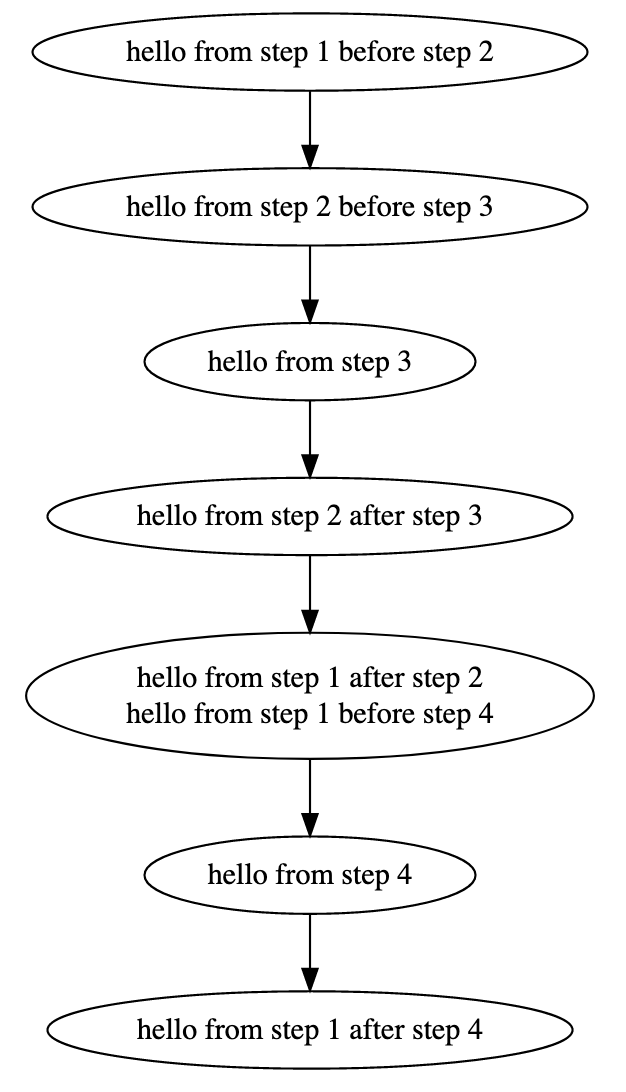
Through these examples we notice that describing the workflow in Bash is far more intuitive than describing it in DAGs.
Breaking workflows in tool executions (the break_down_on_tools parameter)
As we have seen before, a breaking is happening when a step is called from another step. By setting true the parameter break_down_on_tools in the API you can trigger "breakings" in tool executions as well. For example let's assume that a workflow has the tool: t__1__1 and this tool has a variable that is called exec which contains the path to the executable of the tool. Let's also assume that we have the following step:
STEP__1
echo "before tool execution"
${t__1__1__exec} --parameter
echo "after tool execution"
If we convert to DAG this step, it will result in a graph with a single node. This is because the step does not call other steps. If we set the parameter break_down_on_tools to true, then the tool execution command (${t__1__1__exec} --parameter) will be treated as a step calling command and the resulted DAG will contain 3 nodes (similar to the first example before). But why someone might want to have a different node in the DAG for every tool execution? In cases where the tool is in a different execution environment (for example docker container) this might be very useful. Basically this offers a complete isolation between the tools that are used and the scripts that call them.
The JSON format
The JSON representation of the DAG of a workflow has the following fields:
environment_variables: Dictionary of environment variables and their corresponding values. These environment variables should be present in every execution node. More importantly the paths that are defined there should also be accessible from all execution nodes. These variables are loaded by default from every step, so usually you don't have to do anything.input_variables: This is a dictionary with the names, values and description of the input parameters. Bash commands to propagate these values are included in all bash scripts. The keys are the names of the input parameters. The values are dictionaries with the following keys:value: The input value that has been assigned through the UI (right click in an input node and select the "SET" option)description: The description of this input variable.output_variables: This is a dictionary containing the output variables. In contrast toinput_variablesthis includes all output variables of this workflow including the output variables of the workflows that it includes. The keys are the IDs of the output parameters. The values are dictionaries with the following keys:description: The description of this output variablebelongto: Contains the workflow that this output variables belongs to. This is a dictionary with the following keys:name: The name of the workflow to which this output variable belongs.edit: The edit of the workflow to which this output variable belongs.
steps: Dictionary with the bash commands. Keys are unique IDs for each step. Each step is described with a dictionary with the following keys/values:type: The type of the step. Values can be:initial,tool_installation,simple,tool_invocation,final(see below for an explanation of each type).bash: The bash commands of this step.run_after: A list of IDs of the steps that need to run before this step. Or else this step should run after these steps. This list is empty for the step that runs first. Basically through the IDs in this field you can easily deduct the directed acyclic graph(DAG) of the workflow. It is important that this is NOT the transitive reduction of the DAG. This means that therun_afterfield contains ALL the IDs of the steps that have to be run before the step. For example if we have the workflowA-->B-->Ctherun_afterofAis empty, therun_afterofBis[A]and therun_afterofCis[A, B]. Notice that in the transitive reduction of this DAG therun_afterofCshould be[B]and not[A, B].limits: Computation limits, if any, that have been declared with theLIMITScommand or theLIMITSvariable.- Each step belongs to one of the following types:
initial: The step with IDINIT_STEP: This is the first step that should be run. This step:- Exports the environment variables:
OBC_WORKFLOW_NAME,OBC_WORKFLOW_EDIT,OBC_NICE_ID,OBC_SERVER. - Creates the directory:
OBC_REPORT_DIR=${OBC_WORK_PATH}/${OBC_NICE_ID}. This directory will contain the files that will be included in the report. - Creates the file:
OBC_REPORT_PATH=${OBC_WORK_PATH}/${OBC_NICE_ID}.html. This file will contain the html with the report. The report will contain html links to the files in theOBC_REPORT_DIRdirectory, - Creates the file:
${OBC_WORK_PATH}/obc_functions.shthat should be accessible from all execution nodes. This scripts contains theREPORTfunction. By calling this function in any bash script, the report is updated. - Creates the file
${OBC_WORK_PATH}/<NICE_ID>_inputs.sh. This script exports the variables with the input parameters of the workflow. This script runs before every step.
- Exports the environment variables:
tool_installation: The steps that have IDs with the following format:ABC__KLM__123are steps that install the tools that are required for the workflow to run. TheABC__KLM__123ID format refers to the tool with nameABC, with versionKLMand edit123. Of course the IDs in therun_afterfield of these steps respect the tool dependencies. These steps perform the following tasks:- export the environment_variables:
OBC_WORKFLOW_NAME,OBC_WORKFLOW_EDIT,OBC_NICE_IDandOBC_SERVER. - Runs the bash scripts that export the parameters of the previous tools. These are tools that were installed before this tool in the pipeline. See below for the
${OBC_WORK_PATH}/<ID>_VARS.shfiles. - Run the tool installation commands
- Run the tool validation commands
- Check if the tool validation commands returned any error code (other than 0).
- Create a file called:
${OBC_WORK_PATH}/<ID>_VARS.sh. This file is a bash script that when it runs, it exports the parameters of this tool. This script should be called before any other subsequent step, otherwise subsequent steps will not have access to the parameters of this tool. This is taken care within the bash scripts of the subsequent steps (no need to do anything).
- export the environment_variables:
simple: The steps that have the IDs with the following format:step__ABC__KLM__123__456. These are steps of the workflows.ABCis the name of the step in the workflow.KLMis the name of the workflow.123is the edit of the workflow.456indicates the current number of sub-step that this step has been broken into. Notice in the 1st example that the commands instep__1have been broken in two DAG nodes (first and last). Also the commands of the stepstep__1have been broken in three DAG nodes (first, fifth, and last). So in order to DAG-ify a step we need to break it into several DAG nodes. The last digit in the STEP ID indicates the order of this node which contains the commands of the original step that has been broken into. of this node. The bash script of a sub-step (or else DAG node) performs the following tasks:- Export the environment_variables:
OBC_WORKFLOW_NAME,OBC_WORKFLOW_EDIT,OBC_NICE_IDandOBC_SERVER. - Run the bash scripts that export the parameters of the tools of the workflow.
- Run the bash scripts that export the input values of the workflow (
${OBC_WORK_PATH}/<NICE_ID>_inputs.sh). - Run the bash scripts that export the variables that have been defined from all the previous sub-steps of this sub-step in the DAG.
- Run the bash script that exports the global bash functions (
obc_functions.sh) - Run the bash commands of this sub-step
- Create a file called
${OBC_WORK_PATH}/<ID>_VARS.shwith all the variables that have been defined in this sub-step.
- Export the environment_variables:
tool_invocation: These are steps that call a tool that has been installed in one of the environments. They have the same ID format assimplesteps. They only contain a single line that invokes a tool. This distinction allows developers to treat differently simple bash commands in a step with commands that call a tool. This is useful for example in the Airflow executor.final: The step with IDFINAL_STEP. This is the last step that should be run. This step:- Exports the environment_variables:
OBC_WORKFLOW_NAME,OBC_WORKFLOW_EDIT,OBC_NICE_IDandOBC_SERVER. - Run the bash scripts that export the parameters of the tools of the workflow.
- Run the bash scripts that export the variables that have been defined from all the previous sub-steps of this sub-step in the DAG.
- Run the bash script that exports the global bash functions (
obc_functions.sh) - Creates a tar gzip file with the name
${OBC_WORK_PATH}/${OBC_NICE_ID}.tgzthat contains the HTML of the report and the files that this report includes - echoes the output variables in a JSON format.
- Exports the environment_variables:
DAG. This is the Directed Acyclic Graph of the workflow. It is a dictionary. Keys are the IDs of the steps. Values are lists of the IDs of the steps that should run before the keys (or else the predecessors of the steps that are keys)